What’s the first thing you do when you open Instagram? If you’re like most of us, your finger probably goes straight to tap on stories and see what your friends and accounts you follow have been up to over the last 24 hours.
Instagram Stories have become one of the best ways for everyone — from creators to small businesses and social media managers — to show up, stay top of mind, and connect with their most loyal followers.
Whether it’s a quick behind-the-scenes snap, a poll sticker, or a sneak peek of your latest product, stories are where the day-to-day magic happens.
The only catch? Stories are fleeting, often on-the-fly, and easy to forget when your day gets busy. If you’ve ever found yourself scrambling for something (anything!) to post at the last minute, I’ve got good news: you can schedule Instagram Stories.
And trust me, scheduling stories on Instagram will take your strategy from good to gold. It’s something I really wish I’d discovered sooner.
In this guide, I’ll cover the main advantages of scheduling Instagram Stories and explain exactly how to schedule stories to help you show up without the stress.
Why schedule Instagram Stories?
Instagram Stories might not be the best content format to reach new followers, but they do play an important role in keeping your current audience engaged, which is what the algorithm wants to see.
The more someone watches or interacts with your stories, the more likely Instagram is to show them your future posts and reels.
Here’s Adam Mosseri, the Head of Instagram, on how stories factor into the Instagram algorithm.
“The most important signals we look at when ranking Stories are the likelihood that you’ll tap on the story, like the story, or reply with a message,” he says.
Scheduling your Instagram Stories is like giving Future You a helping hand. It takes the pressure off needing to be “on” all the time and ensures your stories show up consistently and stay relevant, even on your busiest days.
Stay consistent (without burning out)
Scheduling your Instagram Stories ahead of time helps you keep showing up without scrambling for content or overloading your audience. Scheduling helps you stay active and consistent without feeling like you have to be glued to your phone 24/7.
Put more thought into what you post on your Instagram account
We’ve all posted a quick “just so I’ve posted something” story, but scheduling your Instagram Stories can help you break out of that habit. Scheduling gives you time to think creatively and post with intention, helping you post stories that are thoughtful, on-brand, and aligned with your bigger goals.
Keep showing up for your social media followers
Stories are great for building relationships — but only if your audience actually sees them.
Scheduling stories on your Instagram account allows you to plan ahead for key engagement moments (think teasing a new product drop, sharing a promo code, or asking a poll question), so you’re regularly showing up in that prime real estate at the top of your followers’ feeds.
Easily schedule ahead of time
No more digging through your camera roll for the right screenshot or trying to find that one video you swore you saved. When you schedule your stories ahead of time, it’s easier to stay organized.
You can batch-create your content, stay in the zone, and get on with the rest of your to-do list.
Stick to optimal posting times
You might not always be online when your audience is, but scheduled stories can be. With scheduling, you can post your stories when your followers are most active without having to set a reminder or stop what you’re doing.
Plan and schedule Instagram Stories from your desktop
Sometimes, creating content on a bigger screen just feels better. Personally, I also prefer to keep my laptop for work, and my phone for personal stuff.
When you schedule stories from your desktop, you get more space to plan, write, and design without squinting at your phone or juggling files between devices. It’s a smoother, more streamlined process that gives you more time to focus on the important stuff.
Now that we've covered the ‘why’ of scheduling Instagram Stories, let’s dive into the ‘how’ to schedule stories. We’re going to unpack two easy methods:
- Scheduling Instagram Stories using Buffer
- Scheduling Instagram Stories using Meta Business Suite
Remember: Instagram does not offer native scheduling for stories within the Instagram app itself, so you’re going to need a third-party social media scheduling tool.
How to schedule Instagram Stories using Buffer in 4 simple steps
Scheduling Instagram Stories might sound like a big task, but with Buffer, it’s actually super simple. Here's how to do it in just a few clicks:
Step 1. Start your story
- Head to the Publishing tab at the top of your Buffer dashboard.
- Select your Instagram account from the list on the left.
- Click Create Post (it’s that blue button in the top right).
- In the post window, choose Story.
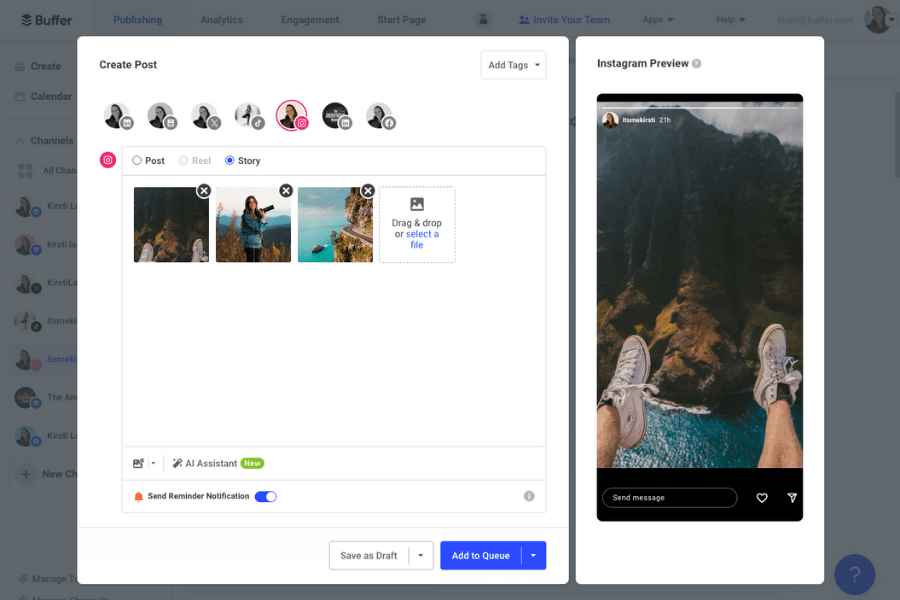
Step 2. Add your photos or videos
Time to upload your content.
- Drag and drop your images or videos into the post window — or click Select a file to browse your folders.
- Once they’re in, you can reorder them by dragging and dropping to get everything just right.
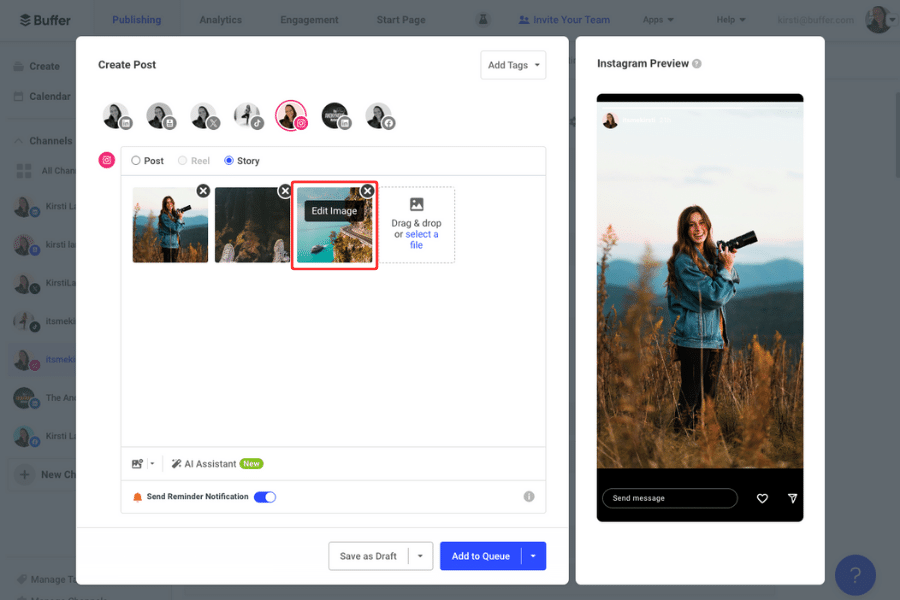
Step 3. Make quick edits
Notice a photo needs a little tweak? No problem.
- Just hover over the image and click Edit image.
- You’ll be able to crop, rotate, blur, brighten, and more — perfect for those last-minute touch-ups.
Step 4. Start scheduling Instagram stories
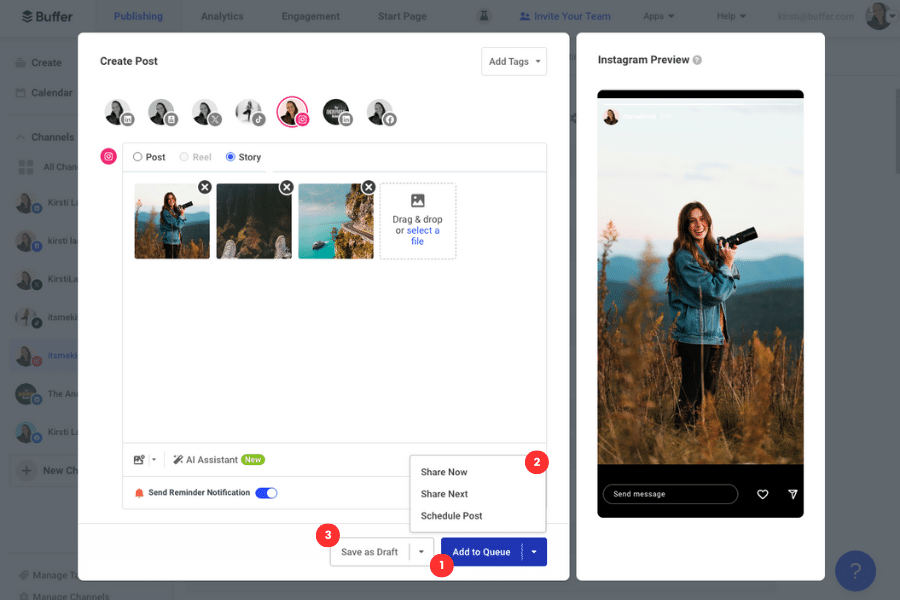
Now for the fun part — choosing when your stories go live!
- Click Add to Queue to pop your story into the next available slot.
- Want more control? Click the arrow next to Add to Queue and choose:
- Share Now to post immediately
- Share Next to bump it to the front of the line
- Hit the Schedule button to pick a specific date and time
A quick heads-up for those with Instagram creator accounts
If you’re using a business Instagram account, Buffer will auto-post your story for you at the time you choose
If you’re on a creator account, you’ll get a handy reminder from the Buffer mobile app when it’s time to post. All you have to do is tap and share.
And that’s it — you’re officially scheduling Instagram Stories like a pro!
How to schedule Instagram Stories using Meta Business Suite
- Go to Meta Business Suite from your computer.
- Go to Content or Planner.
- Click the drop-down menu and choose Create story.
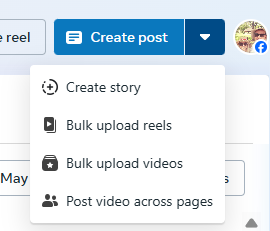
- Select your Facebook and Instagram accounts.
- Upload media (images and videos) for your story.
- To schedule the Instagram Story to publish later, click the Schedule button.
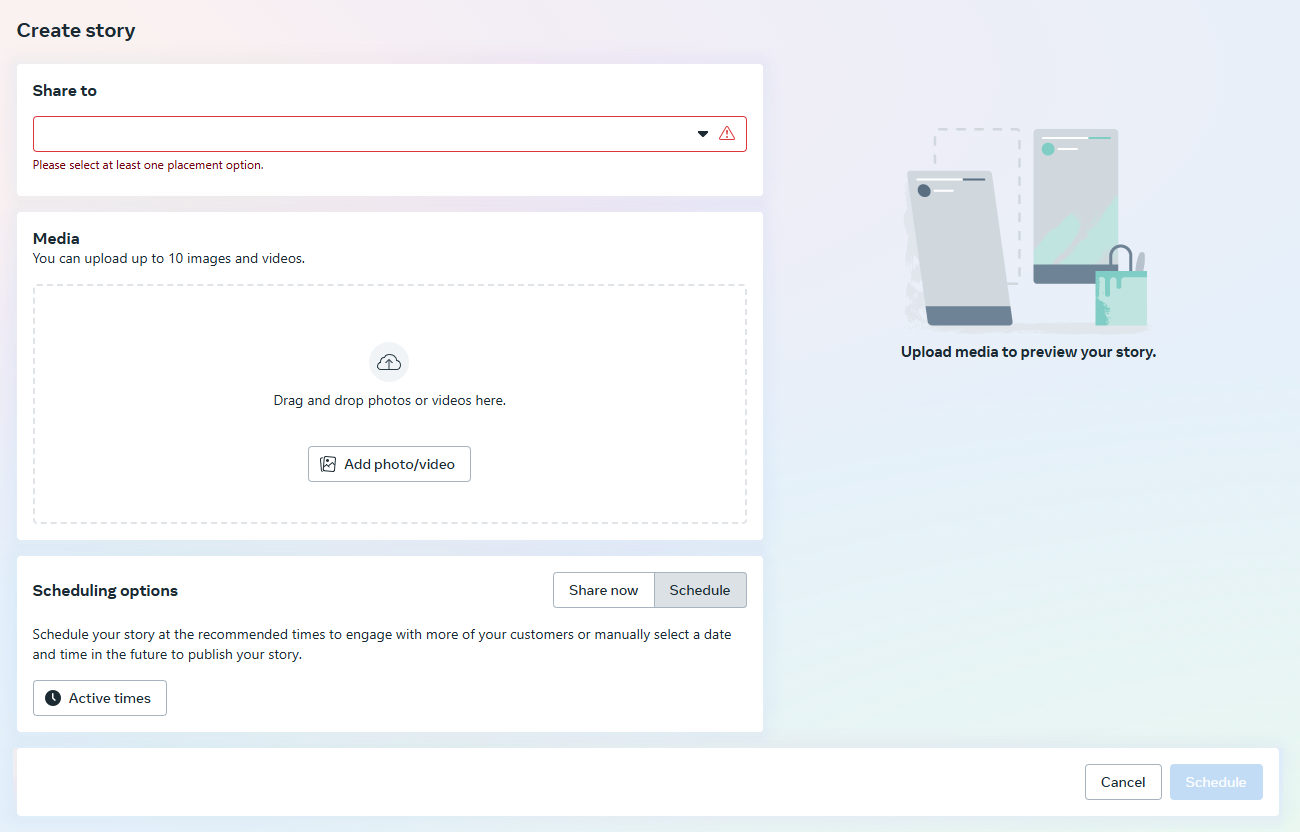
Important note: Meta Business Suite currently only allows you to schedule stories from desktop.
Scheduling stories on Buffer vs. Meta Business Suite
5 reasons to schedule Instagram Stories using Buffer
1. Plan stories from your phone or laptop
Whether you're curled up with your laptop or running between meetings with just your phone, Buffer’s got you covered. You can plan and schedule Instagram Stories ahead of time from either web or mobile using our apps.
Having both options makes it super easy to stay on top of your content calendar wherever you are = more time for creativity and less time scrambling to get something posted last minute.
2. Upload and schedule all your story content in one go
Ever spent way too long hunting down screenshots and videos scattered across your phone, laptop, and maybe even an old Google Drive? I’ve been there.
With Buffer, you can bulk upload up to 10 photos or videos for your Instagram Stories at once. No more digging through folders or airdropping files to yourself, because everything’s in one place and ready to go.
3. Easily drag and drop to storyboard your story
Stories are meant to flow, and Buffer helps you get the order just right. Once you’ve uploaded your content, you can drag and drop your files to rearrange them, kind of like building a mini slideshow. It’s a simple way to preview the story experience before your followers see it live.
4. Post at the perfect time (without setting an alarm)
Our analysis of over 5 million Instagram posts shows that some times get way more engagement than others.
With Buffer, you can schedule your stories to go out during those high-engagement windows, so there’s no need to be online or glued to your phone.
5. Get better story analytics
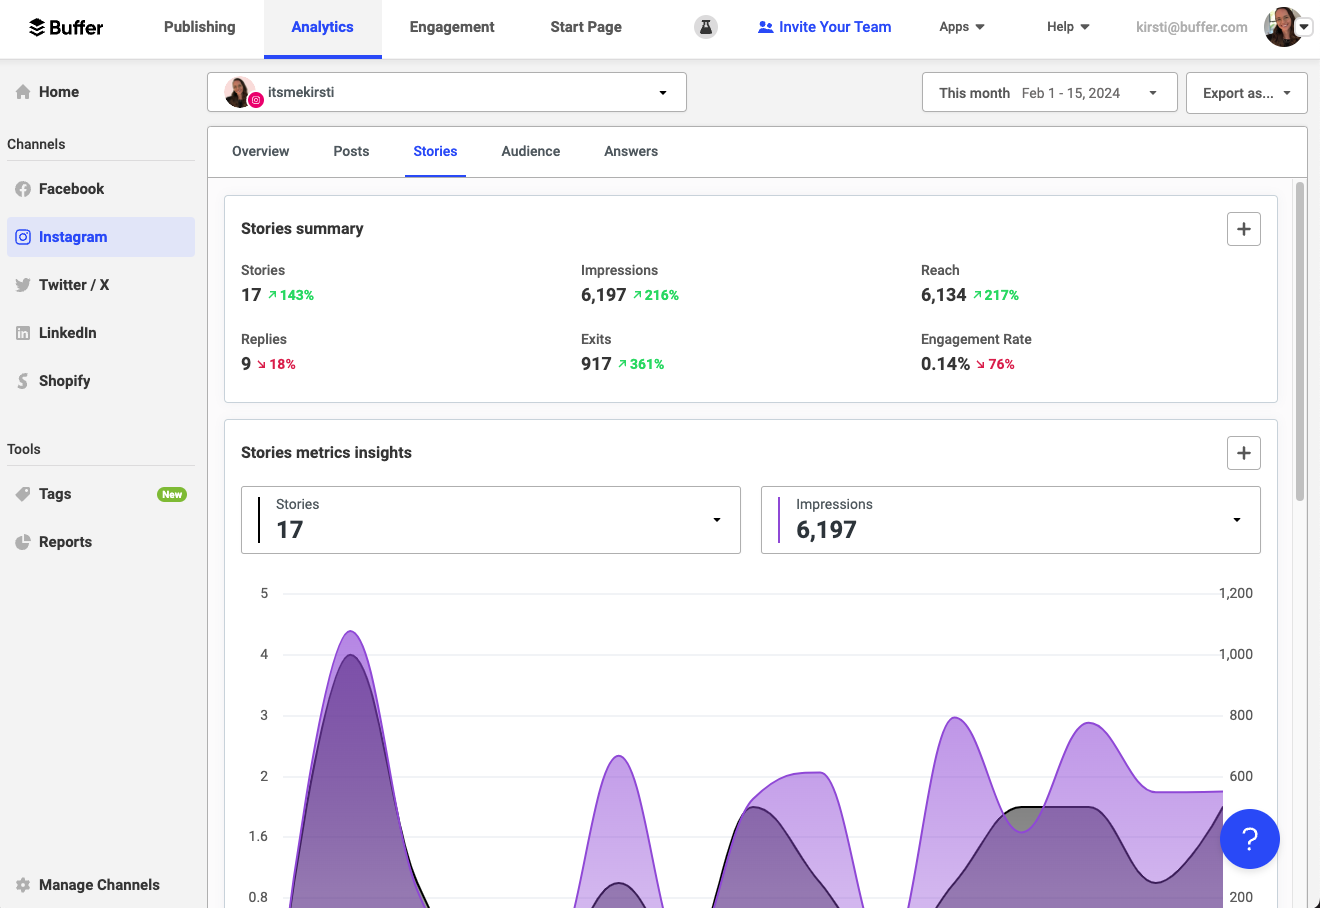
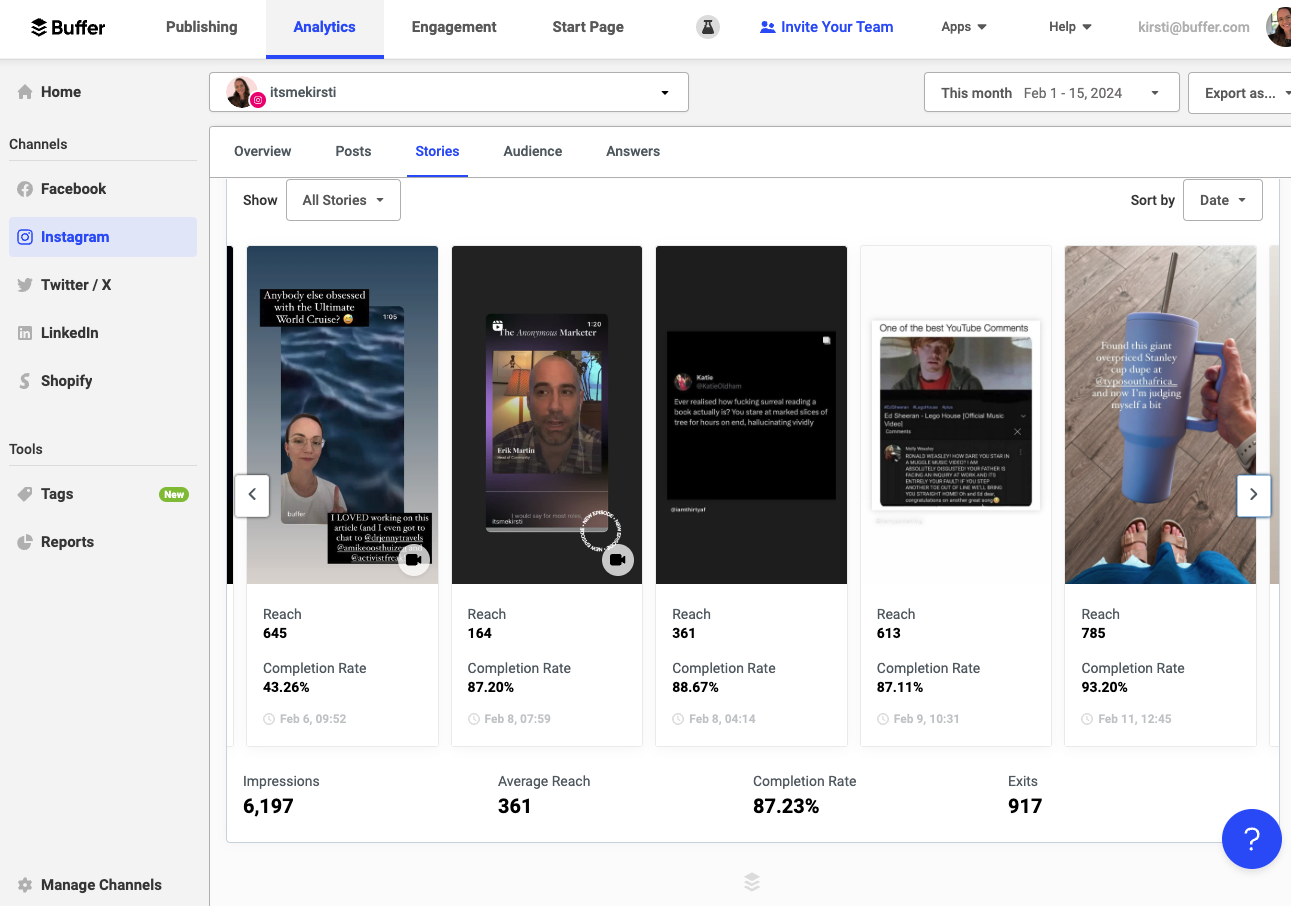
Want to know which stories your followers loved and which ones got skipped? Buffer gives you access to next-level Instagram Story analytics, including metrics like reach, impressions, replies, tap-forwards, exits, and completion rates.
With this kind of insight, you’ll know exactly what’s working and how to keep improving (no guessing required).
Quick tips for scheduling Instagram Stories
Want to make your Instagram Stories even more effective? Here are a few quick tips to help you create scroll-stopping content, stay consistent, and get the most out of every scheduled post.
Stick to the right story size (so nothing gets cut off)
Instagram Stories are designed for people to view them full-screen while holding their phone vertically, which means that a 9:16 aspect ratio (1080 x 1920 pixels) works best.
Use the recommended dimensions so that your content shows up clearly without anything important getting cropped out.
Don’t forget the link sticker
If you have something to promote, don’t forget to add a link sticker to your story. It’s an easy way to send viewers straight to your website, blog, product page, or anywhere you want. Just tap the sticker icon after uploading your story and paste your link.

Here’s a step-by-step guide on how to add a link to your Instagram Story.
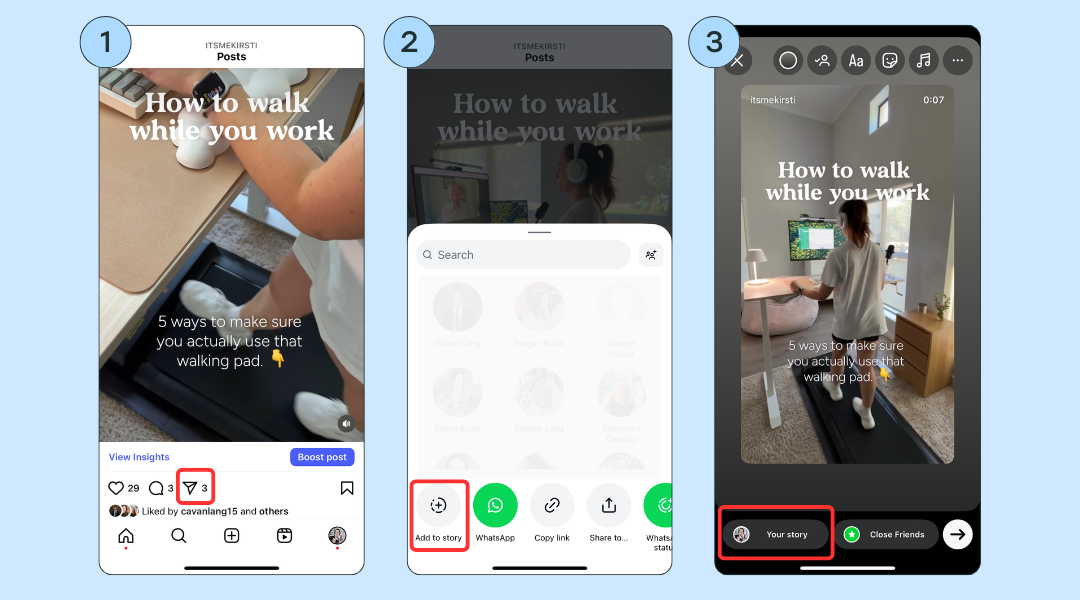
Turn posts into stories
Got a great feed post or reel? Boost its reach and make the most of the content you’ve already created by sharing it to your stories. Add a quick caption or sticker to encourage followers to tap through.
It’s super simple, too:
Mix it up with fun content
Show behind-the-scenes moments, polls, questions, quick tips, or even just a funny meme. Mixing things up keeps your audience engaged and reminds them there’s a real person behind the brand.
Stay on track with posting goals + streaks
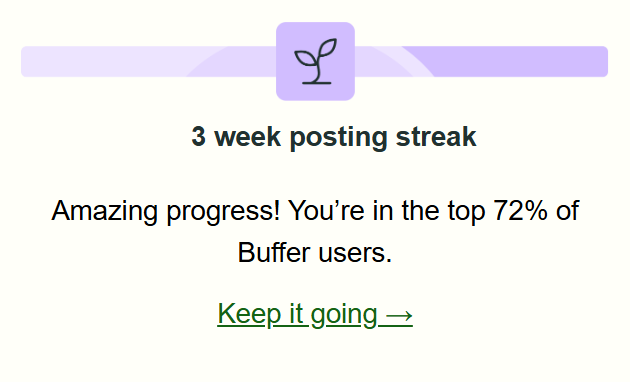
Need a little motivation to stay consistent? Set story posting goals in Buffer and keep your streak going. When you schedule posts and other types of content, that can also count towards your streak.
Every week, I get an email from Buffer on my progress, and it’s amazing how a little accountability inspires me to keep going:
See what’s working with story insights
With Buffer’s analytics, you can track key metrics like impressions, reach, replies, and completion rates so you can see what’s resonating and what to try next time.
Use free tools to level up your stories
From content creation to scheduling and audience research, there are tons of free tools out there to help you make your stories pop. Here’s a list of 26 free Instagram tools to help you create scroll-stopping stories and other content.
Start scheduling your stories the easy way with Buffer
I promise you, scheduling your Instagram Stories is going to help you take your social media game to the next level.
Sure, it’s great to post stories on the fly, but having stories scheduled ahead of time reduces the mental load and ensures that every story is working towards your goals. That’s where the help of a third-party scheduler comes in handy.
The good news is that Buffer’s Instagram Story scheduler is available on the free plan for up to three channels.
We also have a 14-day free trial so that you can take Instagram analytics for a spin. Here’s everything you need to know about using Instagram with Buffer.
Instagram Stories scheduling FAQ
Can you schedule stories on Instagram?
Yes, you can schedule and publish Instagram Stories using tools like Buffer or Meta Business Suite.
How to edit or delete a scheduled Instagram Story
In Buffer, head to the Queue or Drafts tab for your Instagram channel. Click on the scheduled Instagram Story you want to change. From there, you can edit the content, update the timing, or delete it entirely before it goes live.
More Instagram resources
- 13 Ways to Get More Followers on Instagram
- How to Use Instagram Close Friends (and Pair With Broadcast Channels and Unlockable Reels)
- Unlockable Reels Are Coming to Instagram: Here’s How They Work
- 26 Free Instagram Tools to Help Grow Your Account
- How to Sell on Instagram: A Complete Guide for Creators and Businesses
- How to Share Instagram Feed Posts to Stories: 3 Simple Steps
Try Buffer for free
190,000+ creators, small businesses, and marketers use Buffer to grow their audiences every month.


