
Meta offers several tools to help implement marketing strategies and manage your online presence effectively. But if you’ve never interacted with them before, it can be an overwhelming experience.
So whether you’re a beginner creator or small business owner, this guide will walk you through the key setup tasks and common activities for Meta Business Suite.
What is Meta Business Suite?
Meta Business Suite is a comprehensive social media management tool developed by Meta (of course), ideal for businesses of all sizes.
It consolidates various functionalities into a single platform, designed to help businesses efficiently manage their Facebook, Instagram, and WhatsApp for Business accounts.
Meta Business Suite simplifies the social media and ad management process for its main platforms by combining functionalities from the now-sunsetted Facebook Business Manager and Facebook Creator Studio.
This platform enables users to streamline their workflow, reducing the need to switch between different tools and dashboards.
Key features of Meta Business Suite
Meta Business Suite has several features designed to simplify and enhance your social media efforts.
- Unified inbox: You can set up automated responses for frequently asked questions, such as business hours, contact information, and order status inquiries. This feature saves time and ensures consistent communication with your audience.
- Content creation and management: Meta Business Suite provides a variety of templates for posts, stories, Reels, and ads. These templates help you quickly create professional-quality visuals, ensuring your content is engaging and visually appealing.
- Content scheduling: You can schedule posts in Meta Business Suite across Facebook and Instagram.
- Detailed insights and analytics: You can track metrics like reach, engagement, impressions, follower growth, and conversion rates, providing a comprehensive view of your social media performance.
Meta Business Suite also allows you to design ads, set objectives, and launch campaigns directly from the platform. You can optimize your ad spend with advanced budgeting and targeting options. You can also use the Facebook Pixel to track conversions, ensuring your ads reach the right people.
How to start using Meta Business Suite
Getting started with Meta Business Suite is fairly easy. First, you must set up your account, profile, and dashboard.
Create an account and set up your Business profile
Visit the Meta Business Suite website and log in with your Facebook credentials. If you don’t have a Facebook account, you’ll need to create one first.

Once logged in, you’ll be prompted to set up your business account. Enter your business name, and select the primary Facebook Page for your business.
If you don’t have a Facebook Page yet, you can create one during this process.
Add in your information
Fill in the necessary business details, such as your business email, address, and phone number. Ensure all information is accurate and up-to-date, as this will be visible to your audience.
Once you’ve set up your account, upload a high-quality profile picture and cover photo that represents your brand.
Navigate to the About section and fill in your business description, hours of operation, and other relevant details. This information helps customers understand your business and how they can engage with you.
Set up two-factor authentication by navigating to the 'Security' section in your account settings for added security. This ensures that only authorized users can access your business account.
How to navigate the Meta Business Suite dashboard
The Meta Business Suite dashboard can be overwhelming at first look. Here’s what’s most important:
- Home: This is your main hub, where you can see an overview of your content performance. It includes a to-do list, recent posts, and quick links to create posts or ads.
- Notifications: This tab shows all your recent notifications, including comments, likes, and messages from your connected Facebook and Instagram accounts.
- Inbox: Manage all your messages, comments, and reviews from Facebook, Instagram, and WhatsApp in one place. This unified inbox helps streamline communication with your audience.
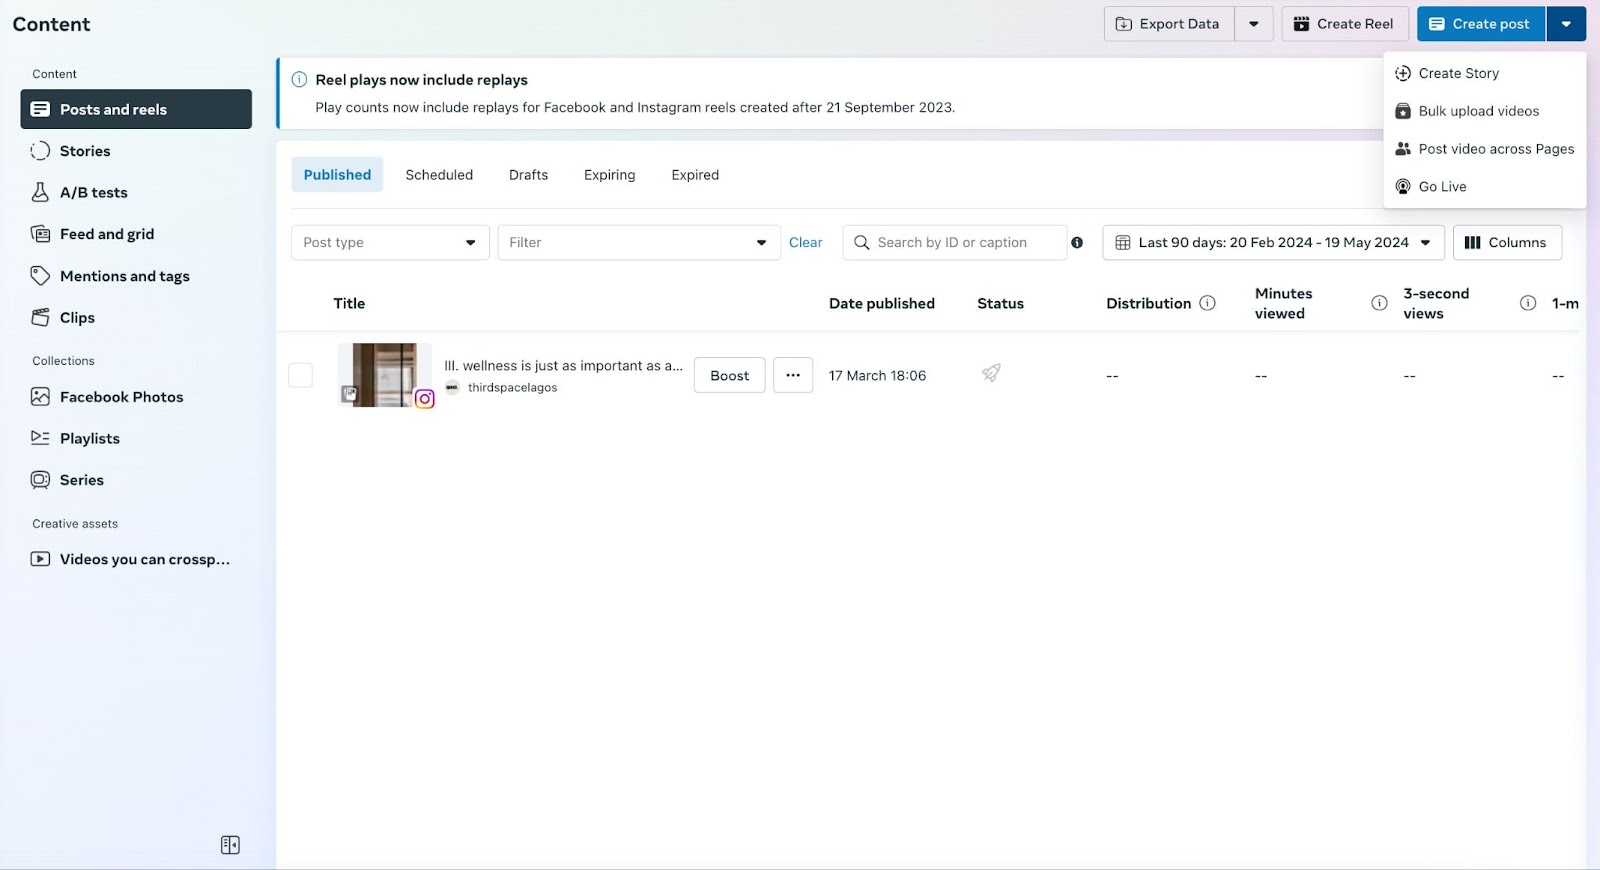
- Content: This section allows you to create, schedule, and manage your posts and stories for both Facebook and Instagram.
- Planner: The Planner tab displays a calendar view of your scheduled posts, stories, and ads. It helps you plan and organize your content in advance.
- Ads: Under the Ads tab, you can manage your ad campaigns, create new ads, set your budget, and target your audience. This is where you handle all aspects of your advertising strategy.
- Insights: The Insights tab provides detailed analytics on your posts, stories, and ads. You can track metrics like reach, engagement, and follower growth to understand your social media performance.
- Settings: Adjust your settings to customize your Meta Business Suite experience. Here, you can manage user roles, permissions, and integrations with third-party apps.
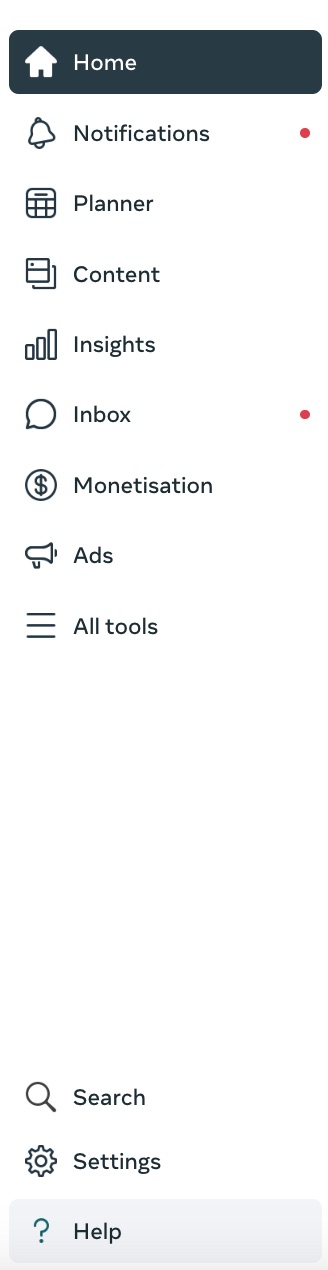
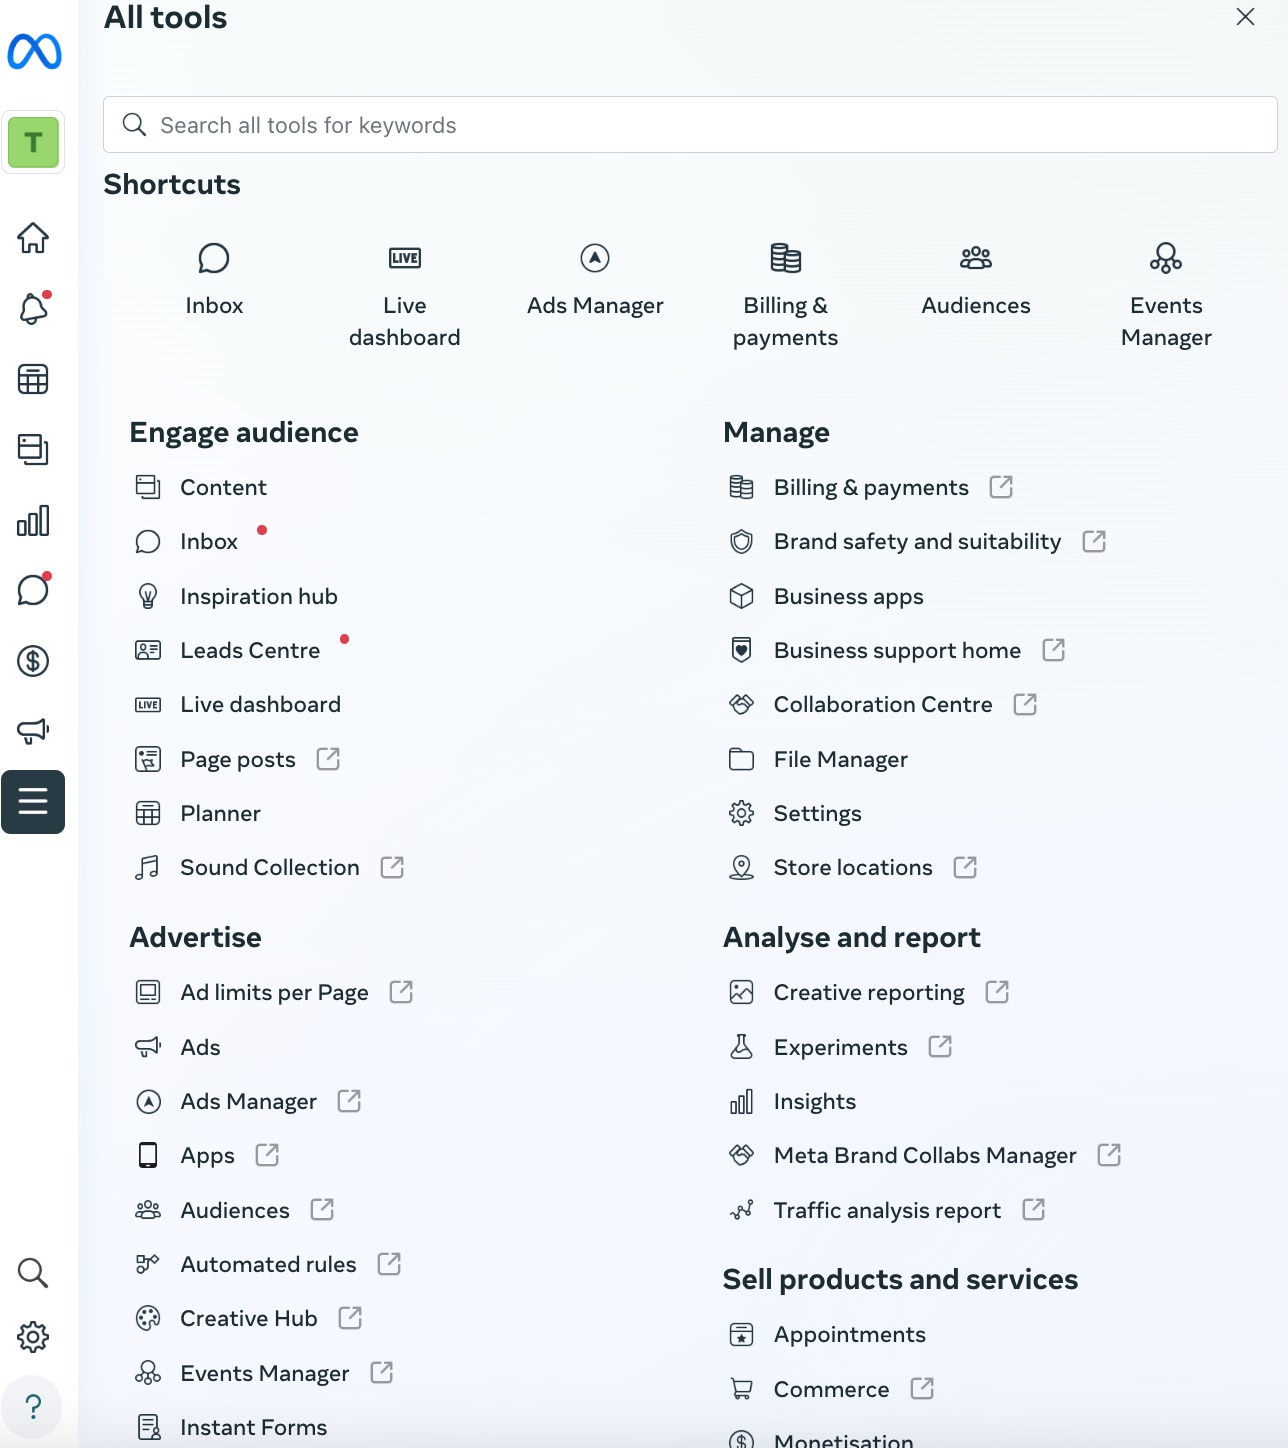
You can also visit the All tools section to access additional tools and features, such as A/B testing, audience management, and lead generation options.
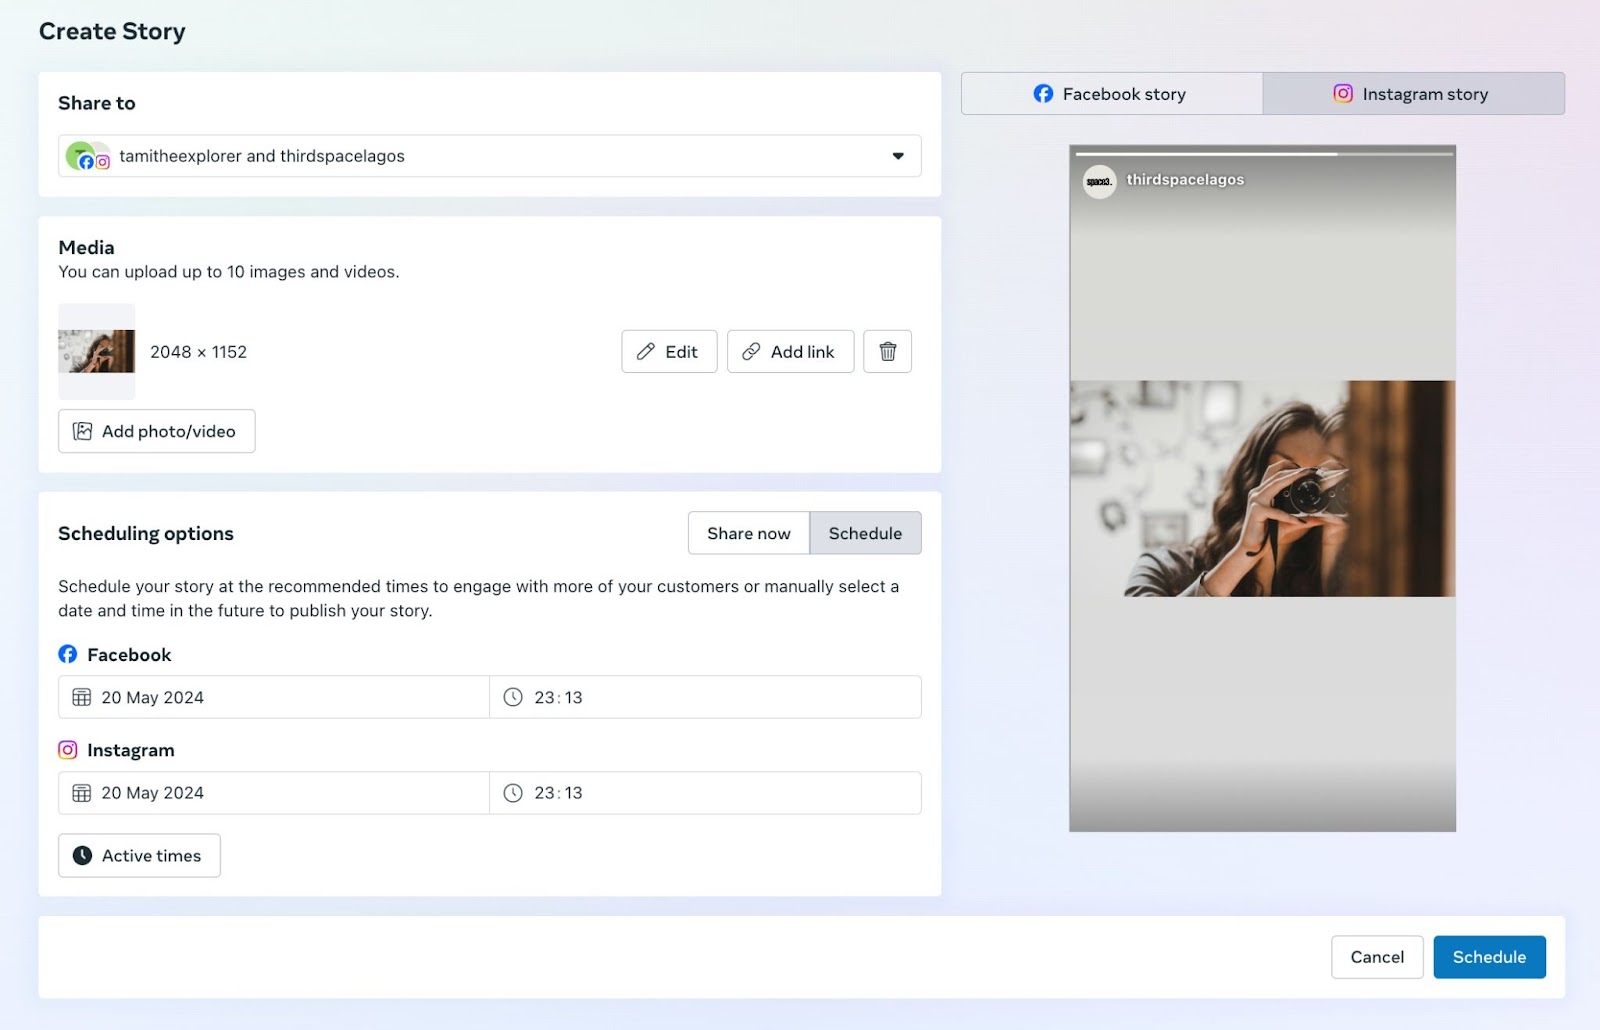
How to schedule content in Meta Business Suite
To create and schedule a post in Meta Business Suite:
- You can create and schedule posts in different areas of your dashboard – Home, Content, or Planner.
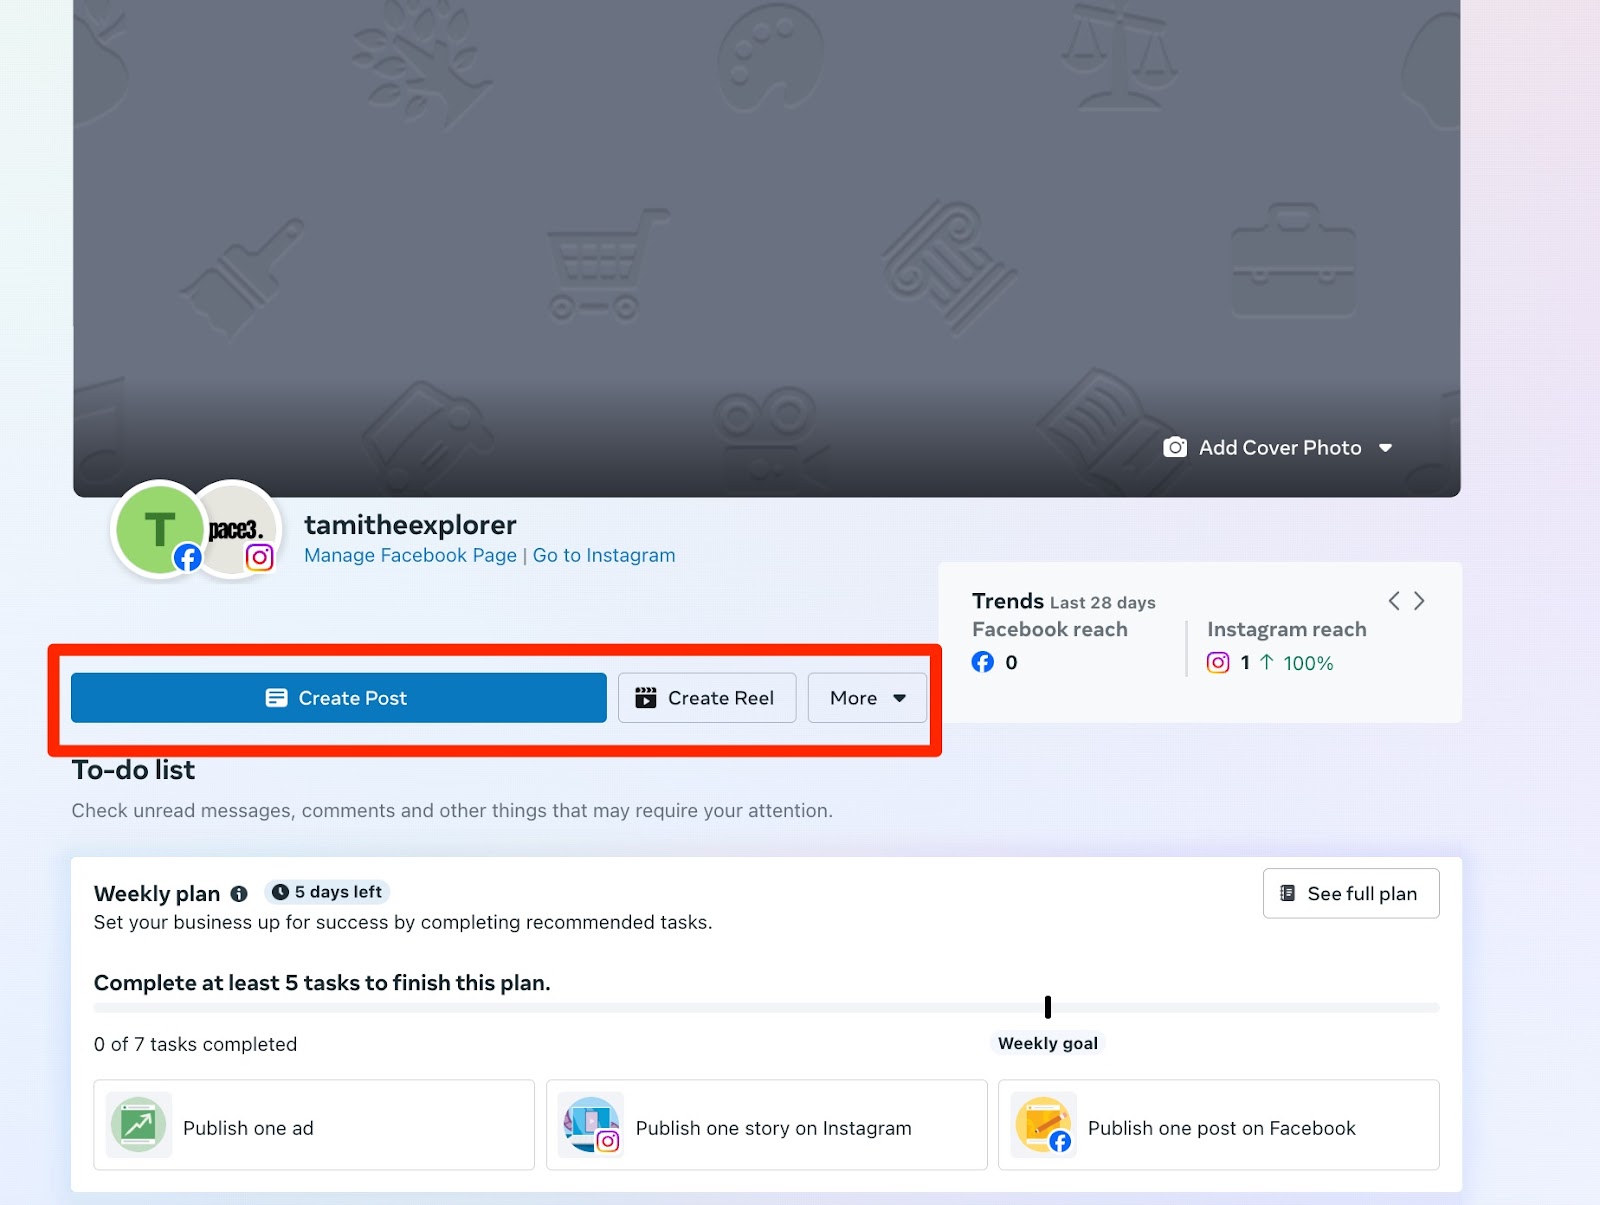

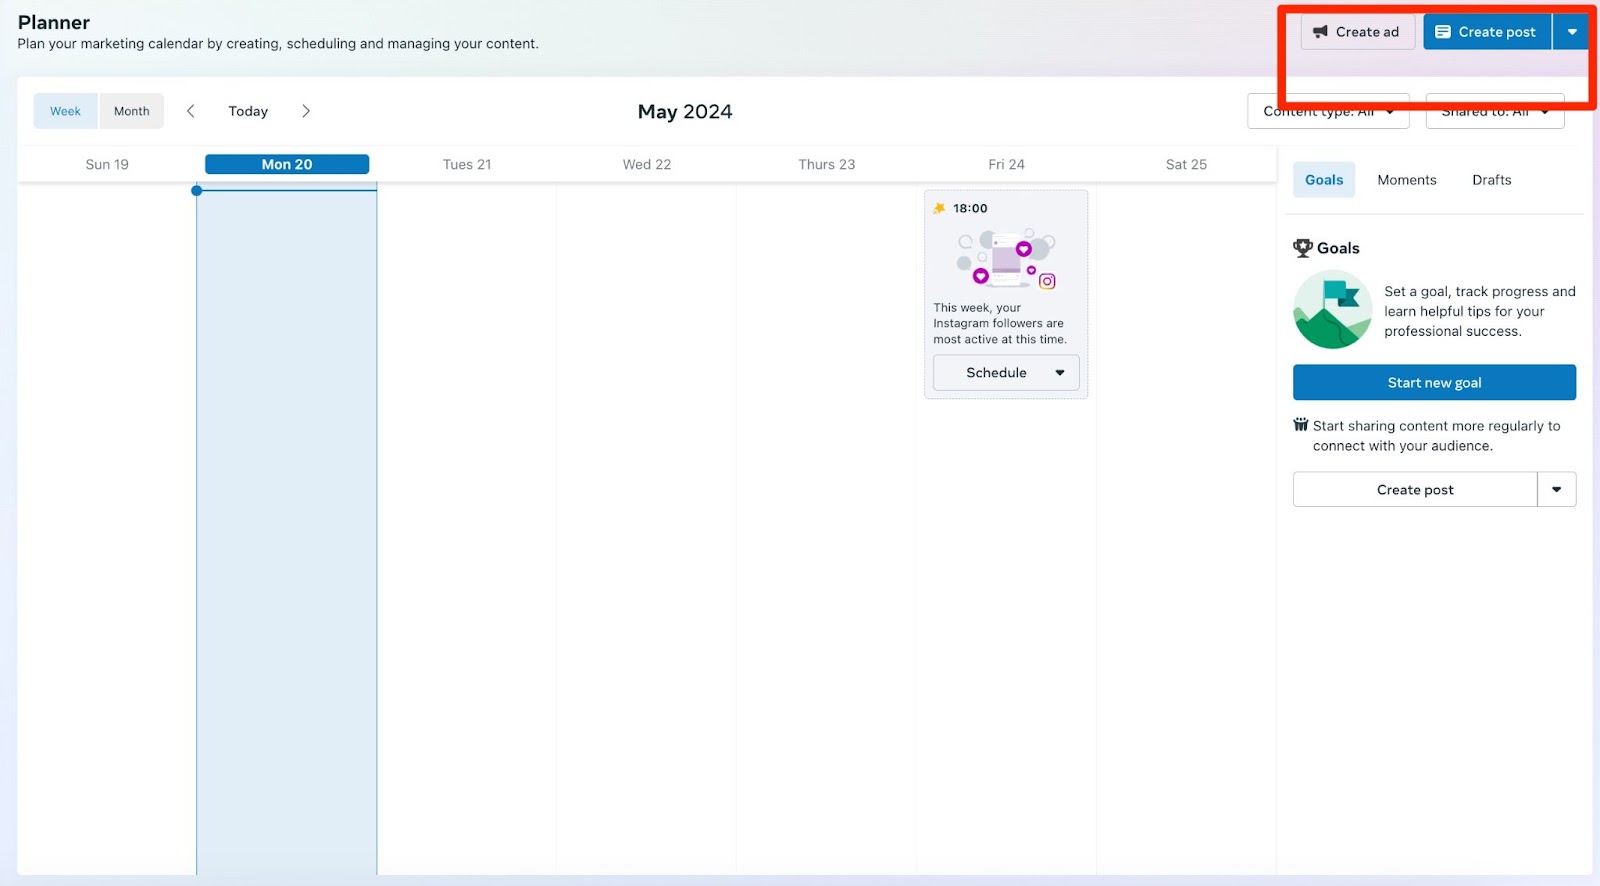
- In any of these areas, tap Create post
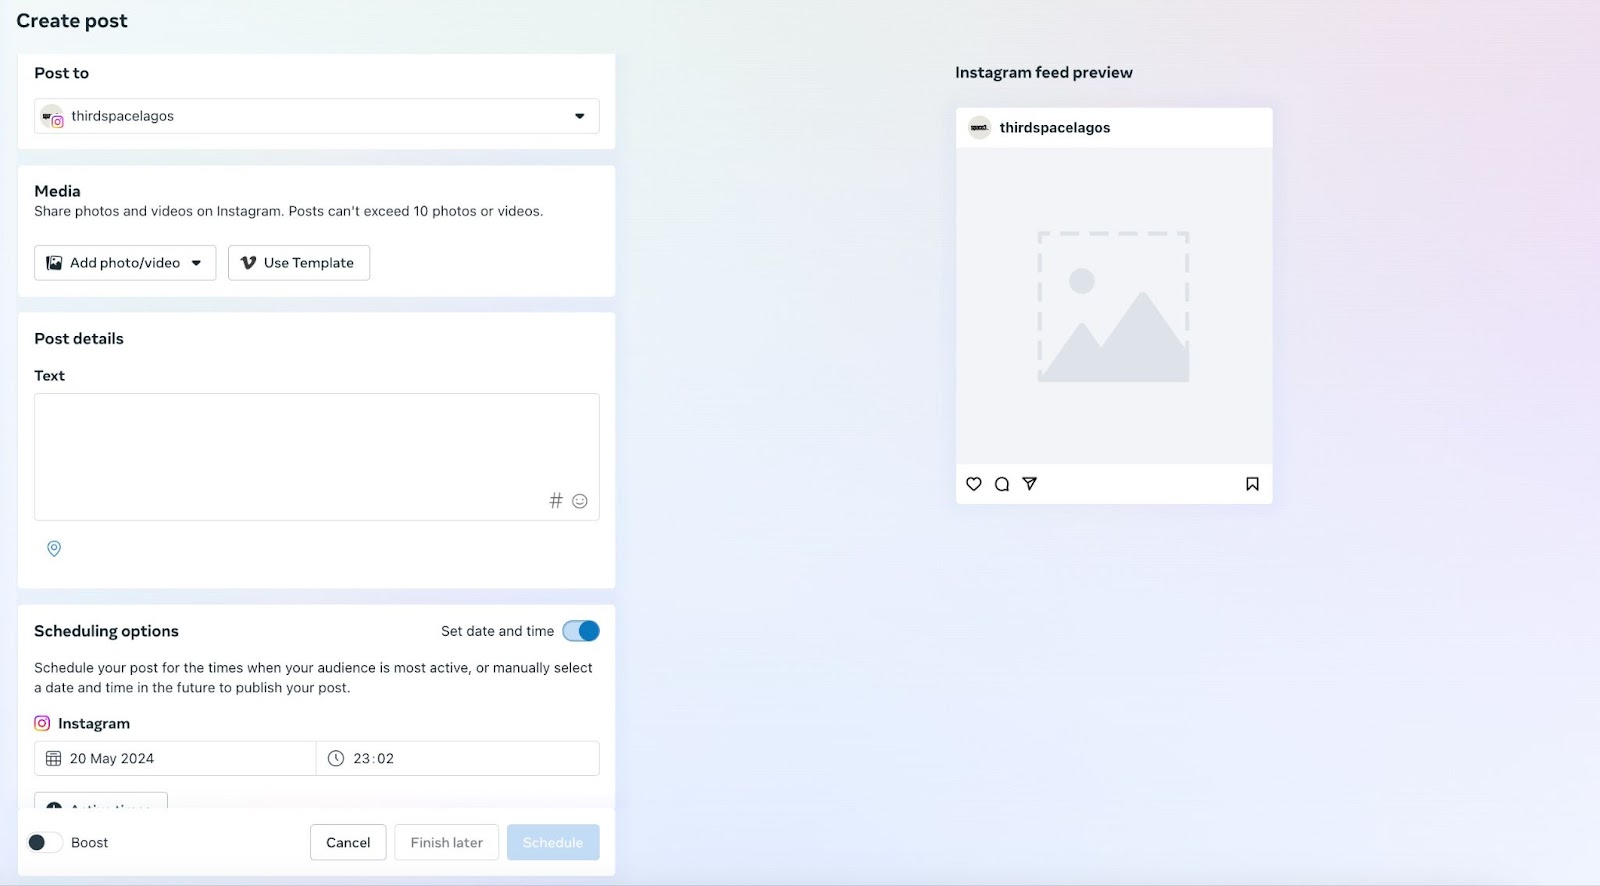
- Select where you want to share the post: Facebook, Instagram, or both.
- Enter your post details, including the caption, media for the post, and tags and location.
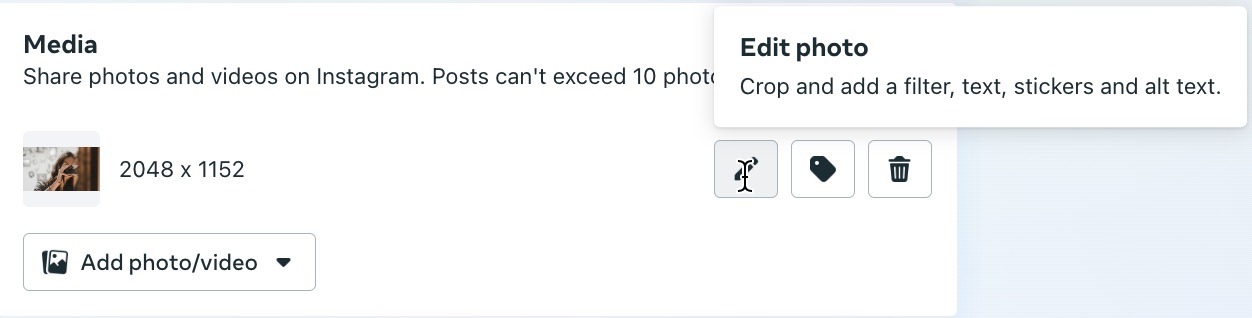
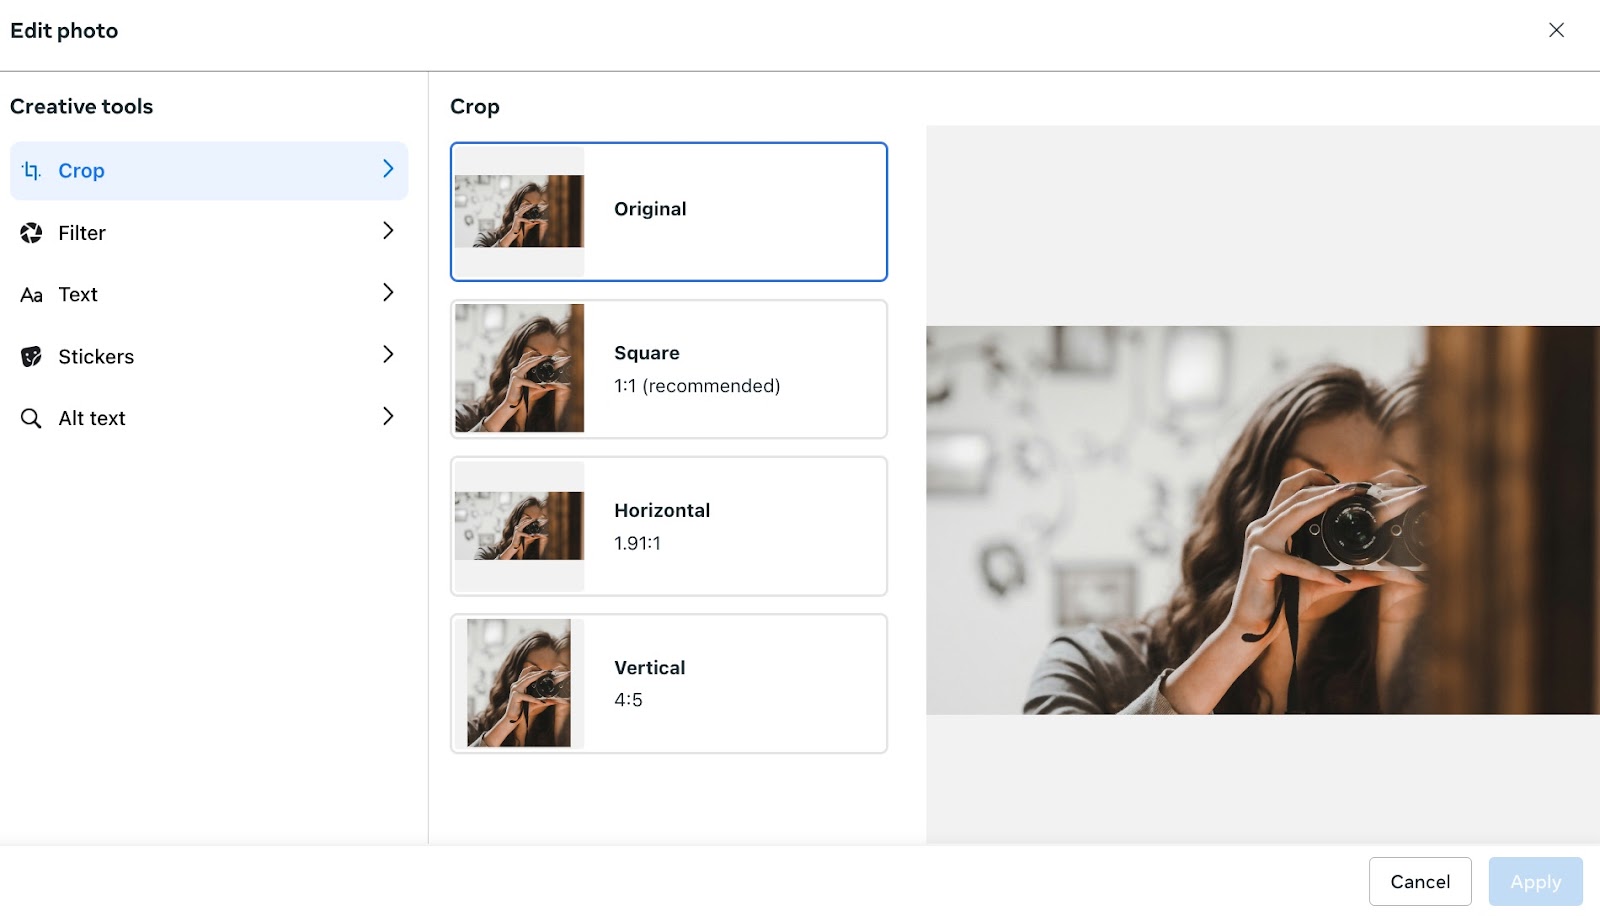
- You have several options for editing your posts as well, provided in the Edit button you can find by hovering over your uploaded media.
- Preview your post on the right. You can also see how it will look on Facebook compared to Instagram or on desktop compared to mobile.
- Select whether you want to Boost the post, which will create an ad out of the post.
- Once you’re satisfied, click Schedule, Publish, or Finish Later to save a draft of your post.
Create and schedule a Reel
To create and schedule an Instagram or Facebook Reel:
- Tap the Create Reel, usually beside the Create post button.
- Choose where you want to share the Reel: Facebook, Instagram, or both. You can do this by selecting the appropriate accounts in the "Share to" field.
- Click on Add video or Add photos to upload the media you want to include in your Reel. Note that you can’t currently add Photo Reels to Instagram.
- In the Reel details section, enter a captivating caption that grabs your audience’s attention and clearly describes your Reel. Use relevant hashtags to increase visibility and engagement.
- Select a thumbnail by either picking one of the suggested options or uploading your own cover image.
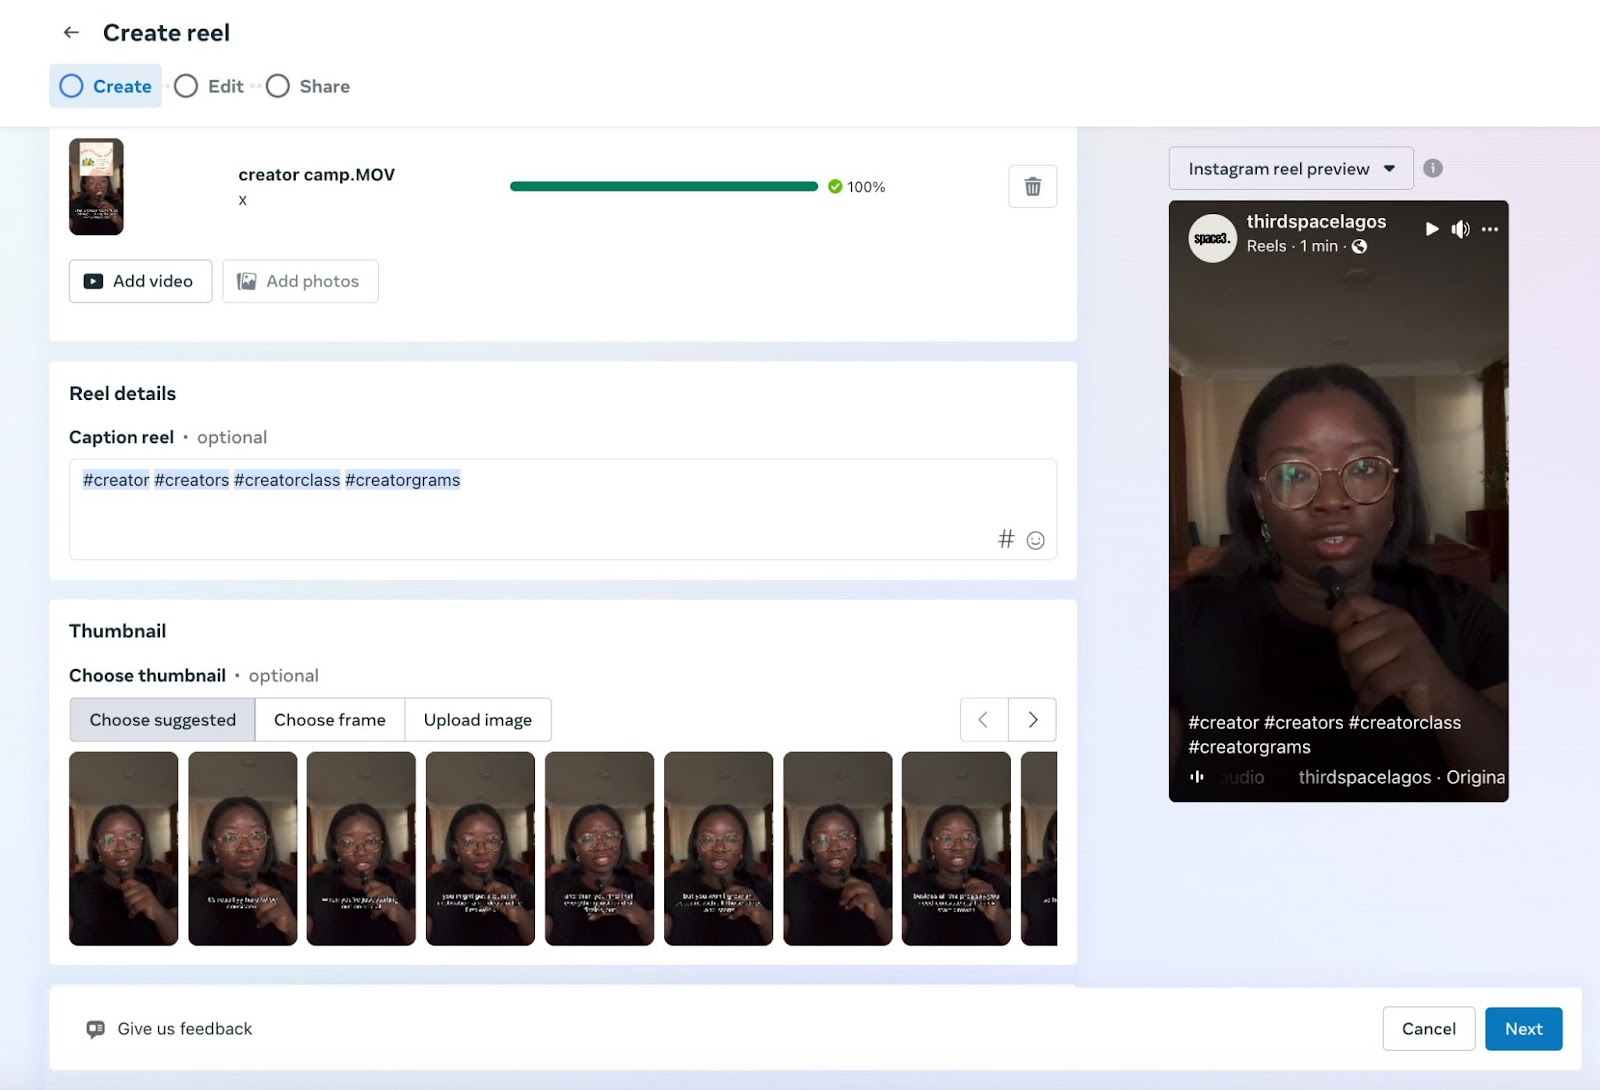
- If you’re collaborating with someone on the Reel, you can add their name or URL in the "Collaborator" section. They will be automatically invited, and you can send an invitation directly.
- Tap the Next button
- Here, you can add trending audio to your Reels, as well as make other edits to your video.
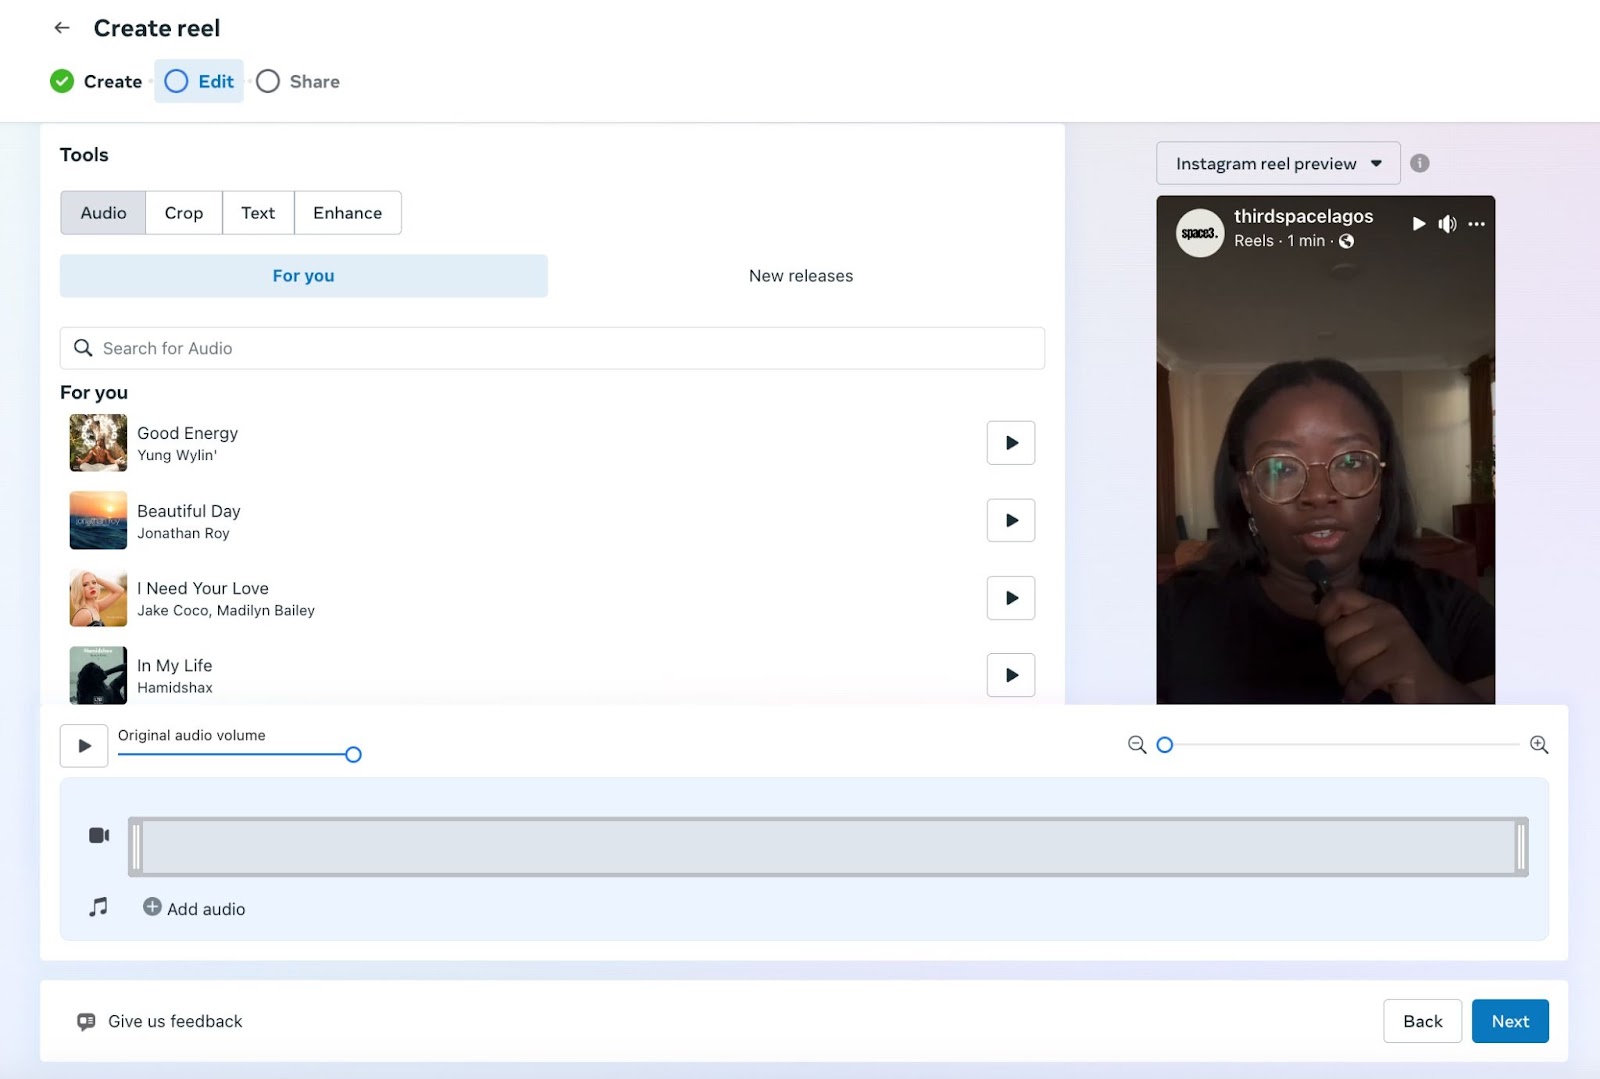
- If you need to make any changes to your uploaded media, use the Edit button.
- If you want to turn your Reel into an ad, select the Boost option.
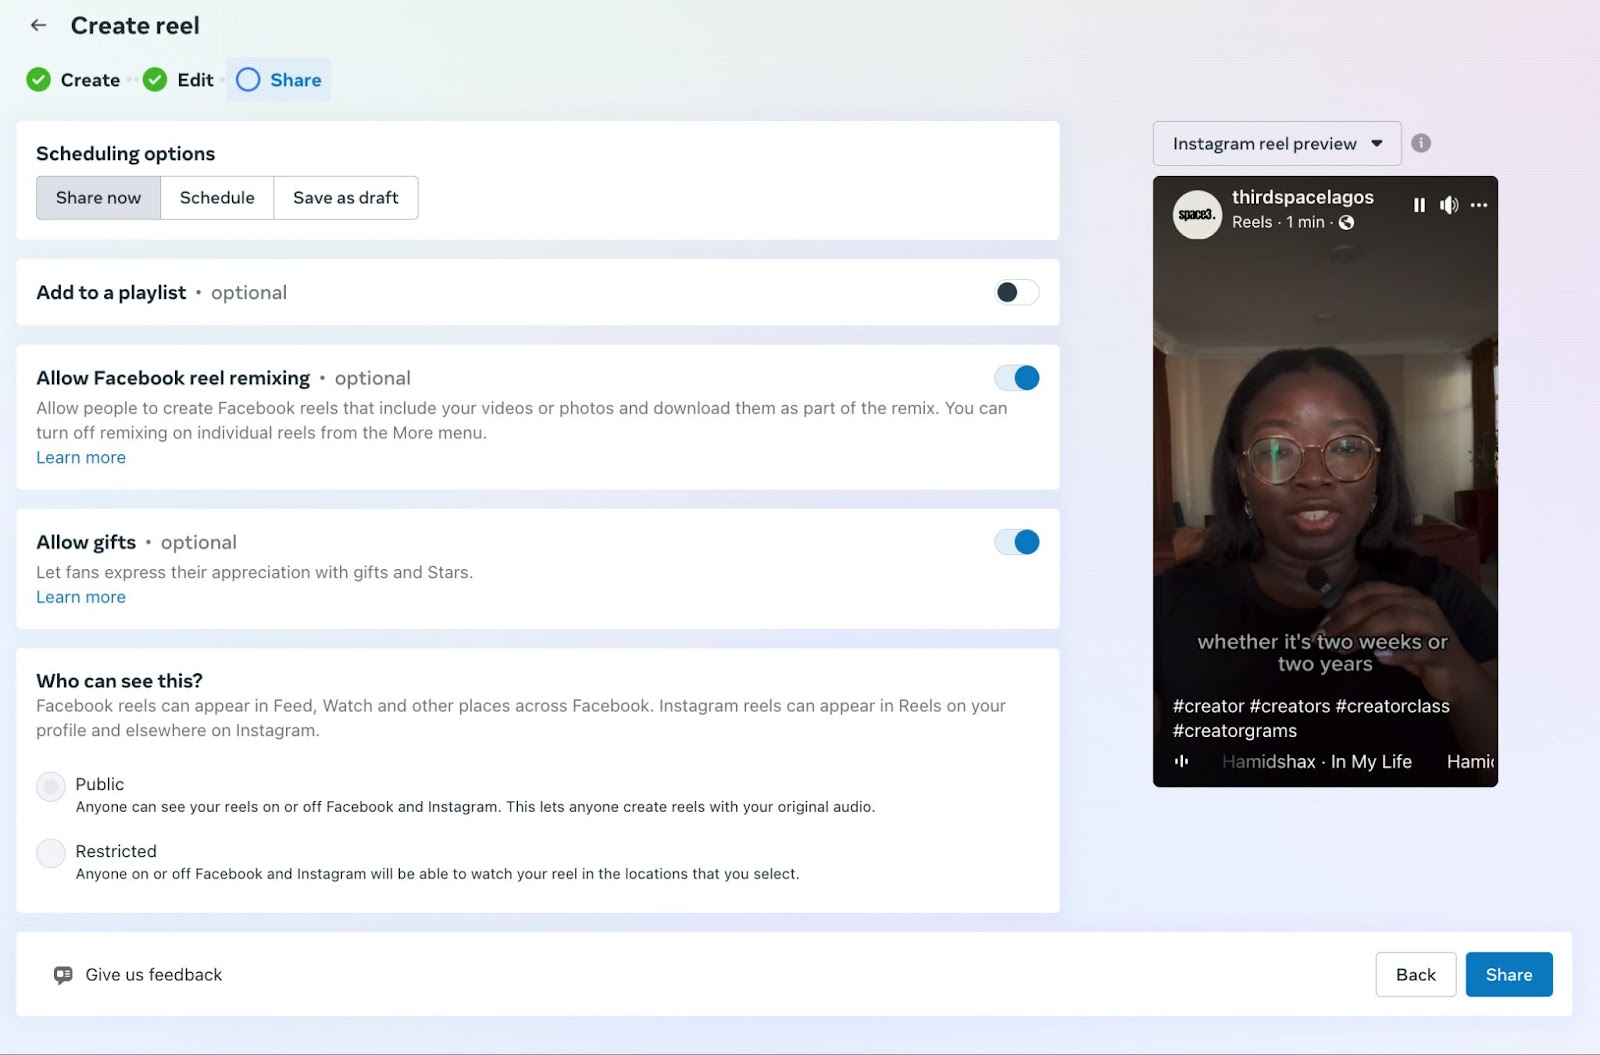
- Once you are satisfied with your Reel, you have several options, Share Now, Schedule or Finish Later (however, note that you can’t save Instagram Reels as drafts – only Facebook Reels.)
- At this stage, you can allow “Remixing” or gifts from your audience. You can also choose to share your Reel publicly or to a Restricted group.
Create and schedule a Story
To create and schedule an Instagram or Facebook Story:
- From the drop-down menu beside the Create post button, Create Story.
- Add media (such as pictures and videos). You can also select multiple images at once.
- To edit your Story, tap the Edit button to crop or add text and stickers. You can reposition and resize them on your screen.
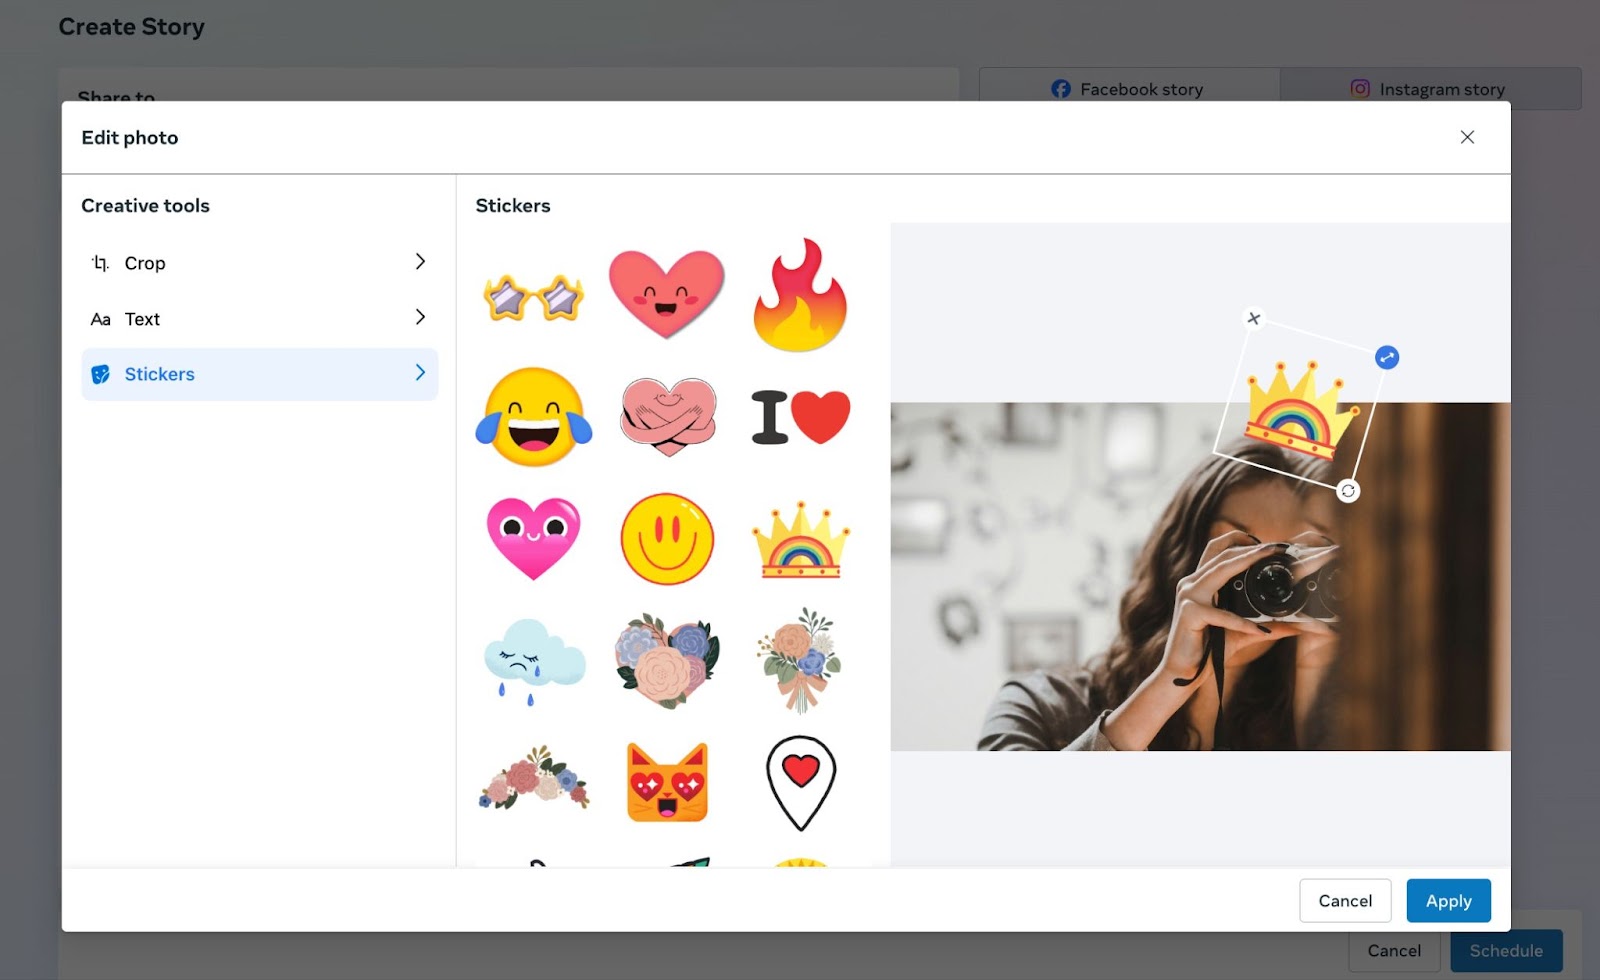
- Select where you want your post published: Facebook Stories, Instagram Stories, or both.
- Once you’re satisfied, you can tap Share to publish immediately or tap Schedule to publish later.
How to add a Facebook Business page to Meta Business Suite
Follow these steps to add a Facebook Page:
- Log in to your Meta Business Suite account.
- Navigate to the Settings tab in the left-hand menu.
- Under Accounts, select Pages.
- Click on the Add button, which will present you with three options to Add a Page, Request Access to an Existing Page, or Create a New Page. Since you likely already had Facebook Page to get to this point, the last option might not be relevant unless you want to create and manage a new Page.
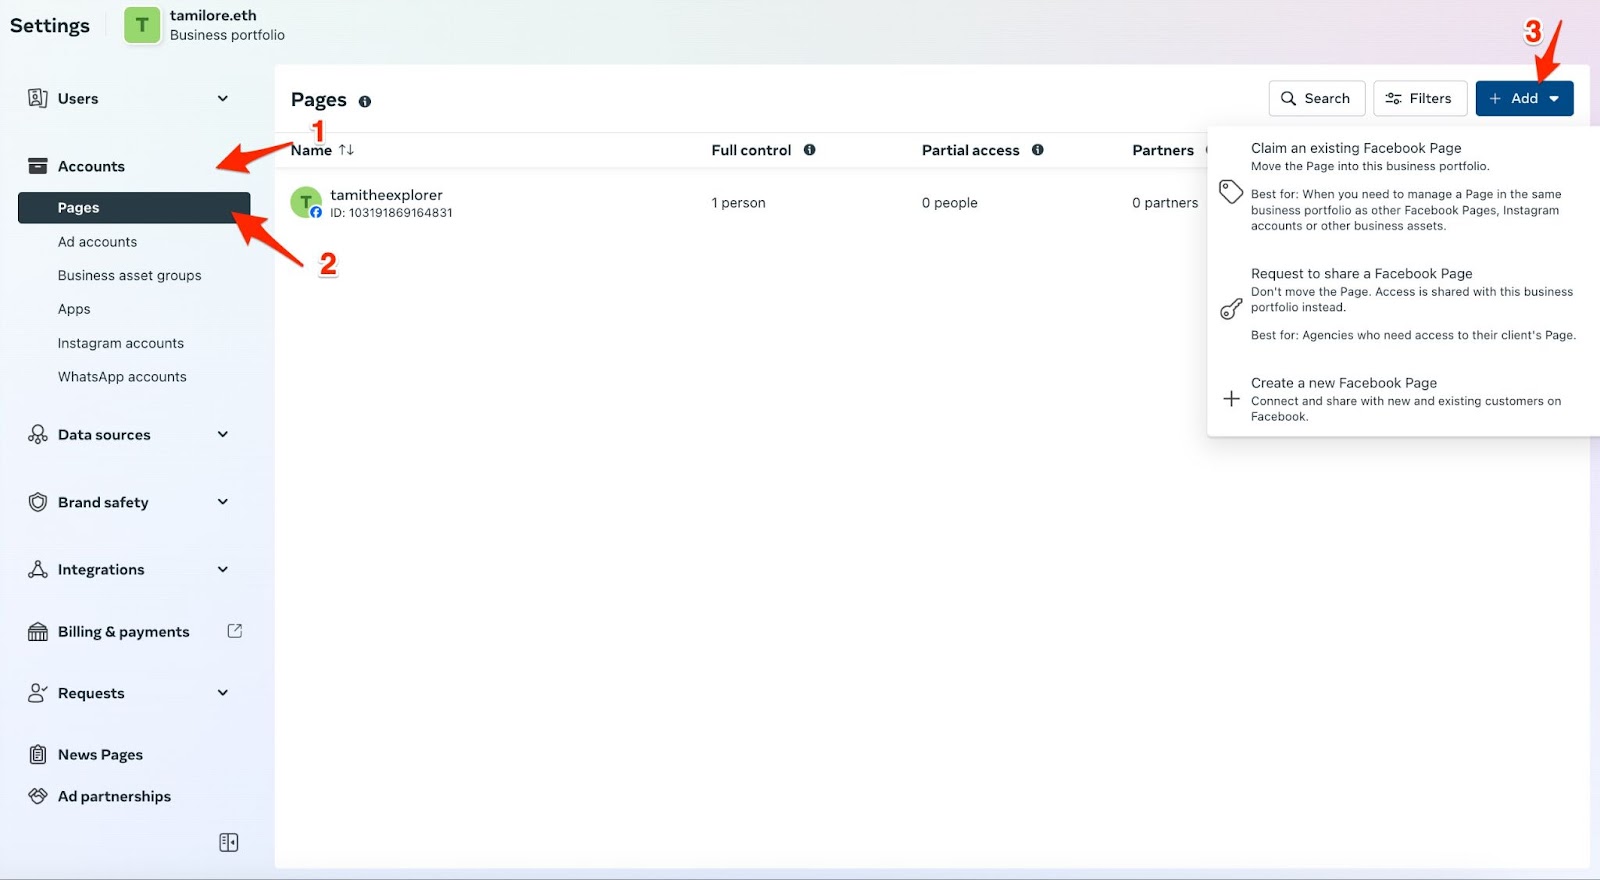
- For existing Pages, click Add a Page. Enter the name or URL of the Page you wish to add.
- If you are the Page owner, you will be prompted to verify your ownership by logging into your Facebook account. Follow the prompts to complete the verification process.
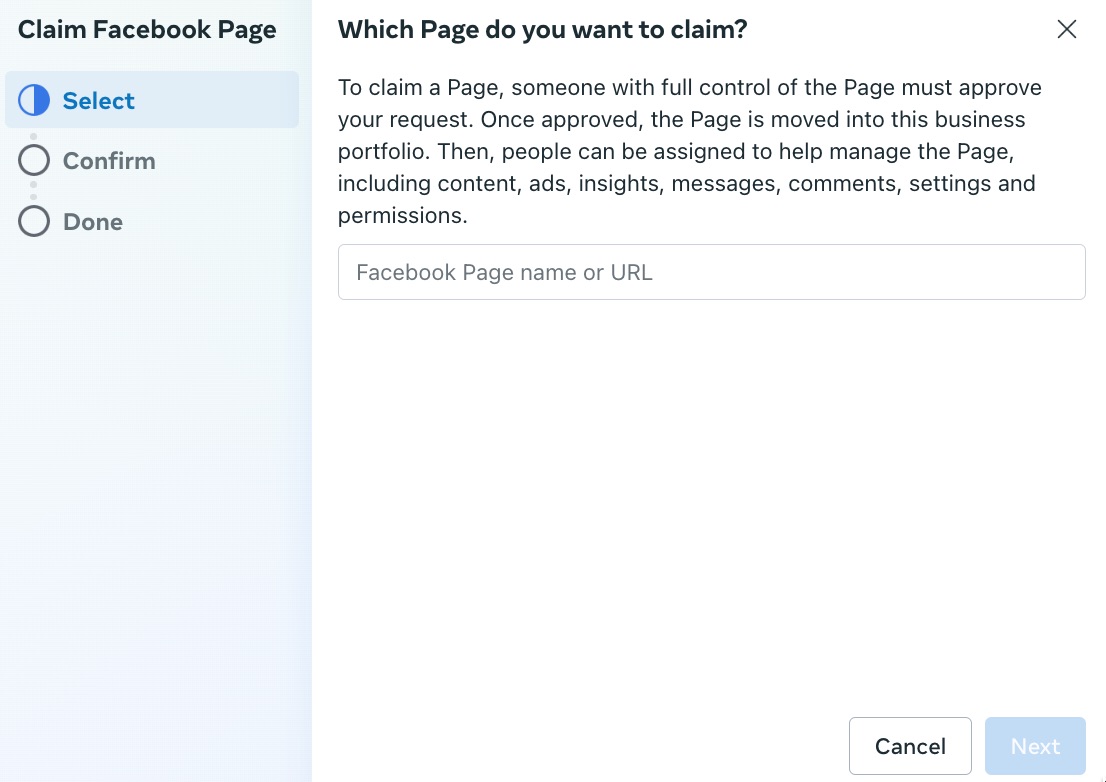
- Once verified, tap Add Page to finalize the process. The Page will now appear in your Meta Business Suite dashboard.
How to add an Instagram account to Meta Business Suite
Follow these steps to add an Instagram account:
- Log in to your Meta Business Suite account.
- Navigate to the Settings tab in the left-hand menu.
- Under Accounts, select Instagram Accounts.
- Tap the Add button.
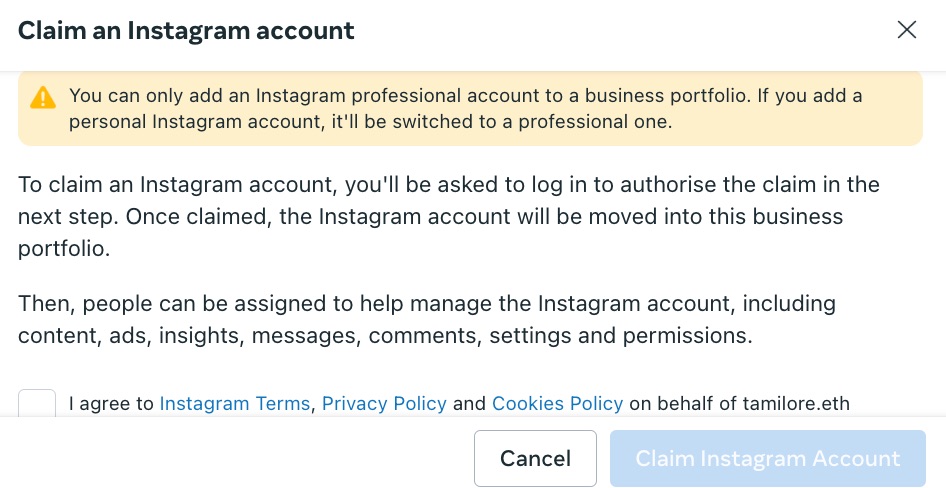
- A pop-up will appear, reminding you that you can only add an Instagram professional account to a business portfolio. If you add a personal Instagram account, it'll be switched to a professional one. Review the terms and agree, then click Claim Instagram Account.
- A new window will open, prompting you to log in to your Instagram account. Enter your Instagram username and password and tap Log In.
- After logging in, you will be prompted to authorize Meta Business Suite to access your Instagram account. Click Authorize to proceed.
How to integrate WhatsApp with Meta Business Suite
Follow these steps to integrate your WhatsApp Business inbox with Meta Business Suite.
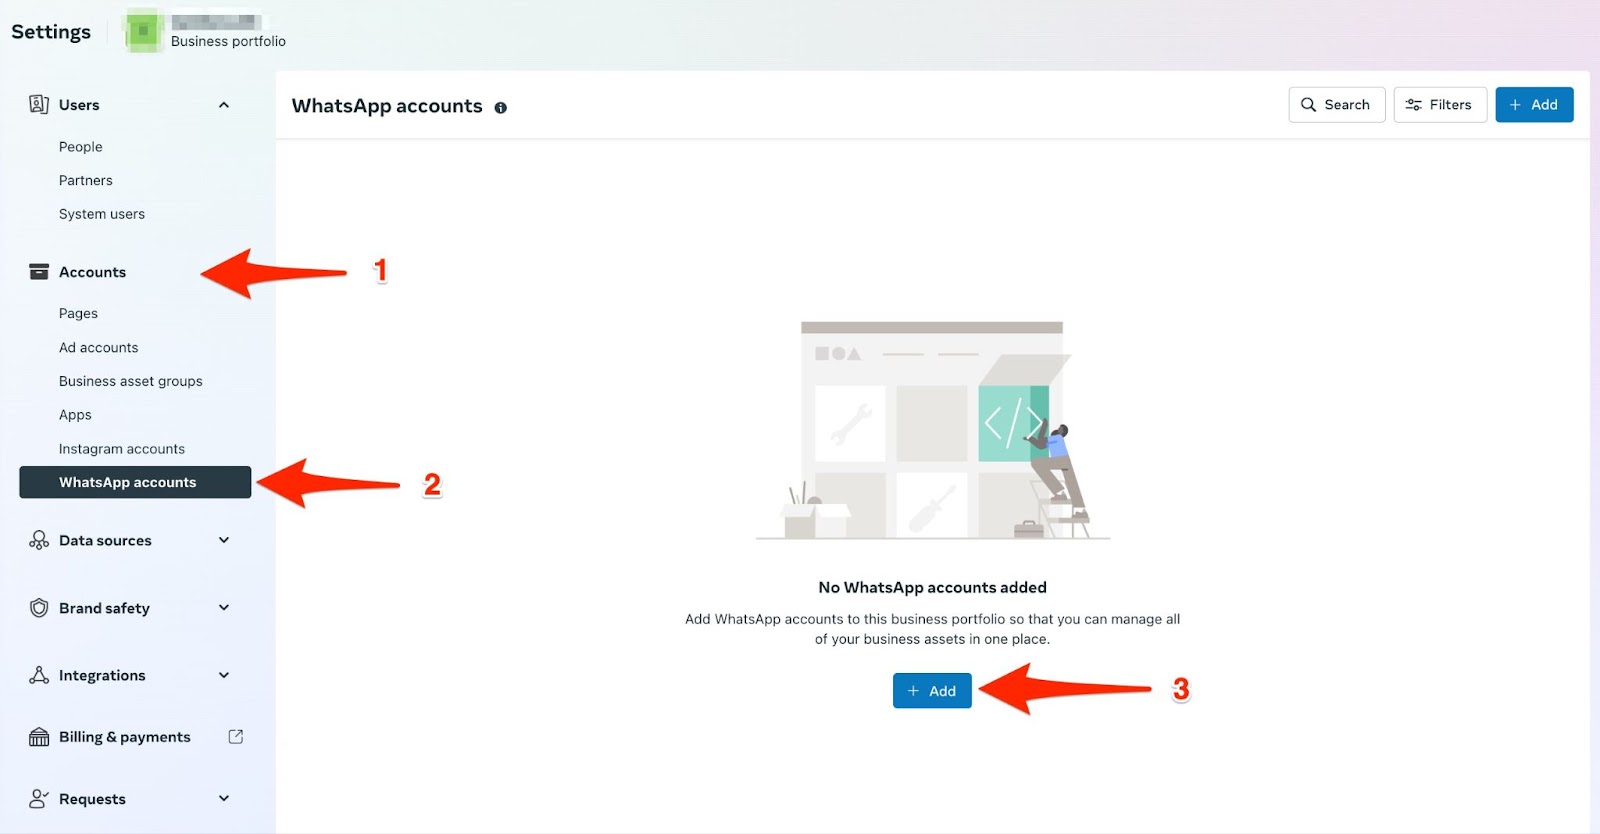
- Open Meta Business Suite and navigate to Settings.
- Open the Accounts drop-down and click on WhatsApp Accounts.
- Tap the Add button.
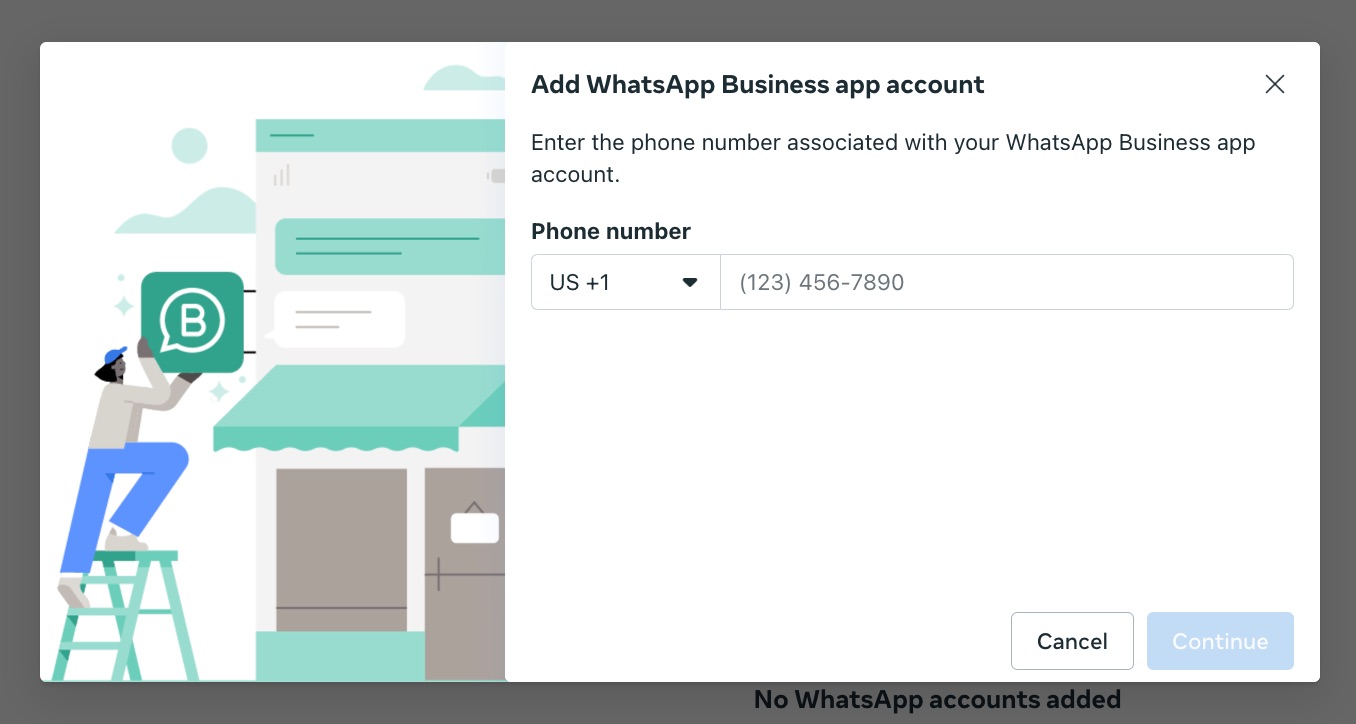
- Follow the instructions to add your WhatsApp Business account and profile.
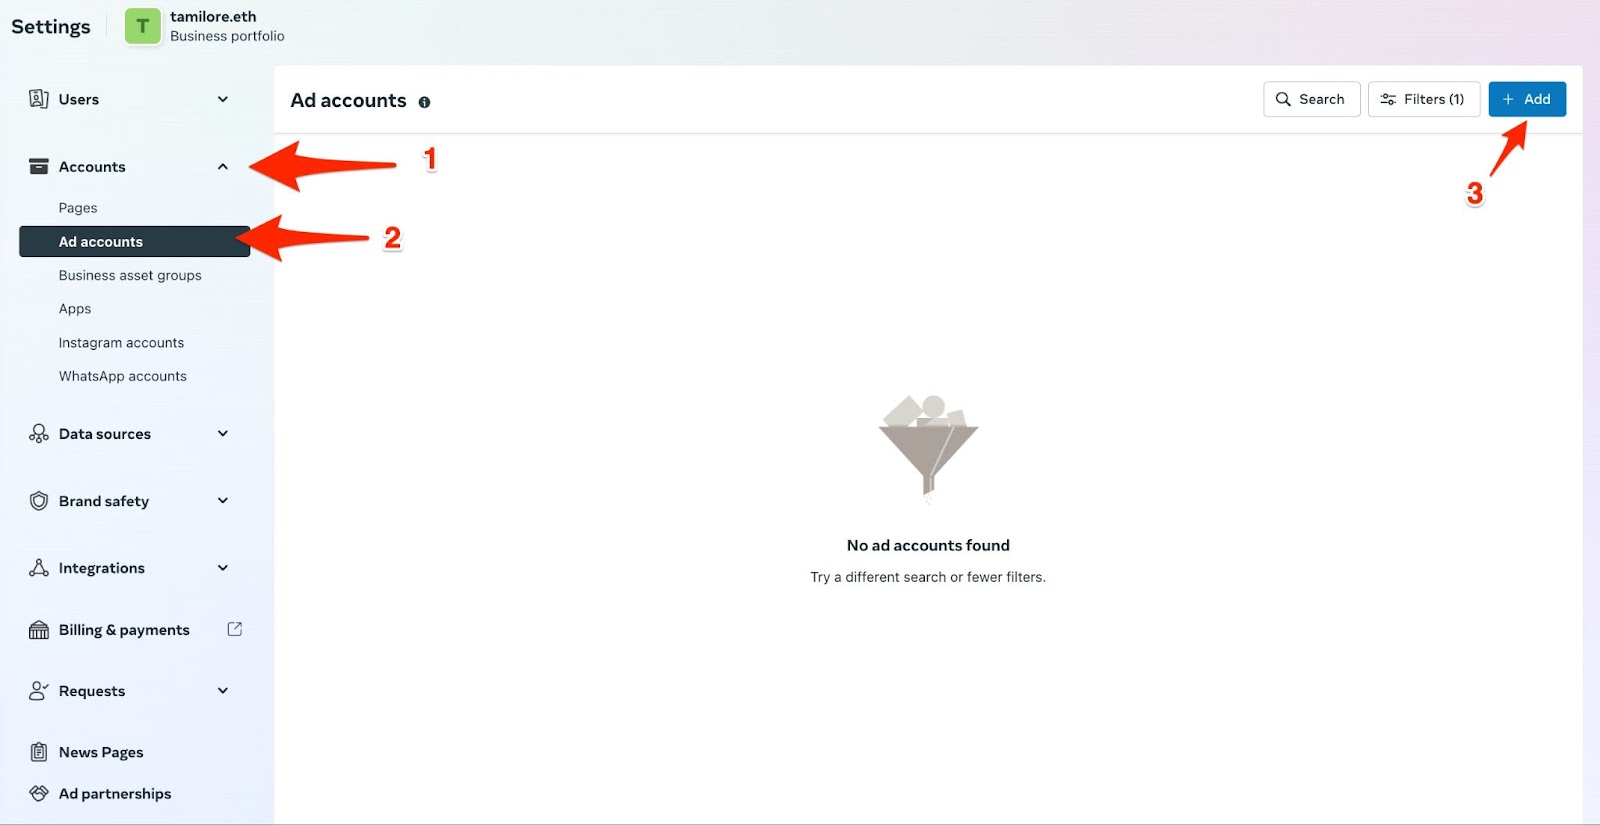
How to connect your ad accounts in Meta Business Suite
To add an ad account to your Meta Business Suite:
- Go to Settings.
- From the menu, tap Accounts then Ad Accounts.
- If you request access or add an ad account, enter the ad account ID. Follow the prompts to select people and access levels.
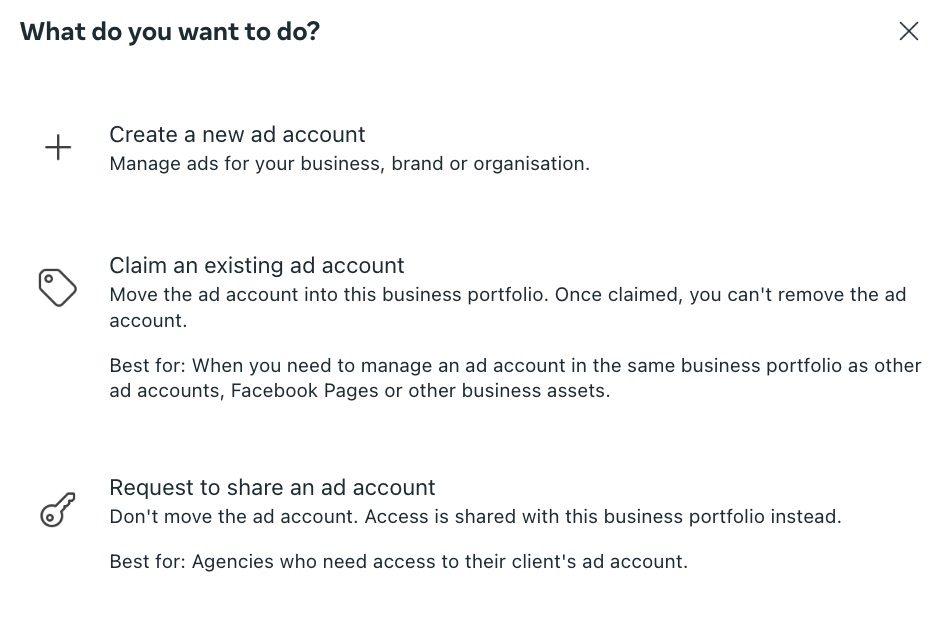
- Choose from the three options: Create a new ad account, Claim an existing ad account, or Request to share a new ad account.
- Click the Add button.
How to check your analytics in Meta Business Suite
Meta Business Suite offers various reports, such as audience demographics, engagement trends, and ad performance reports.
These insights can help you identify your most engaged demographics, the best times to post, and which ad strategies are most effective. Here’s how to navigate the analytics dashboard.
On your main dashboard, click on the Insights tab in the left-hand menu. This will open the analytics dashboard to view detailed performance metrics for your Facebook and Instagram accounts.
The dashboard is divided into several sections, including:
- Overview: Provides a snapshot of your recent performance. Key metrics include impressions, reach, content interactions, followers, link clicks, and minutes viewed. This section also displays a breakdown of reach from organic and ad sources.
- Content performance: This section is divided into various tabs like Posts and Reels, Stories, and Ads. Here, you can see detailed insights into the performance of your content, including engagement metrics and growth trends.
- Messaging: Tracks your messaging performance, including the number of new contacts, conversations started, approximate earnings from messages, orders created, and response rate.
- Audience insights: Provides detailed information about your followers, including demographics, location, and behavior. This helps in understanding your audience better and tailoring your content to their preferences.
- Ad performance: Displays metrics related to your ad campaigns, such as spend, reach, and conversions. This section helps in analyzing the effectiveness of your ads and optimizing future campaigns.
- Recommendations: Based on your current performance, Meta Business Suite offers actionable recommendations to improve your reach, engagement, and ad performance.
How to manage users in Meta Business Suite
Managing users in Meta Business Suite is crucial for maintaining a secure and efficient workflow. Here’s a step-by-step guide to adding new users, set their permissions, and remove users when needed:
How to add new users in Meta Business Suite
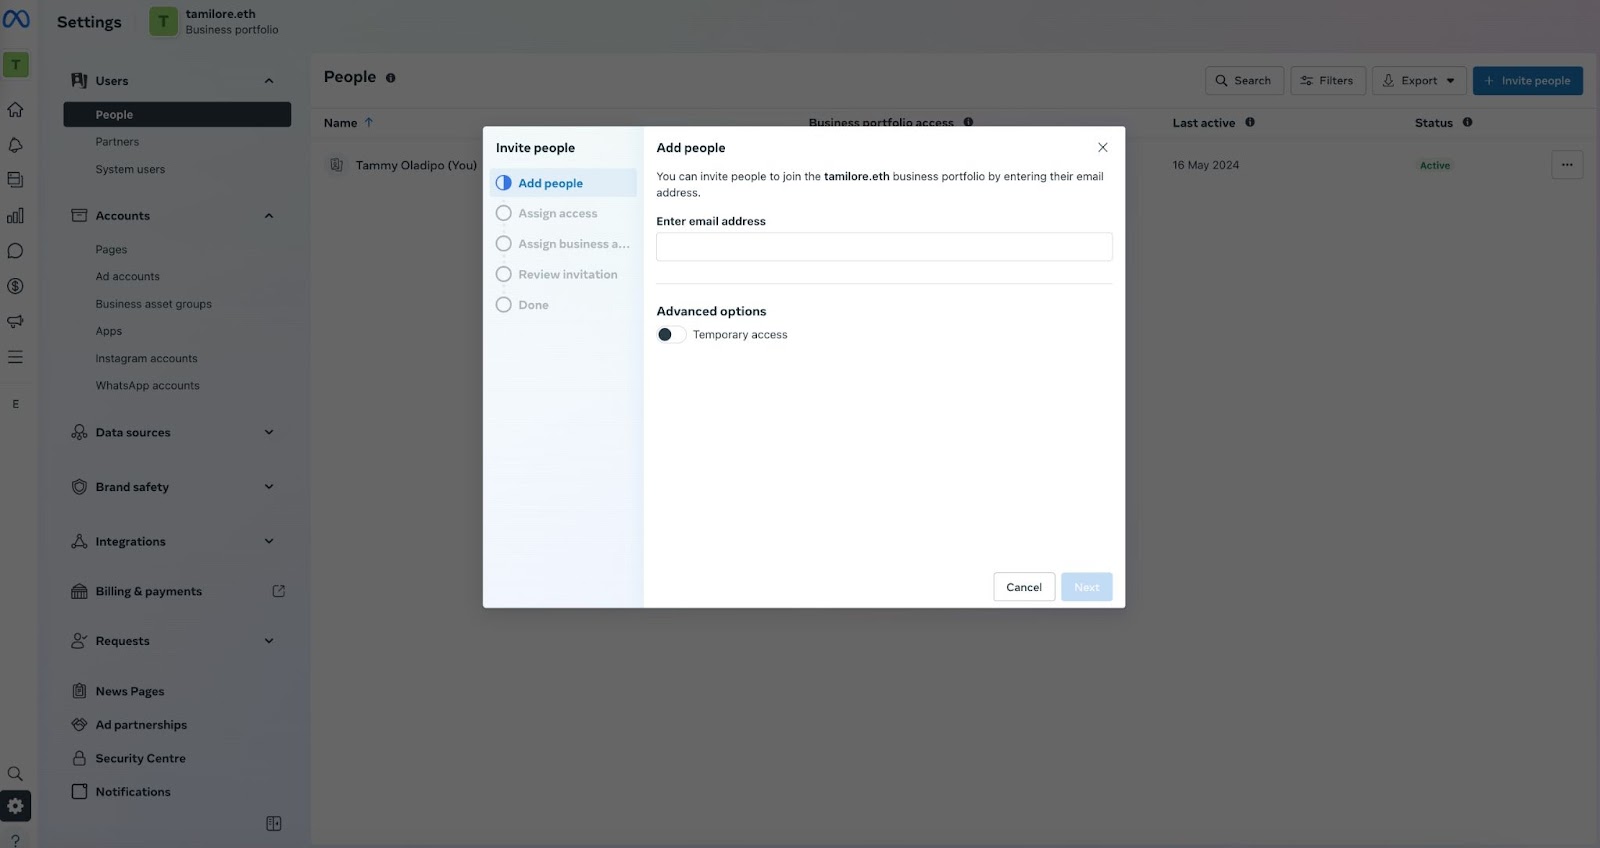
- Log in to your Meta Business Suite account and navigate to the Settings tab in the left-hand menu.
- Click on the People section under the Users category to manage users.
- Click the Invite People button and enter the email addresses of the users you want to add. Separate email addresses with commas to add multiple users at once.
- In the Advanced options, you can toggle on Temporary access if you want to give users limited-time access. Click Next to proceed to the next step.
- Once satisfied, click Invite. The invited users will receive an email with instructions on how to join your Meta Business Suite.
How to set user permissions in Meta Business Suite
- In the People section, select the user whose permissions you want to adjust.
- Click on the Edit button next to their name.
- You’ll see a list of permissions – adjust them to control what users can and cannot do. The available permissions are:
- Facebook access with full control
- Facebook access with partial control
- Task access for message replies, community activity, ads, insights
- Task access for ads, insights
- Task access for insights
- Community Manager access to moderate live chats
- You can enable or disable specific permissions for each role. For example, you can allow an Editor to create and schedule posts but restrict access to analytics and ad management.
- Once you’ve customized the permissions, click Save. The user’s access will be updated immediately.
How to remove users in Meta Business Suite
- Go to the People section under Settings.
- Find the user you want to remove from the list.
- Tap the Remove button next to their name. A confirmation dialog will appear.
- Confirm that you want to remove the user by clicking Remove again. The user will no longer have access to your Meta Business Suite.
Review and update user roles and permissions regularly to ensure only authorized personnel can access sensitive information. This helps maintain security and ensures that your team can collaborate effectively without compromising the integrity of your business data.
FAQs about Meta Business Suite
Do you have to have a Facebook account to use Meta Business Suite?
To get started with Meta Business Suite, you need a Facebook business Page or an Instagram business account. If you don't yet have one, learn how to set one up from this article.
How much does it cost to use Meta Business Suite?
Meta Business Suite is free to use.
Is Meta Business Suite different from Facebook/Meta Business Manager?
Facebook Business Manager is a free platform provided by Meta that allows businesses to manage their Facebook pages, ad accounts, and business assets in one place.
It was designed to help businesses and agencies handle multiple Facebook assets more efficiently, providing tools for managing permissions, accessing insights, and coordinating advertising efforts.
While both Meta Business Suite and Facebook Business Manager aim to streamline social media management, the two have some key differences and similarities.
Meta Business Suite offers a more comprehensive and user-friendly solution for businesses looking to manage both Facebook and Instagram, whereas Facebook Business Manager is more focused on managing Facebook-specific assets and advertising efforts.
Is Meta Business Suite different from Facebook Creator Studio?
Facebook Creator Studio is a platform designed to help content creators and publishers manage their Facebook Pages and Instagram accounts.
It provides tools for publishing content, analyzing performance, and monetizing video content. Creator Studio is particularly useful for managing and scheduling posts, accessing detailed insights, and optimizing content for better engagement.
Meta Business Suite and Facebook Creator Studio share several features but are designed for slightly different purposes and user needs.
While Facebook Creator Studio is an excellent tool for content creators and publishers focusing on video content and post scheduling, Meta Business Suite offers a more extensive set of tools and a unified experience for businesses managing their overall social media presence across Facebook and Instagram.
Set up your Meta Business Suite account even if you run other social platforms
Meta Business Suite is a good starting point if you only use Facebook and Instagram for your brand. It helps you improve efficiency, maintain consistency, make data-driven decisions, enhance customer engagement, and simplify your advertising efforts.
However, if you’re managing non-Meta social channels like TikTok, LinkedIn, or X (formerly known as Twitter), consider investing in more robust collaboration and automation features. A tool like Buffer will further simplify the management of your social media accounts across platforms.
Try Buffer for free
200,000+ creators, small businesses, and marketers use Buffer to grow their audiences every month.