
Paid advertising on social media can be incredibly powerful if you're battling to reach the right audience — especially when you need to tap into very specific demographics.
Which is where Facebook really shines. With over 3 billion monthly active users, it's no surprise that Facebook is the go-to social media platform for running ads.
The Facebook algorithm can be tricky to figure out, especially when you're just starting out as a small business owner, creator, or social media manager. That's where Facebook advertising comes in — it helps you reach your audience more reliably.
That's why, when it comes to social media strategy, understanding how to advertise on Facebook can be such a valuable skill to have in your social media toolkit.
Key takeaways
- Massive reach: Facebook offers access to over 3 billion monthly active users across Facebook and Instagram.
- Precision targeting: Advertisers can target users based on specific demographics, behaviors, and life events, or use Meta Advantage+ AI for automated targeting.
- Centralized management: All campaigns are managed through Meta Ads Manager, requiring a verified payment method and a Facebook Page.
- Flexible budgeting: You can set daily or lifetime budgets.
- Real-time tracking: Use the Meta Pixel to track website conversions and adjust campaigns based on live performance data.
Jump to a section:
Why advertise on Facebook?
If you want precision, scale, and measurable results, Facebook advertising delivers on all three.
Target customers accurately
Facebook has tons of user data, and the good news is, you can tap into it when targeting your audience.
When creating a Facebook Ad, you can get specific with demographics about Facebook users like gender, location, and age. Where Facebook differentiates itself from other platforms with ads, though, is through lifestyle-based targeting options, like:
- Interests
- Behaviors (like recent purchases)
- Education and job history
- Income
- Political affiliation
- Major life events
- Spoken languages
Want to let AI handle the heavy lifting? Meta's Meta Advantage+ features (released in 2023) learn from your ad performance in real time. According to Meta, this will help to "maximize the performance benefits of AI in your ad campaigns and maximize the value of each ad impression."
Get powerful results
Learning how to run Facebook ads is easy once you've mastered Meta Ads Manager — and results tend to happen quickly.
Facebook's global advertising revenue reached $156.8 billion in 2025, and the average Facebook ad now reaches 2,417 users per $10 spent — a 5% increase in reach efficiency year-over-year.
According to Wordstream, the paid ad channels with the highest reported ROI rate are Facebook ads and Google ads.
Reach billions across Facebook and Instagram
Because Meta owns both Facebook and Instagram, their platforms are easily integrated. This means that ads can be run simultaneously on both platforms, giving you access to even more social users, even if you aren't active on Instagram.
Track ad performance in real-time
While Meta got rid of its full Facebook Analytics platform in 2021, it still has excellent resources for understanding ad performance, including reach, engagement, conversions, and more metrics. This data is updated in real-time, so you can adjust your campaigns based on performance.
Another significant benefit of Facebook's current analytics is the ability to add the Meta Pixel to your website. Most content management platforms allow you to easily add this piece of code to your website and track the effectiveness of your Facebook ads. You can monitor user behavior and create specific target audiences for future Facebook advertising campaigns.
Define your advertising goals before you start
Before you dive in, it helps to think about why you're advertising and what you're hoping to achieve. By determining your measure of success ahead of going live with ads, you'll be able to decide which ad objective is best for your needs.
For example, if you want to increase your mobile app's downloads through Facebook ads, your success metric could be 100 downloads in the first month. If it’s lead generation you’re after, success could be measured by a larger email list. You should think about your reason for advertising before you create a campaign.
How to advertise on Facebook
All of Facebook's ad campaigns run through the Meta Ads Manager tool, so learning how to run ads on Facebook means getting to grips with it. The good news is that once you get the hang of it, it's pretty straightforward to use. We’ll walk you through everything in this step-by-step guide to how to advertise on Facebook.
Getting started with Meta Ads Manager
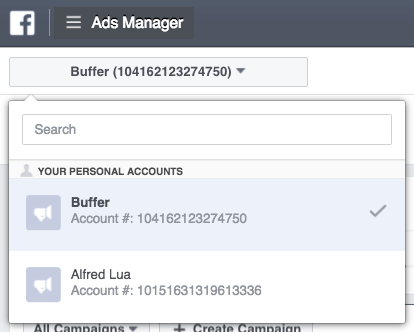
When you sign up for Facebook, you're given a personal ad account ID by default. You can see this ID by going to Ads Manager and looking in the upper left-hand corner.
To use Meta Ads Manager, you need a verified payment method and:
- A Facebook Page or
- To be an admin, editor, or advertiser on someone else's page
If you do not have a page for your business, you can follow Facebook's steps to set one up. Any page you create will be automatically given an ad account.
If there is a page you wish to advertise for created by someone else, you need to ask the page admin to assign you an admin, editor, or advertiser role on the page.
If you already have an existing ad account for your page but want to create a new one, you'll need a Business Manager account. You can create a new ad account once you sign up for Business Manager.
We'll walk through the desktop version here, but don't worry — we'll cover mobile options later in this guide.
Here's a time-saver: bookmark this direct link to Meta Ads Manager so you can jump right in whenever you need it. You will be brought directly into the Meta Ads Manager for your personal ad account. If you manage multiple ad accounts, use the account drop-down menu to pick the right account.
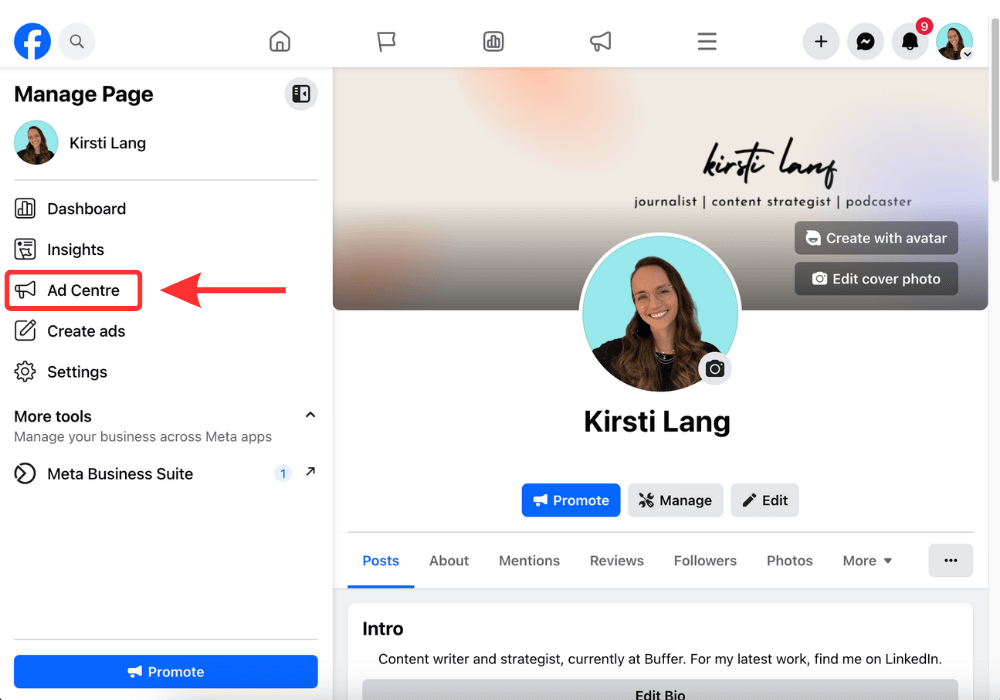
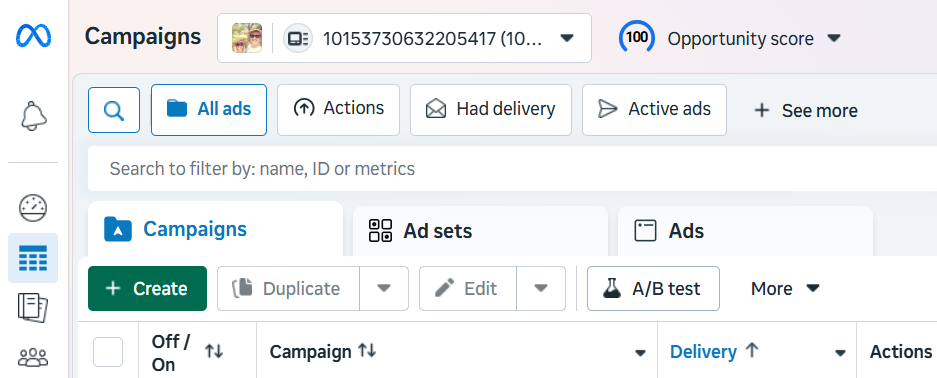
To navigate to Ads Manager right from your business page, head to the left sidebar and click on the Ad Center drop-down arrow of any Facebook Page, then choose All Ads from the drop-down. At the bottom of that page is an option to click Ads Manager.
Click on Facebook's Ads Manager to get started. You will be brought to your Facebook Ad Accounts page, where there will be a quick overview of your ad account(s). If you have access to more than one ad account, select the account where you wish to run ads.
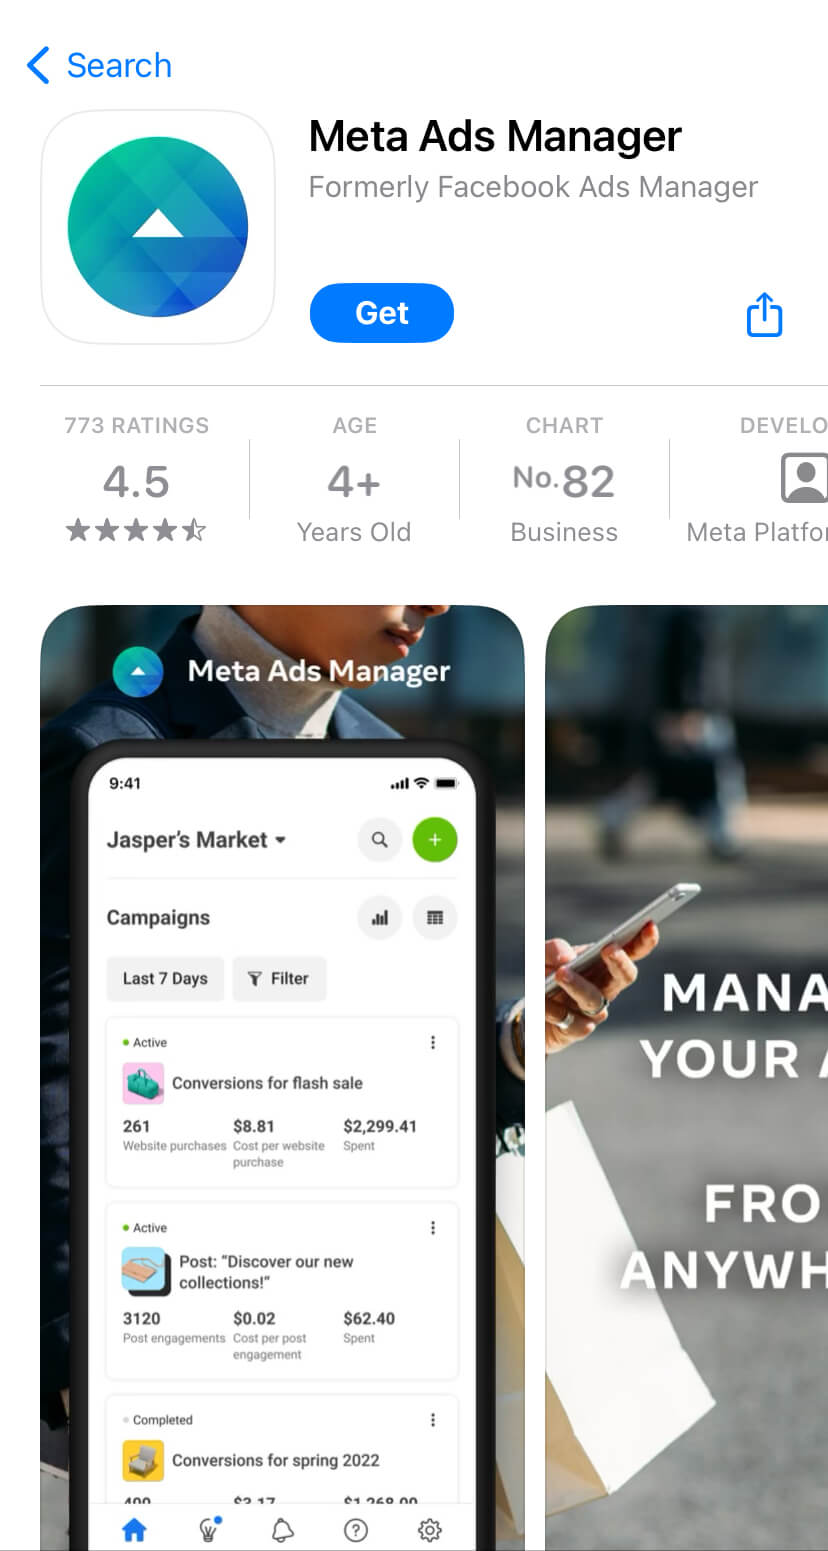
If you'd rather use a mobile device, a Meta Ads Manager app is available for Apple and Android.
How to create a Facebook ad
Let's walk through how to create your first Facebook ad, step-by-step. We'll use the latest version of Meta Ads Manager.
1. Create ad
Click the green Create Ad button to get started with your first ad.
Meta will take you to a page where you will be prompted to choose a buying type and campaign objective.
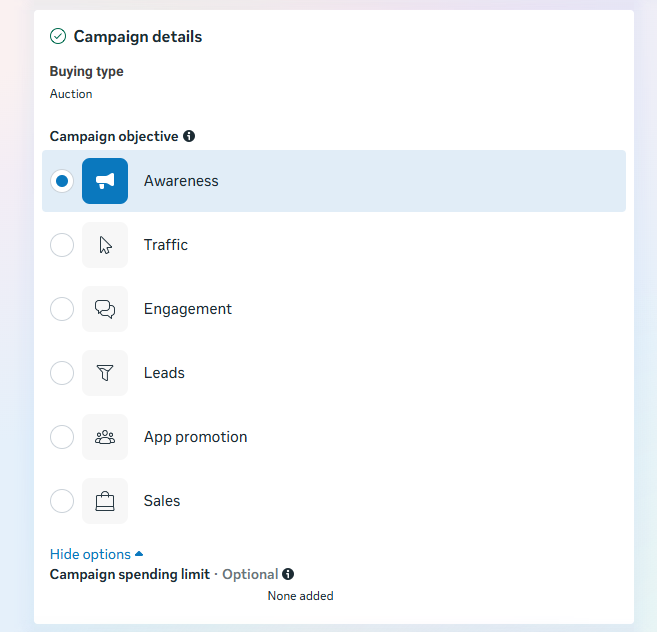
2. Choose your buying type
Meta's ads have two different buying types: Auction and Reservation (formerly Reach and Frequency). Here's Meta's explainer for both:
Auction: Offers more choice, efficiency, and flexibility, with less predictable results. Ads can be placed across Facebook, Messenger, Instagram, and Meta Audience Network.
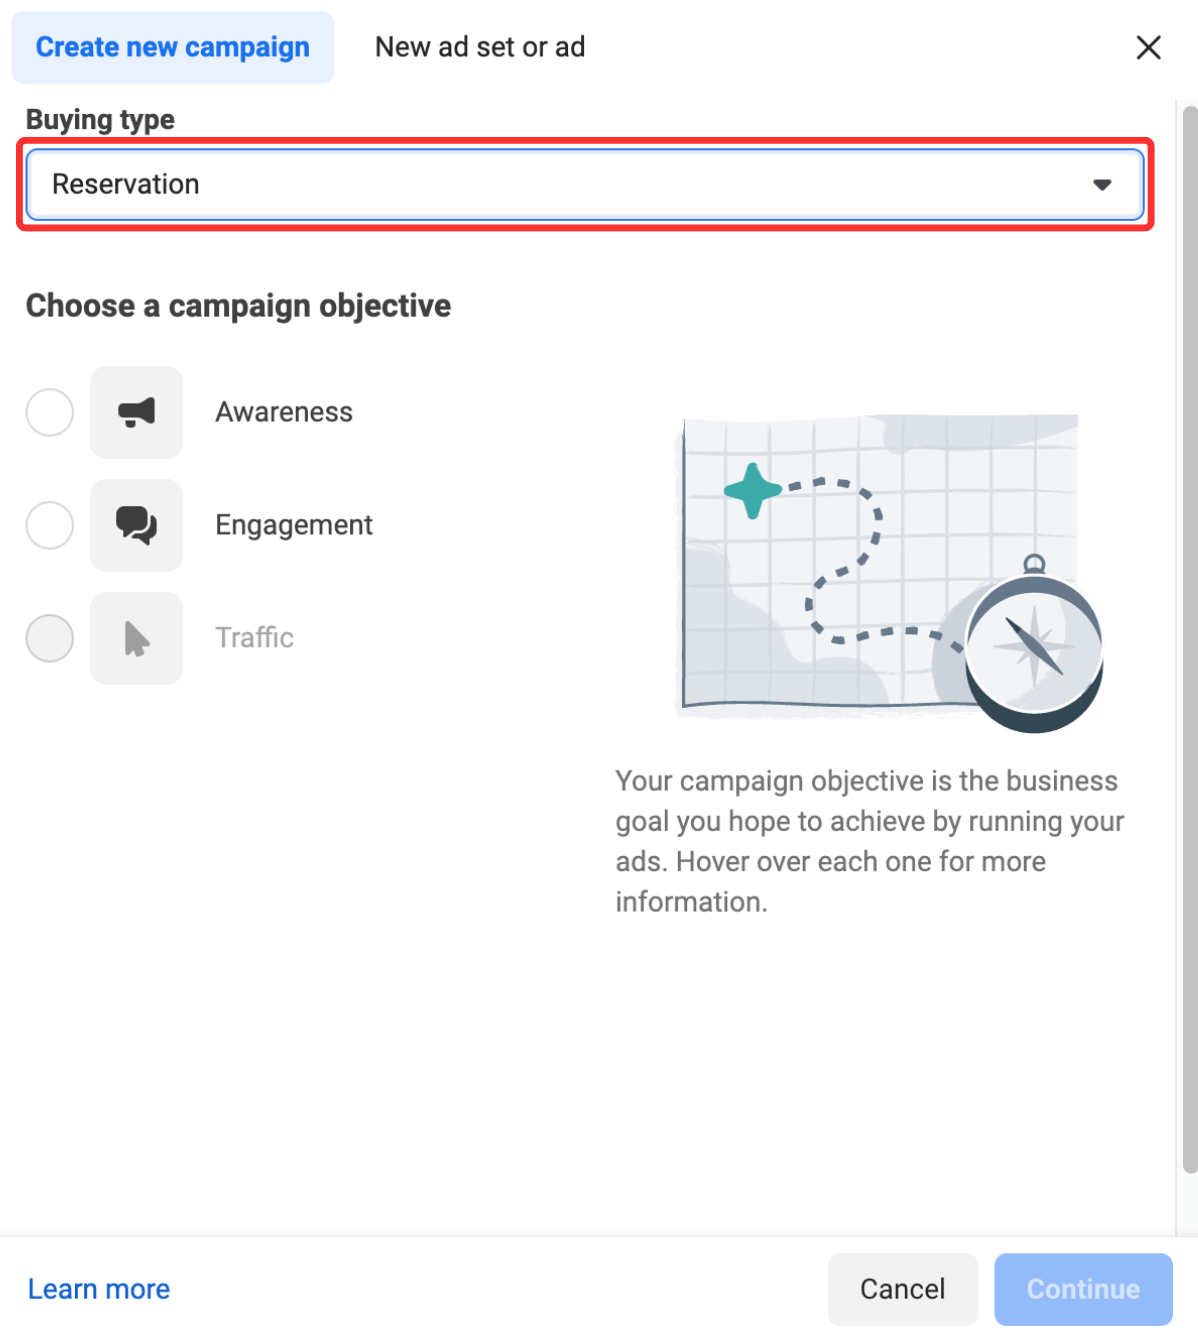
Reservation: Lets you plan and buy your campaigns in advance, with predictable performance goals and more control over your frequency controls. Ads can be placed on Facebook and Instagram.
The key differences between the two lie in your campaign setup and campaign objectives. For example, an Auction ad allows for various campaign objectives, while Reservation only has two: awareness and engagement.
Not sure which one to pick? Meta's guidance here can help you figure out what works best for your needs.
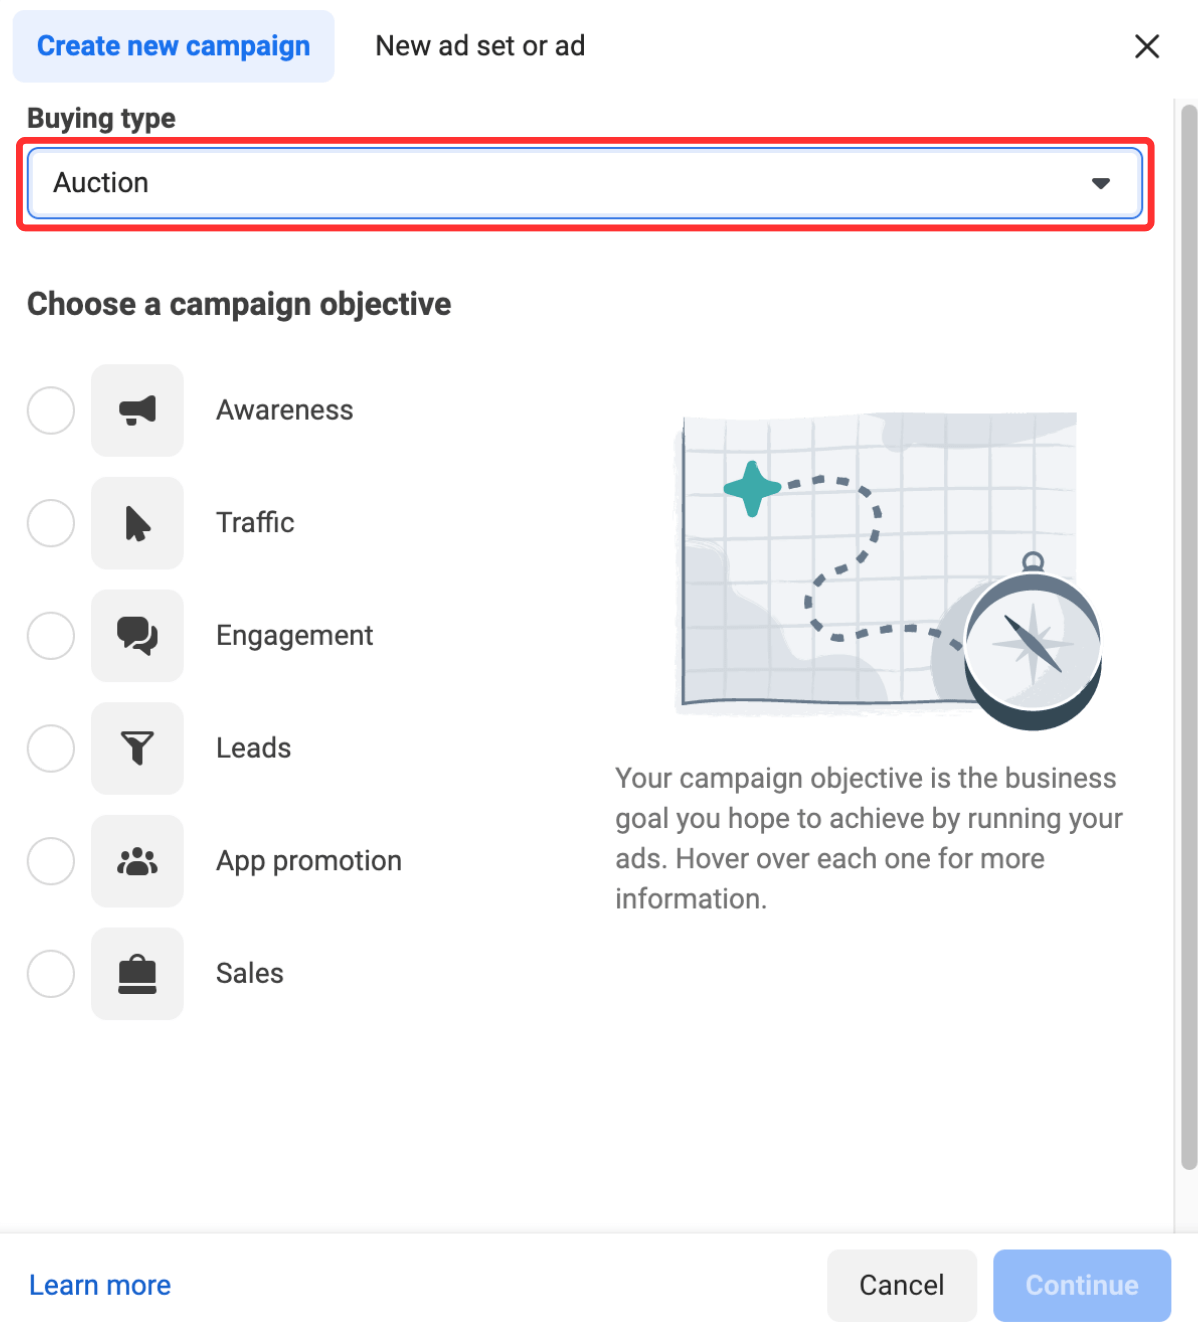
3. Choose your campaign objective
Meta and Facebook let you set up your ads with your ultimate goal in mind. There are six you can choose from:
- Awareness: Your ad will be shown to people most likely to remember them. According to Meta, this goal type is good for reach, brand awareness, video views, and store location awareness.
- Traffic: This ad type will send people to a specific destination, like your website, an event, or a download link. It's best for link clicks, landing page views, and calls.
- Engagement: This ad type will make you more likely to receive messages, in-app purchases, likes, and comments. It's also great for video views, conversions, and calls.
- Leads: Your ad may help you collect info from potential customers. It's good for forms, conversions, and calls.
- App promotion: Get more users for your app or encourage current users to keep using it.
- Sales: Find people who are likely to buy your product or service. This route is obviously great for conversions and in-app sales.
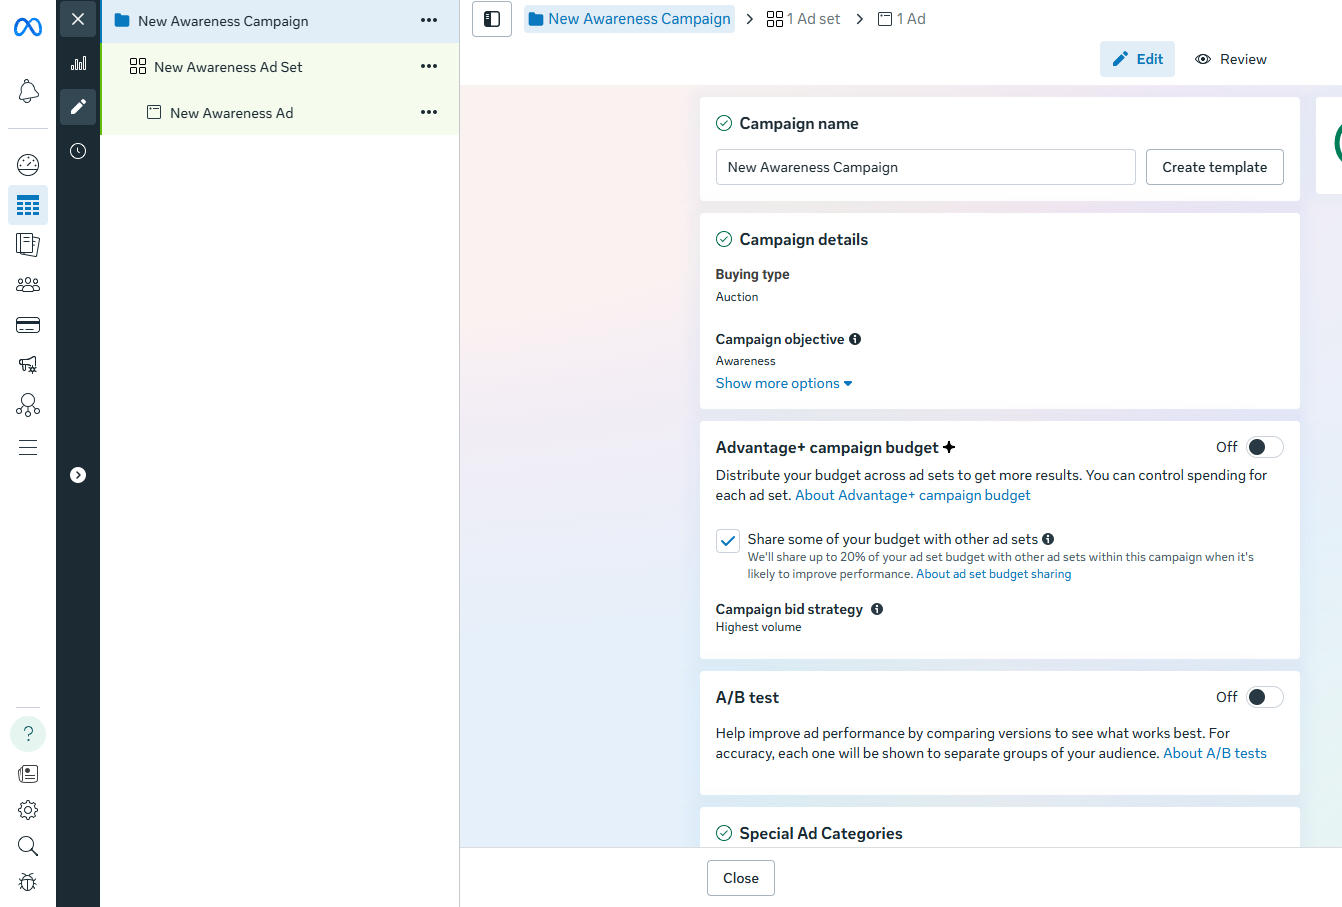
4. Pick a name for your ad campaign
Once you've selected your marketing objective, you'll be asked to name your campaign. Be sure to make your campaign name recognizable to everyone working on the ads.
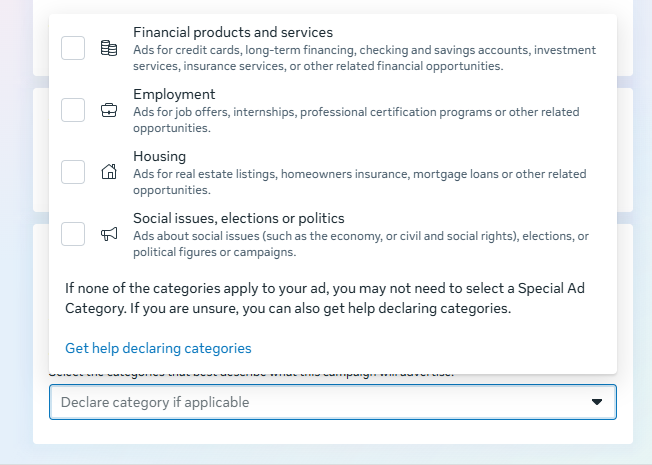
5. Declare your ad category
Different regions have different advertising rules, particularly when it comes to categories like credit, employment, housing, social issues, elections, or politics. If your ad falls into one of these buckets, it's worthwhile declaring it here to ensure it remains compliant with Facebook's and various countries' advertising standards.
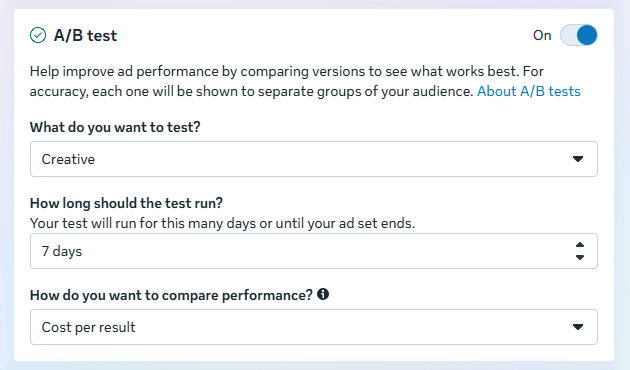
6. Decide whether to turn on A/B testing
At this point in the process, you'll be able to turn on the A/B test feature, where you can try out different images, text, audiences, or placements to maximize your ad performance. The full setup for this will come later in the process — this toggle just turns it on.
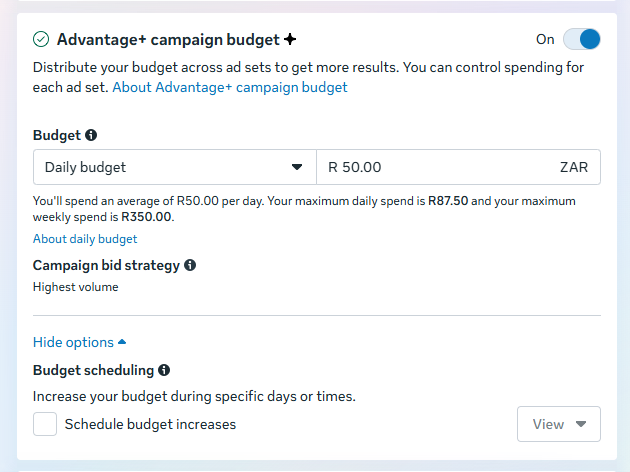
7. Decide whether to use Advantage+ campaign budget
This feature, only available if you choose the Auction buying option, means Facebook will automatically find the best available opportunities for results across your ad sets and distribute your campaign budget in real time to get those results.
Advantage+ campaign budget (formerly called campaign budget optimization) is best suited for campaigns with at least two ad sets.
8. Set your performance goal
Facebook now allows you to get super specific about the ultimate goals of your ad. Each campaign goal mentioned in step 3 has a separate set of specific targets — for example, Awareness has everything from the broader 'Maximize reach' to the hyper-specific 'Maximize two-second continuous video views.'
If you're new to Facebook ads, it's worth trialing the broader options before zeroing in on specific targets that lend themselves to your goals and the content you share.
9. Define your ad spend and schedule
When you set an ad budget, it's important to remember that this figure represents the maximum amount of money you want to spend. You can set your budget per day or as a total amount for the campaign.
- Daily: A daily budget sets a limit on what you spend each day on your ads. Facebook will use your set criteria to find the right place and time to show your ad to your target audience. Once your budget is reached, the ads stop running for the day. The cycle starts again on the next day.
- Lifetime: A lifetime budget is the maximum you'll spend the entire time you run your ad campaign. You give Facebook a number and an end date, and it will spend the money based on ad performance. Once your budget is reached, the campaign ends.
Hit the Next button to go to the next part of the setup.
10. Customize your target audience
Meta recently made some changes to its audience customization settings in Ads Manager, which is why things may look a little different nowadays if you're a regular user.
Previously, marketers could zero in on everything from location to behavior and interests; now, you can choose only three options: location, age, and language.
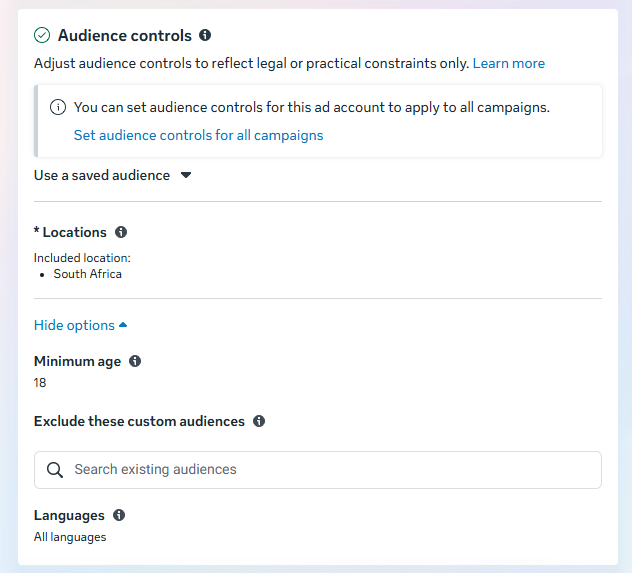
But if you want to get more specific than that, fear not: the new Meta Advantage+ audience feature does all the ad targeting for you.
Here's how it works:
"Meta’s AI uses numerous pieces of information to find your audience, evolving constantly as it learns. For example:
- Past conversions
- Meta Pixel data
- Interactions with previous ads
Our latest model innovations analyze millions of signals to find the right message, for the right audience, at the right time."

Good news for the Meta Ads Manager veterans who know their target audiences inside out and want to reach them. As you can see, your custom audiences are still available in the ad creation wizard, and you can even switch back to the original audience options.
11. Choose your ad placements
Ad placement defines where your ad appears for your target audience. Meta has made similar changes to its placement tools, with the AI-powered Advantage+ placements to help maximize your ad reach.
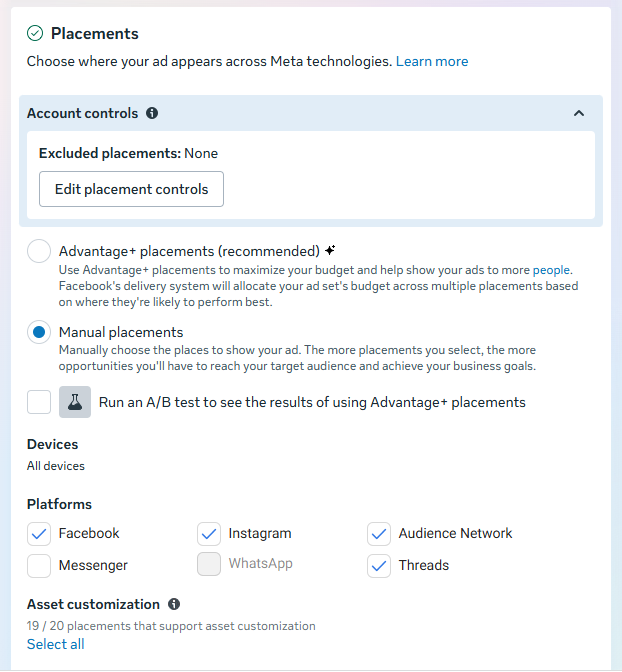
However, you can still decide on ad placement yourself by selecting the Manual placements option in the screenshots above. When you do, you'll see the options below become available to you:

There are several options across the Meta suite of social platforms:
- Feeds: Get high visibility for your business with ads in feeds.
- Stories, status, and reels: Tell a rich, visual story with immersive, full-screen vertical ads
- In-stream: Quickly capture people's attention while they're watching videos.
- Search results: Get visibility for your business as people search.
- Messages: Send offers or updates to people already connected to your business.
- Apps and sites: Expand your reach with ads in external apps and websites
For more, check out Facebook's guide to ad placement.
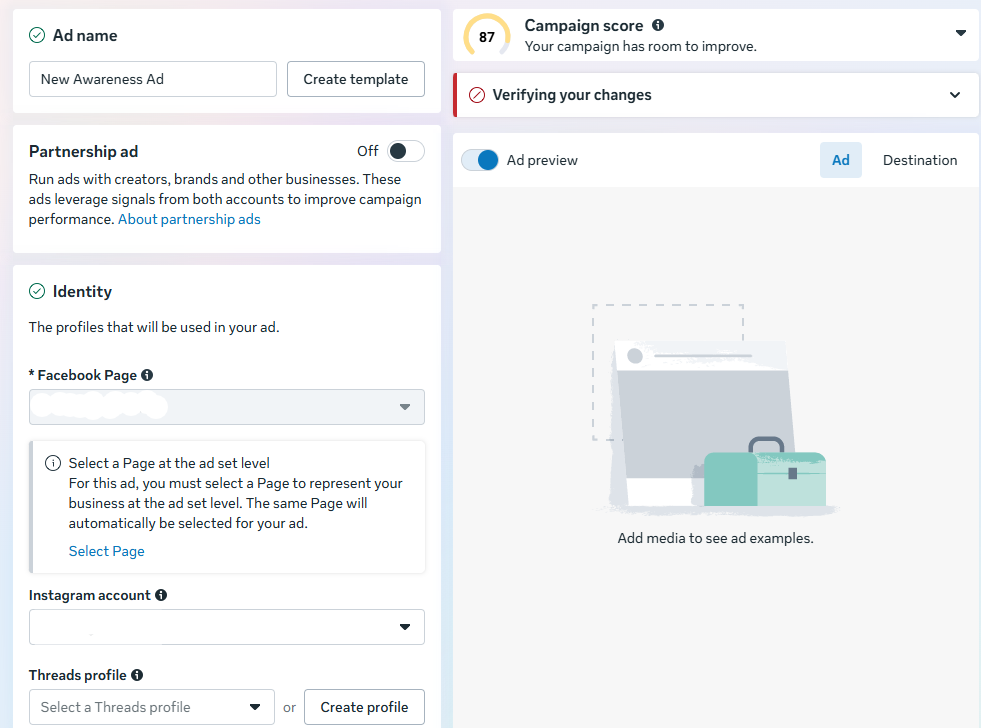
12. Choose your social accounts
In the next window, you can choose which Meta social media profiles you want the ads to run on.
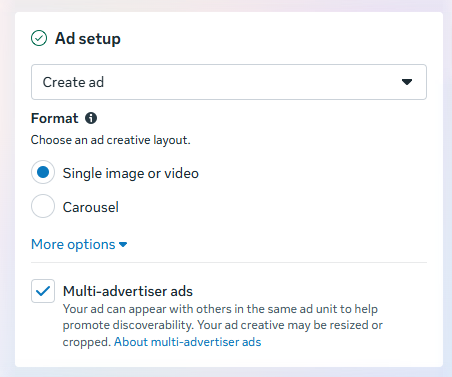
13. Choose your ad format
Under Ad setup, you'll be able to create a new ad, use an existing post, or use any mock-ups you have in Meta's Creative Hub.
Once you've made that selection, choose whether your ad will feature a single image or video, a carousel (multi-image or video post), or a collection (a group of products that becomes a full-screen experience on mobile).
14. Add your media and copy
Now comes the fun part: adding your images and videos.
Upload your photos or clips — carousel ads, video ads, they’re all created right here.
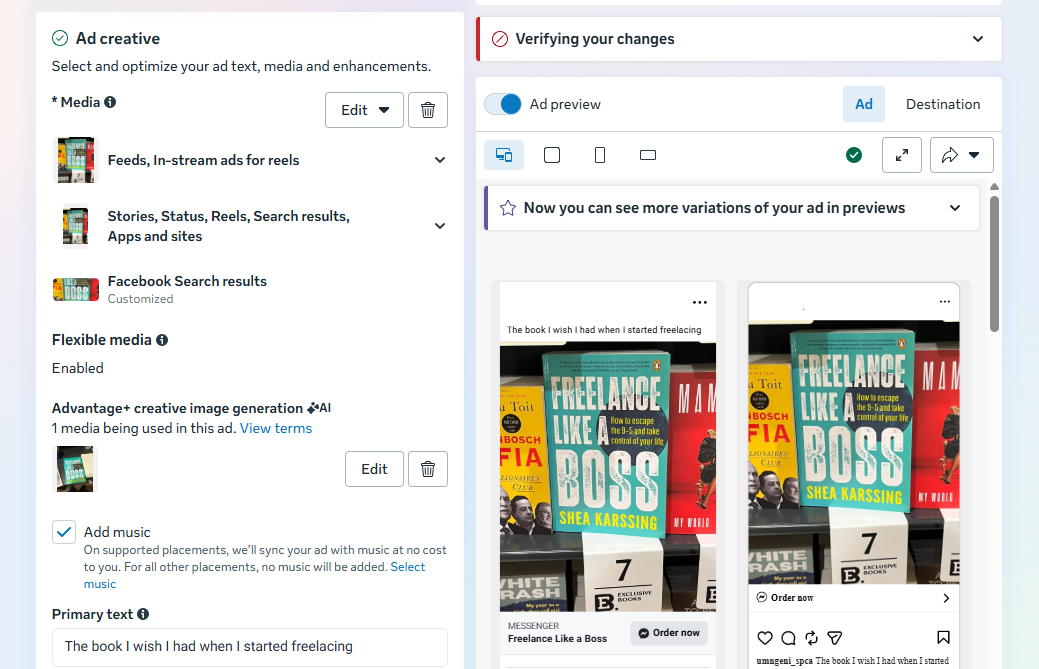
In this area, you can also switch up the ad copy and ad creative you use in each section of the Meta apps, if you want to tailor the experience for each platform.
Lower down in this section, you can choose music for the formats where this is applicable (check out our article on trending Instagram audio to help guide your choice!)
You'll also be able to add your ad copy with the various text options in this section — don't forget to include an applicable call-to-action (CTA).
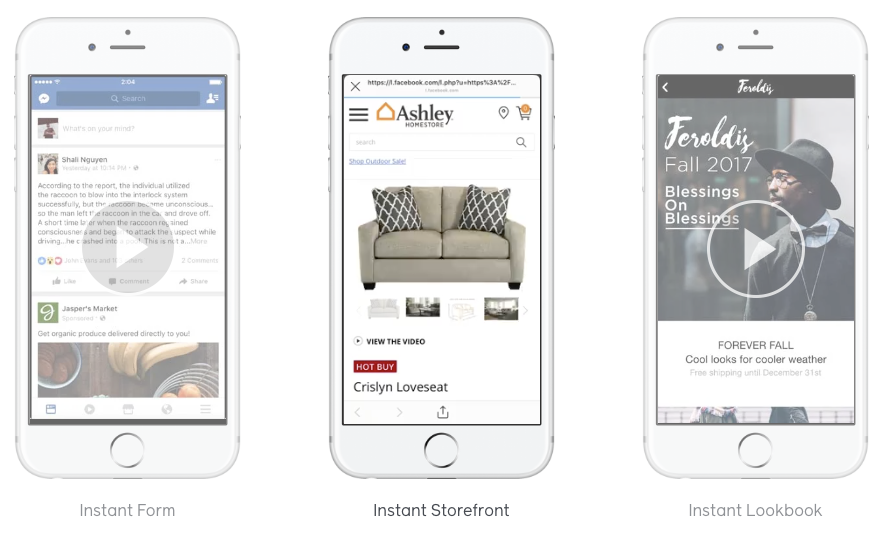
15. Choose your destination
As you'll have come to expect by now, you'll have a host of interesting options to play with when it comes to your ad destination — where Facebook sends people when they click on your ad.

There's Instant Experience (formerly Canvas) — a fast-loading, mobile-optimized experience. These offer a way for Facebook to keep your audience in their app. In other words, they're a simple, dynamic landing page, form, or lookbook you can create with Facebook.
Of course, you can also choose your website link and even add your own UTM tracking parameter.
On top of that, you can send people directly to your inbox in Facebook Messenger, Instagram, or WhatsApp.
16. Publish your ad
To submit your ad, click the 'Publish' button at the bottom right-hand corner of the page.
Once your ad is submitted, Facebook will hold your post so they can review it to make sure it fits it specs and doesn't violate their community guidelines. Expect it to be reviewed within 24 hours. You'll receive a confirmation email from Facebook once the ad is live.
How much does it cost to create a Facebook ad?
Here's the simple answer: you'll only pay what you want to spend. (Though the specifics can get a bit more nuanced.) The budget you set in step 9 above is what you'll spend on the ad — however, the mileage you get from that spend can vary quite a lot.
According to data from Wordstream, the average cost per click (CPC) on Facebook ads across all industries is $0.70 for traffic campaigns, and $1.92 for lead campaigns, compared to $5.26 in Google Ads.
CPC varies significantly by industry. Here is a breakdown of the highest and lowest average costs:
| Business category | Traffic campaigns – average CPC | Leads campaigns – average CPC |
|---|---|---|
| Arts and entertainment | $0.49 | $1.08 |
| Attorneys and legal services | $0.86 | $4.10 |
| Beauty and personal care | $0.74 | $3.06 |
| Education and instruction | $0.86 | $1.65 |
| Furniture | $0.85 | $2.18 |
| Health and fitness | $0.80 | $2.64 |
| Home and home improvement | $0.99 | $2.23 |
| Industrial and commercial | $0.86 | $1.80 |
| Personal services | $1.00 | $2.08 |
| Physicians and surgeons | $0.82 | $2.23 |
| Real estate | $0.91 | $1.57 |
| Restaurants and food | $0.72 | $0.74 |
| Sports and recreation | $0.41 | $1.07 |
Get strategic with your Facebook ads
Now that you've nailed the basics of creating a Facebook ad, you can start experimenting to see what works best for your audience.
For each step above, pausing and thinking back to your goals is helpful. Make sure everything you define and create aligns with your own measure of success. Not sure what your audience wants to see? That's totally normal, and Facebook has tools to help you figure it out.
Facebook has plenty of tools for A/B split testing, so you can compare ads side by side to find out what works. From there, keep an eye on how your ads perform and don't be afraid to experiment. The data will show you what's working — and what might need a tweak.
FAQ about advertising on Facebook
How much does it cost to advertise on Facebook?
Facebook ads work on a flexible budget. You can set a daily or lifetime budget and only spend what you’re comfortable with. On average, cost per click (CPC) varies by industry, but many traffic campaigns fall under $1 per click. Your total cost depends on your audience, competition, and goals.
Is $5 a day enough for Facebook ads?
Yes, $5 a day is enough to test a campaign. While it may not deliver massive reach, it can help you gather early data, test creatives, and see how your audience responds. Start small, measure results, and increase your budget once you know what’s working.
Are Facebook ads worth it for small businesses?
They can be — especially if you need predictable reach. Organic posts don’t always reach your full audience, but paid ads let you target specific people based on interests, behaviors, and demographics.
What’s the difference between boosting a post and running a Facebook ad?
Boosting a post is a simplified way to promote existing content directly from your Facebook Page. Running a Facebook ad through Meta Ads Manager gives you more advanced targeting, budget control, placements, and performance tracking.
How long does it take for Facebook ads to work?
Most ads start delivering impressions within hours, but meaningful performance data typically takes a few days. Facebook’s system also goes through a learning phase, where it tests your ad with different users. For best results, allow at least 3–7 days before making major changes.
Do I need a business page to run Facebook ads?
Yes. To run ads through Meta Ads Manager, you need a Facebook Page and a verified payment method. If you’re managing ads for someone else, you’ll need admin, editor, or advertiser access to their page.
How do I target the right audience on Facebook?
You can target by location, age, and language, and use tools like custom audiences or Meta Advantage+ audience to refine delivery. The key is to start with a clear idea of who your ideal customer is, then test and refine based on performance data.
What is Meta Advantage+ in Facebook ads?
Meta Advantage+ uses AI to optimize your audience targeting, placements, and budget distribution automatically. Instead of manually narrowing your audience, Advantage+ analyzes performance data in real time to find people most likely to complete your goal.
How do I measure Facebook ad performance?
Use Meta Ads Manager to track metrics like reach, clicks, conversions, and cost per result. For deeper tracking, install the Meta Pixel on your website to measure actions like purchases or sign-ups. Focus on metrics tied directly to your campaign goal.
How long does Facebook take to approve ads?
Most ads are reviewed within 24 hours. During this time, Facebook checks your ad for compliance with advertising policies and community standards. You’ll receive a notification once your ad is approved and live.
More Facebook resources
- Inside the Facebook Algorithm in 2026: All the Updates You Need to
- How to Get More Followers on Facebook for Free in 2026: 10 Tried-and-
- What Is a Good Facebook Engagement Rate? Data From 52 Million+ Posts
- 16 Facebook Statistics to Know for 2026
- Facebook Ad Specs + Image Sizes — Fully Updated for 2026
- How to Schedule Facebook Posts in 3 Easy Ways (+ Save Hours Every Week)
Try Buffer for free
200,000+ creators, small businesses, and marketers use Buffer to grow their audiences every month.