Lately, every engineer at Buffer has been keeping a closer eye on accessibility. Regardless of the platform Buffer is housed on, be it iOS, Android or the web – we consider it part of our craft to ensure that anyone can use the things we make. Aside from the fact that it opens up Buffer to more users, we also subscribe to the belief that it’s simply the right thing to do.
For iOS, that means it’s on Andy and I to recognize tools that can help us excel in that department. Core ML, introduced alongside iOS 11, presented us with such an opportunity. While you would think machine learning and accessibility may only be tangentially related, we found a perfect use case that connects them together that’ll help our vision impaired users.
Here’s what I found and some of the challenges I faced while exploring it.
Alt Text for Images
Before we dip into machine learning, let me quickly recap on a feature I was hoping to incorporate it with.
It wasn’t too long ago that we rolled out alt-text support for images you can add to your Twitter posts within Buffer. For the uninitiated, this aids vision impaired users by describing the image that’s on their screen. For our ecosystem, that means when Voice Over is on for an iOS user.
It works as you’d expect, users simply tap the “Add Description” button you see on the bottom left of any image they attach:
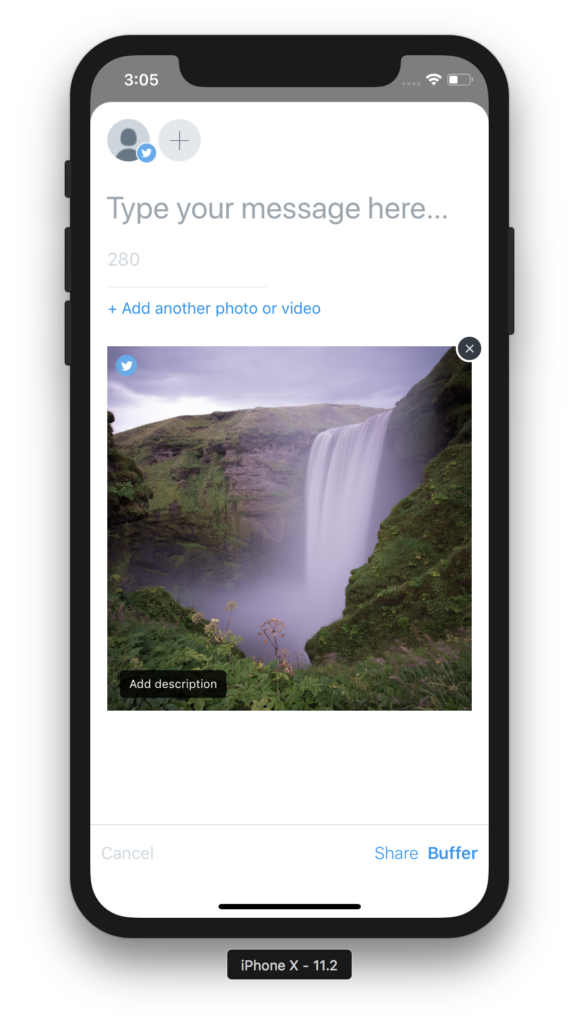
It’s a key feature for a lot people, so we jumped at the opportunity to add it. More importantly, it’s encouraging to see our accessibility users enjoy the addition:
Great news! @buffer is now supporting image description on iOS. Accessibility of images is really important to us. Thank you @ay8s #a11y https://t.co/5SpP8T4CDk
— European Blind Union (@euroblind) February 1, 2018
This brings us to the 6 week cycles our engineering teams have been using lately. Before the start of each one, we’ve allowed for a 2 week “free roam” period. This is time any engineer can leverage to pursue things that interest them like learning a new framework, open sourcing some of our code, writing a blog post such as this or simply exploring any area of innovation that we could bring into Buffer.
This is what ultimately led me to Core ML. I wanted to see if we could use it to automatically recognize what were in the images people were posting, and apply that to the alt-text field. This would give us boosted accessibility without users having to do more work.
Let’s take a look at how it all works.
Core ML Primer
In many ways, Apple almost perfected the art of API design when it comes to Core ML. Developers hardly need to know a thing about how machine learning actually works to utilize it. All of challenges you might face when implementing these kinds of things yourself has been abstracted away and packaged in a simple framework that is essentially plug and play.
To get a high level understanding of what it can do, I’ve found it helps to focus in on what kinds of problems you’re trying to solve. Core ML works by taking some inputs (i.e. text, images, raw numbers) and producing a desired output. Certain types of models can produce the different types of output you’re looking for.
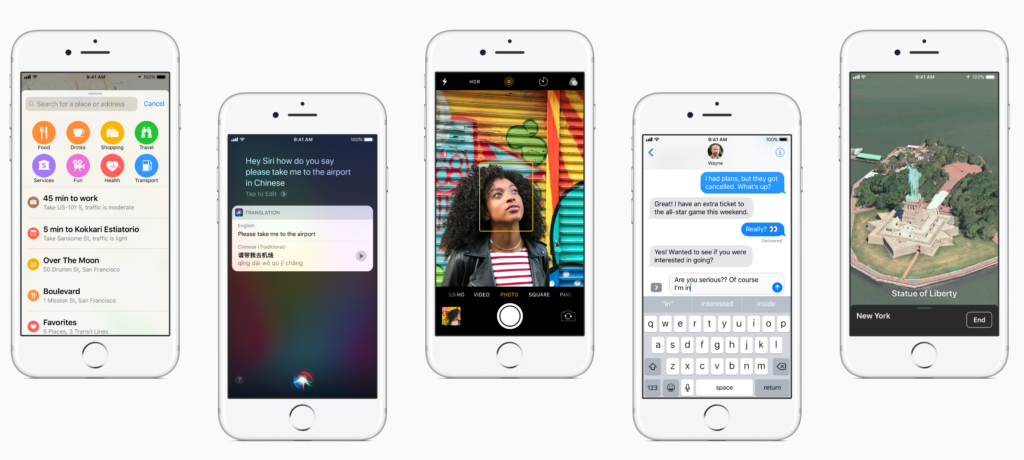
To get a sense of the broader applications, here are some examples of where Apple uses it within iOS. Siri, predictive text, image recognition and more:
It can handle over 30 different layer types such as convolutional neural networks, tree ensembles, support vector machines, generalized linear models and more. This enables us to translate text, perform sentiment analysis, scene classification or even style transfer techniques made popular by prominent apps like Prisma.
Normally, to get these kinds of results you would need to first train up a model and put it through learning algorithms. This is what produces a model. As you might expect, Core ML translates models that have already done this work.
From those models, it creates a programmatic interface for developers to interact with them. Further, there are certain domain specific frameworks that work above Core ML to tackle certain tasks. The Vision and NLP frameworks make image detection, text prediction and other common tasks even easier to pull off.
Best of all, this all happens on device. For API consumers, this means:
– User privacy is respected
– There are no server or data costs
– You don’t have to rely on a response from a server, thus eliminating a common error boundary
– It’s always available, 24/7
The Right Model for the Job
In our case, we needed a model that could perform inference. Can a model infer from the input we give it (the image) and produce an output (a description of what the image contains) we can use in Buffer?
For the task of image recognition, a popular choice is Inception V3. As a convolutional neural network, it can match or even exceed human performance in some image recognition scenarios. Boasting support for 1,000s of image types to categorize, it has made for an ideal starting point to implement it within Buffer as we can’t begin to narrow down the types of things our users will upload.
Implementation Details
Now that we had a model picked out, I was ready to get it working within Buffer. The whole process is fairly easy to conceptualize:
1) You drag the model into Xcode
2) It generates a programmatic interface to interact with the model
3) You initialize either a model instance or a core vision model to perform classification
4) Using that instance, you provide it the required input
5) Finally, use the output as you see fit
This is where the things started to get a bit tricky right away. Currently, Buffer’s download size sits at 47.1 megabytes. Inception V3’s model size itself is 90.3 megabytes, almost double our size alone. Packaging it with our app binary simply wasn’t an option, as we’ve gone to great lengths to keep the download size slim. Additionally, .mlmodel files aren’t eligible for On Demand Resource use either.
Background Compilation of Models
It was obvious that the only way this would ship was if we could download it dynamically. It seems Apple anticipated this need, as iOS 11 Beta 4 added an initializer to support this for an MLModel instance.
This means that we could take care of steps 1 and 2 that I mentioned above. We could download the .mlmodel and compile it once the download completed. From there, we would just need to cache that in Buffer so we could later access it.
Here is what the implementation looked like, I left several comments to explain the process:
// Once you get the NSData from the download task from where you hosted the file...

#pragma mark - Local Storage

// A 4 Step Process
// 1) Save off the NSData of the Core ML model to a temporary spot
// 2) Compile the model from that URL, whic gives us another temporary URL of where it's compiled at
// 3) Create a permanent URL by appending the temporary URL that was generated. This is what initlizes stuff
// 4) Save the permanent URL for later use
- (void)saveModelData:(NSData *)data {
    // First, save the raw NSData since MLModel uses a URL for compilation.
    NSURL *modelDataURL = [NSURL URLWithString:[NSString stringWithFormat:@"%@modelData.tmp", NSTemporaryDirectory()]];
    NSError *writeError;
    [data writeToFile:modelDataURL.path options:NSDataWritingAtomic error:&writeError];

    if (writeError != nil) {
        NSLog(@"Couldn't save data. Error: %@", writeError.localizedDescription);
        return;
    }

    // Now compile the model itself, which results in a temporary URL where the model is at
    NSError *compilationOrSaveError;
    NSURL *compiledModelURL = [MLModel compileModelAtURL:modelDataURL error:&compilationOrSaveError];

    if (compilationOrSaveError != nil) {
        NSLog(@"Couldn't compile model data. Error: %@", compilationOrSaveError.localizedDescription);
        return;
    }

    // Now save off the permanent URL so we can later access it in the app support directory
    NSFileManager *fileManager = [NSFileManager defaultManager];
    NSURL *appSupportDirectory = [fileManager URLForDirectory:NSApplicationSupportDirectory inDomain:NSUserDomainMask appropriateForURL:compiledModelURL create:YES error:&compilationOrSaveError];

    if (compilationOrSaveError != nil) {
        NSLog(@"Couldn't save compile model data permanent URL. Error: %@", compilationOrSaveError.localizedDescription);
        return;
    }

    NSURL *permanentURL = [appSupportDirectory URLByAppendingPathComponent:compiledModelURL.lastPathComponent];
    [self savePermanentFileURL:permanentURL];

    // Replace it or save it
    if ([fileManager fileExistsAtPath:permanentURL.absoluteString]) {
        [fileManager replaceItemAtURL:permanentURL withItemAtURL:compiledModelURL backupItemName:nil options:NSFileManagerItemReplacementWithoutDeletingBackupItem resultingItemURL:nil error:nil];
    } else {
        [fileManager copyItemAtURL:compiledModelURL toURL:permanentURL error:nil];
    }

    NSLog(@"Compilation successful and the URL was saved.");
}
I should note that it’s also possible to use CoreML Tools to convert neural networks to half-precious values instead of their normal full precision methods, thus cutting down the model size. We opted not to go this route, as even if the loss of accuracy was negligible the size of the model would still be too large to ship.
Generating the Objective-C Interface
At this point, we have the model on the device and we’ve compiled it. That means we could use what Xcode would’ve generated for us in Step 1, the programmatic interface for Inception V3. We obviously need this imported in relevant code files when the app ships though, before the model could be on the device.
For Swift users, this problem is trivial to solve. You can generate the interface ahead of time, and just include it within your project. However, since Objective-C just produces a header file, this became an issue. The linking process will fail and your app won’t build if you only include a header file for Inception V3 (which inherits from NSObject) but don’t include the implementation file along side it.
To illustrate it more clearly, here is the code Xcode gives us when compiling the model (abbreviated):
//
// Inceptionv3.h
//
// This file was automatically generated and should not be edited.
//

#import <Foundation/Foundation.h>
#import <CoreML/CoreML.h>
#include <stdint.h>

NS_ASSUME_NONNULL_BEGIN


/// Model Prediction Input Type
API_AVAILABLE(macos(10.13), ios(11.0), watchos(4.0), tvos(11.0))
@interface Inceptionv3Input : NSObject<MLFeatureProvider>

/// Input image to be classified as color (kCVPixelFormatType_32BGRA) image buffer, 299 pixels wide by 299 pixels high
@property (readwrite, nonatomic) CVPixelBufferRef image;
- (instancetype)init NS_UNAVAILABLE;
- (instancetype)initWithImage:(CVPixelBufferRef)image;
@end


/// Model Prediction Output Type

// More code to initialize things, etc
So I had a header file, but no implementation.
I was left with either translating the Swift version, or investigating how Xcode generated these files to begin with to see if I could include them ahead of time. This brought me to discover a helpful utility found within Xcode’s tool path called coremlc. Using it, we could create the wrapper classes for Inception V3 without needing to use Xcode at all.
xcrun coremlc generated <path to .mlmodel> <output directory> --language <Swift or Objective-C>Running that in terminal generated the Inception V3 wrapper class that I needed in its entirety. Here is an example of what it looks like in action:
If you're using #CoreML in a production app where binary size matters, you'll find you need to download the models over the wire. This means you need the generated models at compile time.
Swift, no problem. ObjC? You just get the .h file. Here's how to solve that: pic.twitter.com/YK0hYT0DrJ
— Jordan Morgan (@JordanMorgan10) February 1, 2018
The Result
Finally, I had everything required to perform the actual classification. In this case, there are really two routes you can take to get output. You can either call on the model itself by providing a CVPixelBufferRef representation of the image or use the Vision framework to work in tandem with Core ML to get results. I built out support for both, but when we ship it’s likely we’ll stick with Vision.
Here is part of the code we use to show how you can use either approach:
#pragma mark - Private Classifiers

- (void)classifyWithModelForImage:(UIImage *)image completion:(void (^)(NSDictionary <NSString *, NSString *> *))completion {
    dispatch_async(dispatch_get_global_queue(QOS_CLASS_UTILITY, 0), ^{
        NSMutableDictionary *returnValues = [NSMutableDictionary new];
        CVPixelBufferRef pixelBuffer = [self generatePixelBufferFromImage:image];

        if (pixelBuffer == nil) {
            completion(nil);
            return;
        }

        NSError *predictionError;
        Inceptionv3Output *results = [self.model predictionFromImage:pixelBuffer error:&predictionError];
        returnValues[BFR_CLASSIFICATION_KEY] = results.classLabel;

        // Tack on confidence level
        if (results.classLabelProbs[results.classLabel] != nil) {
            NSString *confidenceString = (NSString *)results.classLabelProbs[results.classLabel];
            CGFloat confidenceNumbericalValue = roundf(confidenceString.floatValue * 100);
            returnValues[BFR_CLASSIFICATION_CONFIDENCE_KEY] = @(confidenceNumbericalValue).stringValue;
        }

        dispatch_async(dispatch_get_main_queue(), ^ {
            completion(returnValues);
        });
    });
}

- (void)classifyWithVisionForImage:(UIImage *)image completion:(void (^)(NSDictionary<NSString *,NSString *> * _Nonnull))completion {
    if (self.visionModel == nil) {
        completion(@{BFR_CLASSIFICATION_KEY:@"",BFR_CLASSIFICATION_CONFIDENCE_KEY:@""});
    }

    VNCoreMLRequest *request = [[VNCoreMLRequest alloc] initWithModel:self.visionModel completionHandler:^(VNRequest *request, NSError *error) {
        dispatch_async(dispatch_get_main_queue(), ^ {
            if (error || request.results.count < 1) {
                completion(@{BFR_CLASSIFICATION_KEY:@"",BFR_CLASSIFICATION_CONFIDENCE_KEY:@""});
            }

            // Grab the highest level of confidence result
            VNClassificationObservation *result = request.results.firstObject;
            NSString *foundObject = result.identifier;
            CGFloat confidenceNumbericalValue = roundf(result.confidence * 100);
            completion(@{BFR_CLASSIFICATION_KEY:foundObject, BFR_CLASSIFICATION_CONFIDENCE_KEY:@(confidenceNumbericalValue).stringValue});
        });
    }];
    request.imageCropAndScaleOption = VNImageCropAndScaleOptionCenterCrop;

    CIImage *coreGraphicsImage = [[CIImage alloc] initWithImage:image];

    if (coreGraphicsImage == nil) {
        completion(@{BFR_CLASSIFICATION_KEY:@"",BFR_CLASSIFICATION_CONFIDENCE_KEY:@""});
    }

    CGImagePropertyOrientation cgOrientation = [self cgOrientationFromUIImageOrientation:image.imageOrientation];

    dispatch_async(dispatch_get_global_queue(QOS_CLASS_UTILITY, 0), ^{
        VNImageRequestHandler *handler = [[VNImageRequestHandler alloc] initWithCIImage:coreGraphicsImage orientation:cgOrientation options:@{}];
        [handler performRequests:@[request] error:nil];
    });
}
Andy and I have an internal utilities framework we use for Buffer where we have included this, and we ran it through several images to get a feel for performance, memory consumption and accuracy:
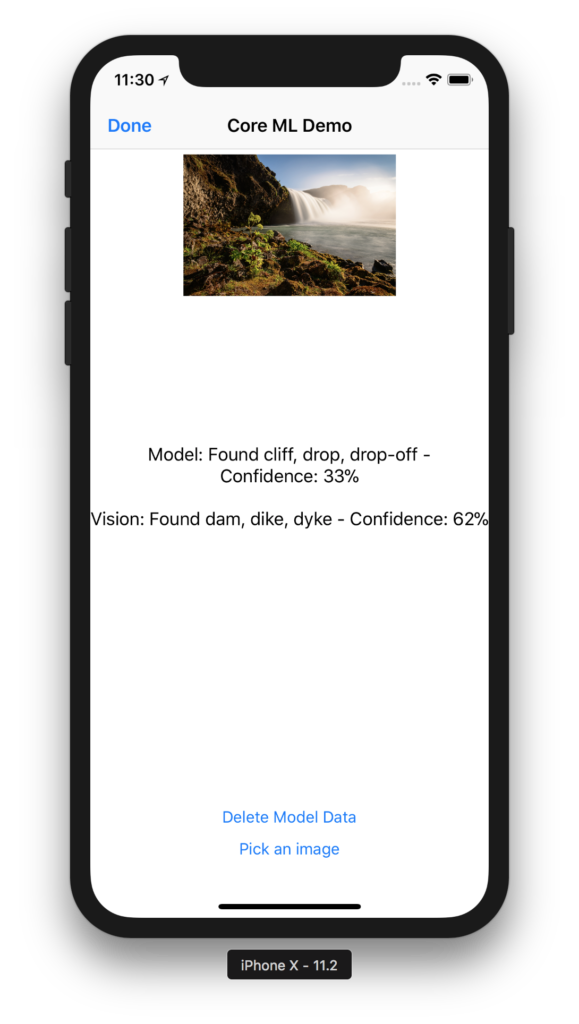
We’ve found that generally speaking, a confidence level of about 70% feels about right to recommend the output for an alt-text suggestion.
In our minds, we’ve just started to tap the potential for machine learning in Buffer. If there is a natural fit to use it more, we certainly will. The code we’ve written can easily be refactored to allow for live hot swapping of models as well, which would avoid users having to wait for an update to take advantage of new models.
Be sure to look for this particular alt-text feature which will release in the coming weeks on iOS.
Final Thoughts
We’ve all got those ideas at our job we wish we could work on, but the grind can often get in the way. It’s not a high enough priority, you can work on it when project X or Y is done, maybe after this sprint, etc. At Buffer we’ve come to realize there is never an opportune time to explore, so we’ve made the conscious decision to set our engineers free for two week periods. Things like the work I’ve described here are some of the features that have come out of it.
Machine learning has a bright future on iOS. I hope this information has maybe given you a few ideas of where it might be useful for your own apps. Feel free to use any of the code you’ve found here, and be sure to leave us a comment if you’ve got any questions.
Further Resources
– WWDC Core ML Introduction
– Core ML Code Sample
– Core ML Ready Models
Try Buffer for free
200,000+ creators, small businesses, and marketers use Buffer to grow their audiences every month.