

Header image source: Émile Perron on Unsplash
Over the last year on the Android team at Buffer, we’ve talked a lot about cleaning up our project and increasing its stability. One of the factors here was the introduction (?) of tests, which we’ve already seen to help us avoid regressions in our code and give us greater confidence in the features we are shipping. And now we’re kicking off some new products at Buffer, we want to ensure that this same approach is taken when it comes to these – just so we don’t end up in the same boat as before.
Motivation
When writing the Unit tests for the Buffer app, we’ve always followed Test-Driven-Development (TDD). There are many resources on what TDD is and its advantages / where they come from, but we’re not going to get into these as there are plenty of resources online. At a high level I personally find some of these are:
– Reduced development time
– Simpler, more understandable and maintainable code
– More reliable code with greater confidence in our work
– Higher test coverage (kinda goes without saying ?)
But only up until recently we were only following the principles of TDD in the form of Unit tests for our non-ui based implementations…

I know I know… We’ve always been in the habit of writing User Interface (UI) tests after what has been implemented is complete – and this doesn’t really make sense. We’ve followed TDD for the backend so that we’re writing code that adheres to the requirements that the tests define, but when it comes to the UI tests we’re writing tests that satisfy the implementation of the feature. As you can see, this is a little contradictory and kind of goes back on the point of why TDD is being used in the first place.
So here I want to look at why this is the case and how we’re experimenting a change. But why was this the case in the first place?
For existing activities in our application, it’s always been difficult to work with them because of how they are coded. Not exactly an excuse as such, but the numerous dependencies, responsibilities and tight coupling make them extremely difficult to test. For new activities that we’ve been adding, out of habit I myself have always written UI tests after the implementation – there’s no other reason for this except it’s been a habit. However, when creating our boilerplate ready for new projects I got thinking about a change. And you’ll be glad to know this habit has been broken and we are now bettering ourselves by exploring TDD for UI tests also ??
Getting started
What we’re going to be following here is a pretty simple example, this is so that the concept is easy to follow and understand – hopefully, it is enough to see some benefits of this approach ?
We’re going to begin by creating a barebone activity. We need to do this so that we can actually run our UI test – think of this setup as the foundation for our implementation, rather than the implementation itself. Here is what our barebone activity looks like:
class LoginActivity: AppCompatActivity(), LoginContract.View {

    @Inject lateinit var loginPresenter: LoginContract.Presenter

    override fun onCreate(savedInstanceState: Bundle?) {
        super.onCreate(savedInstanceState)
        setContentView(R.layout.activity_login)
    }

    override fun setPresenter(presenter: LoginContract.Presenter) {
        loginPresenter = presenter
    }

    override fun showServerErrorMessage() {
        TODO("not implemented")
    }

    override fun showGeneralErrorMessage() {
        TODO("not implemented")
    }

    override fun showProgress() {
        TODO("not implemented")
    }

    override fun hideProgress() {
        TODO("not implemented")
    }

    override fun showInvalidEmailMessage() {
        TODO("not implemented")
    }

    override fun hideInvalidEmailMessage() {
        TODO("not implemented")
    }

    override fun showInvalidPasswordMessage() {
        TODO("not implemented")
    }

    override fun hideInvalidPasswordMessage() {
        TODO("not implemented")
    }

}
You’ll notice that this activity is doing nothing but the initial setup that an activity requires. In the onCreate() method we simply set the layout reference, we also have the reference to our View interface which the activity has implemented – but you’ll notice that these have no implementations yet.
One of the most common things we do in Espresso tests is reference views and strings by resource IDs found within our application. Because of this, we again need to provide a barebone layout file for use by our activity. This is because of a) our activity needs a layout file to display a layout during the tests and b) we need view IDs in place to reference in our tests. Let’s go ahead and make a really simple layout for our login activity:
<? "1.0" "utf-8"?>
< xmlns:android="http://schemas.android.com/apk/res/android"
    android:layout_width="match_parent"
    android:layout_height="match_parent"
    android:orientation="vertical">

    <
        android:id="@+id/input_email"
        android:layout_width="match_parent"
        android:layout_height="wrap_content" />

    <
        android:id="@+id/input_password"
        android:layout_width="match_parent"
        android:layout_height="wrap_content" />

    <
        android:id="@+id/button_login"
        android:layout_width="match_parent"
        android:layout_height="wrap_content" />

<>
You’ll notice here that we haven’t bothered with any styling or position, remember – we’re creating a foundation and not an implementation just yet.
And for the last part of the setup, we’re going to go ahead and define any strings that are going to be used in this activity. Again, we’ll need to reference these in tests – don’t add them to your XML layout or activity class yet, just define them in your strings.xml file.
< "error_message_invalid_email”>…</string>
<string name="___><>
You’ll notice that from this setup we’re writing as little as possible, but providing enough details in our activity and its layout to write tests for it. Our activity is not functional at this point in time, but it opens and has referenceable views. Now we have enough to work with, let’s go ahead and add some tests.
Adding tests
So we have three situations that we know we need to implement, so we’re going to write some tests for them.
- When the user doesn’t enter a valid email address into the email input field, we need to display and error message. So we’re going to write a test that checks that this error message is displayed.
- When the user starts typing into the email input field again, the above error message needs to disappear – so we’re going to write a test for this.
- Finally, when the API returns an error message, this is to be shown in an alert dialog – so we’ll add a test for this too.
@Test
fun invalidEmailErrorHidesWhenUserTypes() {
    activity.launchActivity(null)

    onView(withId(R.id.button_login))
            .perform(click())

    onView(withId(R.id.input_email))
            .perform(typeText("j"))

    onView(withText(R.string.error_message_invalid_email))
            .check(doesNotExist())
}

@Test
fun invalidPasswordErrorDisplayed() {
    activity.launchActivity(null)

    onView(withId(R.id.button_login))
            .perform(click())

    onView(withText(R.string.error_message_invalid_password))
            .check(matches(isDisplayed()))
}

@Test
fun serverErrorMessageDisplays() {
    val response = ConnectResponseFactory.makeConnectResponseForError()
    stubConnectRepositorySignIn(Single.just(response))
    activity.launchActivity(null)

    onView(withId(R.id.input_email))
            .perform(typeText("joe@example.com"))

    onView(withId(R.id.input_password))
            .perform(typeText(DataFactory.randomUuid()))

    onView(withId(R.id.button_login))
            .perform(click())

    onView(withText(response.message))
            .check(matches(isDisplayed()))
}
Cool, so we’ve got our tests written – let’s go ahead and run them.
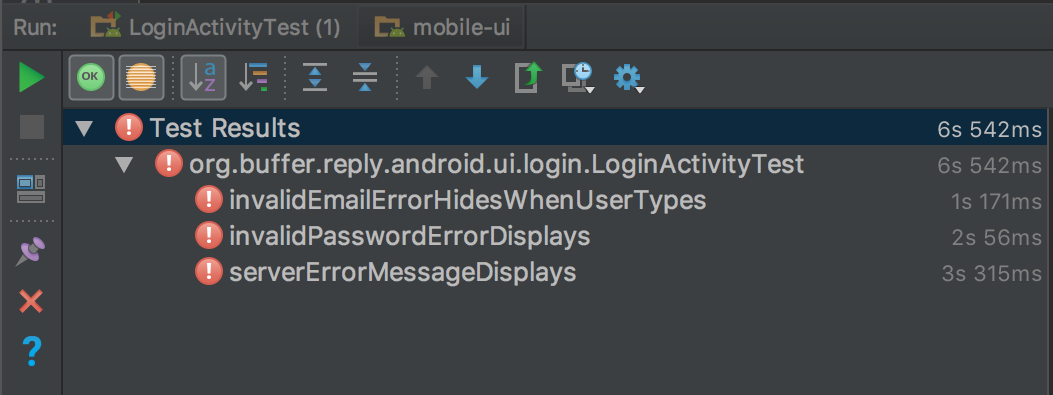
And to no surprise, they failed – this is because we have no implementation yet, so it is to be expected ? If anything, we should be happy to see some red lights for the tests here – I bet that’s a first!
So now we need to add implementations for our activity until the tests pass. Because we’re writing focused tests that only test a single concept (or at least, we should be!), we’ll be able to add implementations one-by-one and also watch our tests go green one-by-one.
So let’s take a look at one of the failing tests, we will begin with the invalidPasswordErrorDisplayed() test. We know a few things here:
- To trigger the login process, the user will type their password and then hit the login button, because of this we need to implement a listener for the login button that calls our presenter login method:
private fun setupLoginButtonClickListener() {
    button_login.setOnClickListener {
        loginPresenter.performSignIn(input_email.text.toString(),
                input_password.text.toString()) }
}- When the user doesn’t enter a password into the password field, we need to implement the logic to show this error message. We’re using a TextInputLayout component so we can simply assign the value of its error message to our error string we defined earlier:
override fun showInvalidPasswordMessage() {
    layout_input_password.error = getString(R.string.error_message_invalid_password)
}
Now we’ve added the logic for this situation, lets go ahead and run our tests again!
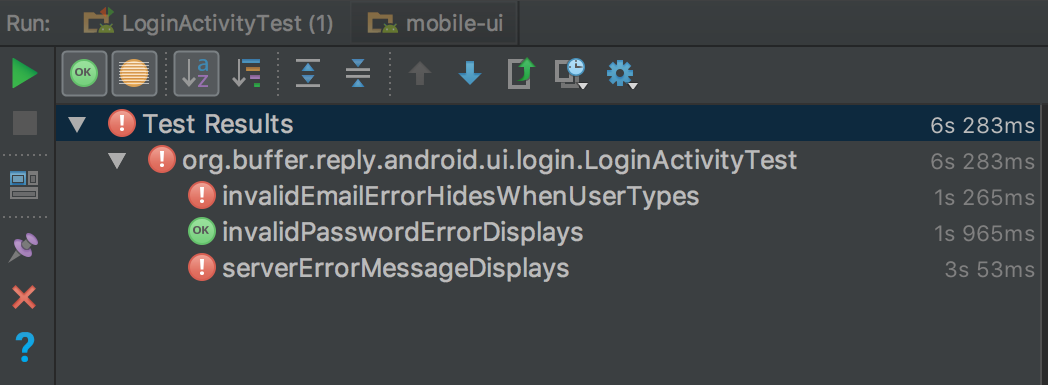
Sweet, looks like the invalidPassworrdErrorDisplays() test passed successfully. But we’re not done yet, we still have two tests which are failing for parts of our login feature that we need to implement.
We’re going to take a look at the serverErrorMessageDisplays() test next. This one is pretty simple, we know that when the API returns an error response (so not a generic error from our networking library) the application should show the error message to the user within an alert dialog. For this, we simply need to create an instance of a dialog, using our server error message within the text of the dialog:
override fun showServerErrorMessage(message: String) {
    DialogFactory.createSimpleInfoDialog(this, R.string.error_message_login_title, message,
            R.string.error_message_login_ok).show()
}
Let’s go ahead and run those tests again:
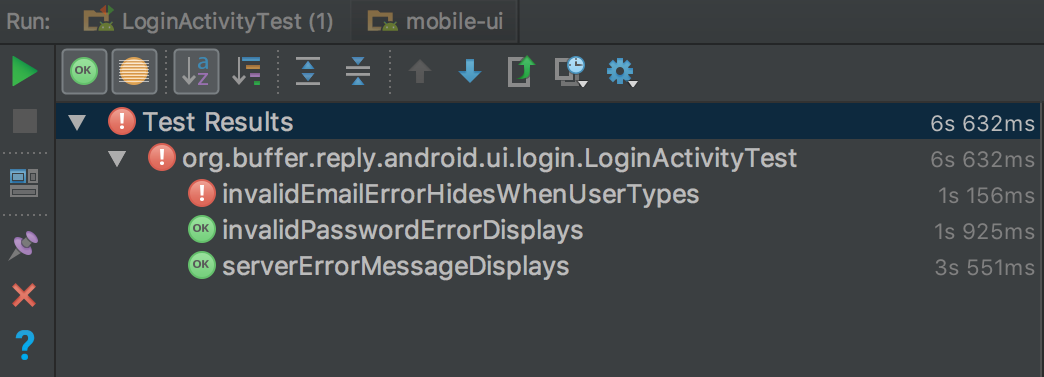
Woohoo! ?? We’re getting there, now we only have the one test left to go, this is the invalidEmailErrorHidesWhenUserTypes() test. Again this is a simple case, but let’s break it down:
- When the user hits the login button and there is no email address, or an invalid email address, that has been entered we display an error message to the user. We have already implemented this, I have just excluded it for simplicity sake ?
- However, when the user starts typing in the field again the error message should be removed from view. For this, we need to listen for when the text content of the input field changes:
private fun setupOnEmailTextChangedListener() {
    input_email.addTextChangedListener(object : TextWatcher {

        override fun afterTextChanged(s: Editable) {}

        override fun beforeTextChanged(s: CharSequence, start: Int,
                                       count: Int, after: Int) {
        }

        override fun onTextChanged(s: CharSequence, start: Int,
                                   before: Int, count: Int) {
            loginPresenter.handleEmailTextChanged(s)
        }
    })
}
That should now be enough to ensure that our error message is hidden when the content of the input field is changed. But we have the tests to run, so that will conclude our changes:
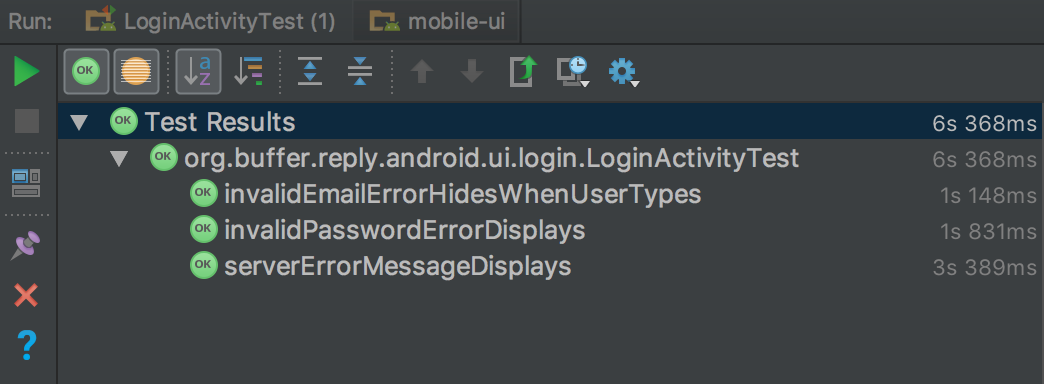
Sweet! Our implementation requirements are in place as our tests are passing – it’s great to see all those greens ?
Conclusion
It’s important to note that this is an incredibly simple example that we’ve applied TDD to. Imagine if we’re developing a complex screen, such as a content feed where multiple actions can be performed on the items in the feed (like in the Buffer for Android app) – in these cases, there’s a lot of different features that we will be implemented in a given activity/fragment. These situations are where TDD in UI test will shine even more as what could end up in us writing overly-complex code for these features can be reduced to implementations that satisfy the given tests that we have written.
To finish off, let’s look at some points learned from this:
- I’ve sometimes spotted people saying that TDD slows down development. I didn’t feel like that was the case here for several reasons. To begin with, Espresso is a written in a fluent language (the view/text followed by the expected state), so these tests take very little time at all to write. When it came to writing the activity logic, I felt like my requirements were clearly laid out and my tests were there to verify the behavior. This removes the case of writing tests to satisfy code and actually writing tests based on the requirements of the implementation.
- In turn, this point means that in more complex implementations than the example, we’re likely to write less code than we would if we write tests after wards. This is because we’re writing code to satisfy our tests, so once our tests pass it means our implementations are good to go (provided we write our tests correctly!). Because of this, it’s important to write small and focused UI tests, as if we start grouping multiple test cases into single tests then it’s likely we will miss something out somewhere.
- I felt that writing tests first for the UI gave me an even better and clearer understanding of the requirements for what I was implementing, something that wouldn’t always be in place otherwise. This, in turn, would likely cause the development process for the implementation to be shorter in length, opposed to the view of others mentioned in the first point.
- The approach ensures that we are writing a complete test suite. Tests will not be forgotten about or not not-implemented, as our requirements are stated by our tests – so as we need to implement things the tests are written first, which makes it pretty hard to go about missing some out, or them being left out for whatever reason.
- It feels more natural. Because of TDD already being followed for Unit tests, it feels a bit backwards writing Unit tests, followed by an implementation, followed by User Interface tests. It feels more of a natural flow to be all in with TDD, rather than going about it in a halfway fashion.
Are you already following TDD when writing your UI tests and are doing something similar or completely different? Or do you want to learn a little more and have some questions? Feel free to comment below or drop us a tweet over at @bufferdevs ?
Try Buffer for free
200,000+ creators, small businesses, and marketers use Buffer to grow their audiences every month.


