

As you may have heard recently, BuddyBuild ended support for the Android platform as of March 1st. When we heard this news there was a lot to think about – after all, we were very happy with what BuddyBuild had been doing for us up until now. What CI will we go for? Does it handle UI testing for us? Will it handle automatic deploys for us? How difficult is it to setup for mobile projects? Does it cater for both Android and iOS?
We narrowed our trials down to two platforms CircleCi and Bitrise. In the end, we decided that Bitrise felt like that right platform for us to go for, why?
- Bitrise feels like it was created with mobile in mind. The setup wizard made it quite self-explanatory how to set up a project and get your builds running
- Their support was top notch. We had a few issues that were occurring and they were more than happy to help and also very quick to respond. Special shoutout here to Tamas who had a couple of these conversations with me ??
- The UI is very intuitive – builds use the concept of workflows, chaining new parts onto a workflow is done in a very logical way making it easy to maintain your build process.
There’s plenty of other great things about Bitrise which we’ll look at throughout this article, but I want to dive into how you can set up your own project in Bitrise ?
Adding your project to Bitrise
When you begin the flow for adding a project to Bitrise, the initial project wizard setup is super handy and does a lot of the hard work for you ? At first, you’ll be shown a screen that allows you to select the repository you wish to add, for us we’re going to add the Reply project from Github:
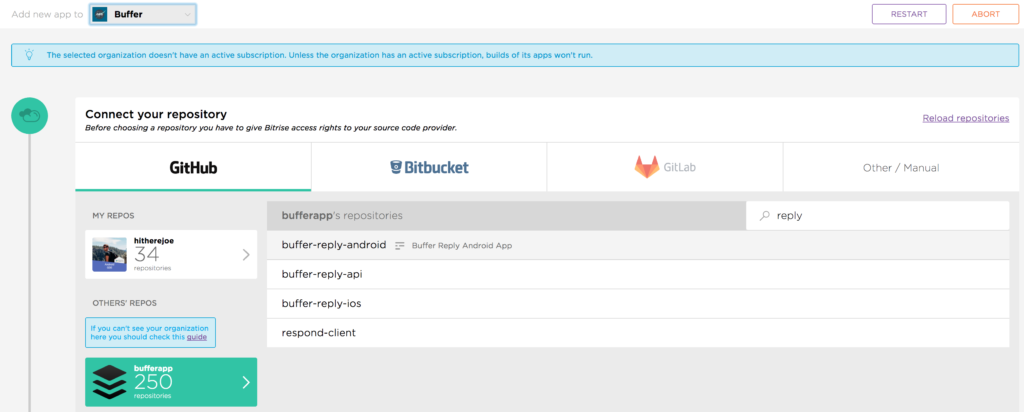
Great! Step one is done and we’ve added a repository to our Bitrise project, next we just need to setup the access requirements – we’re not using any external private repositories so we’re just going to select ‘auto-add SSH key’:
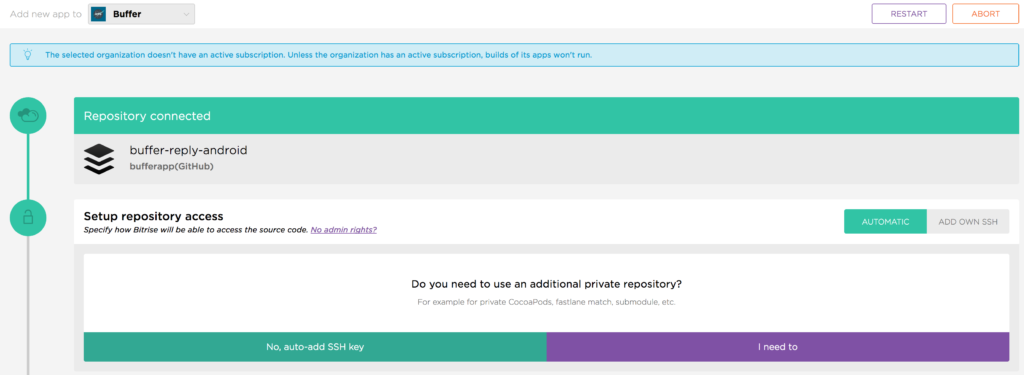
Next, Bitrise will run a scan for us on a branch of our choice – this is to verify that everything so far is setup correctly. Once you’ve hit a branch, select the next button to kick off the process:
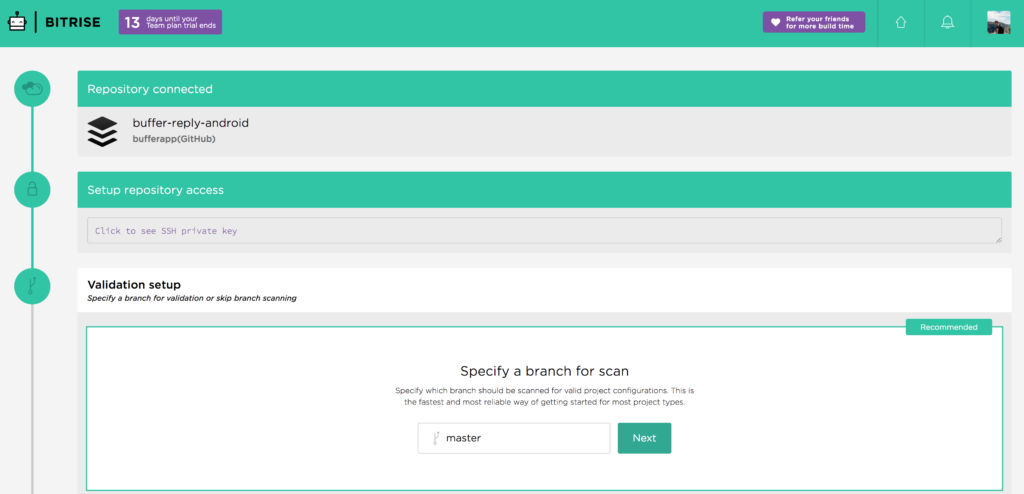
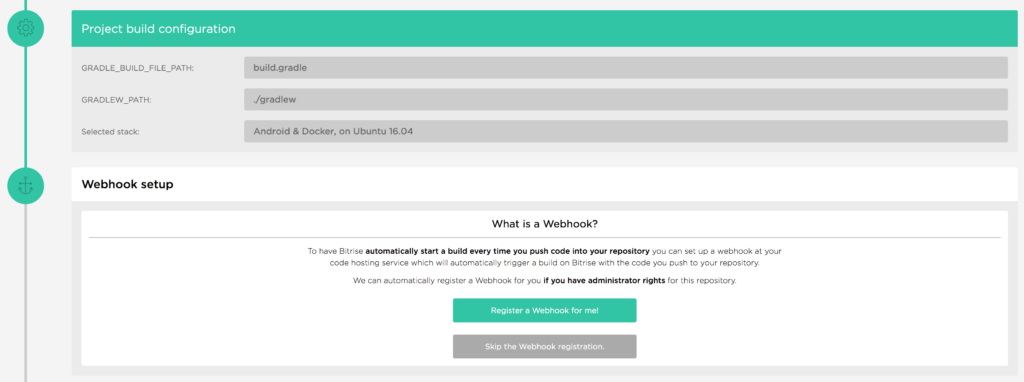
Once that has succeeded (you may need to give it a few minutes) you’ll be able to add some project build configuration details and set up a webhook, this allows you to trigger builds whenever commits are pushed to your repository or if a pull request is opened.
Great! Now our project has been successfully added to Bitrise! As you can see from those steps, the setup wizard does a lot of that for us. Our project is now in Bitrise, but we’re going to want to configure a workflow to be run whenever our project is to be built.
Setting up your workflow
Once you’re in the dashboard section for your project, you’ll notice the header navigation for making your way around your project:

At this point, we’re going to want to select ‘Workflow’ so that we can configure our project builds. When you’ve selected this item, you’ll notice that you’ll already have a ‘primary’ workflow that has been created for you – we’re going to go ahead and keep this one, adding a few things to it for our Android builds. If you ever want to create another workflow, you can do so by selecting ‘+ Workflow’ from within this screen. Now the workflow you may have might end up looking a bit different from what we have, but it gives you an idea of what you can do.
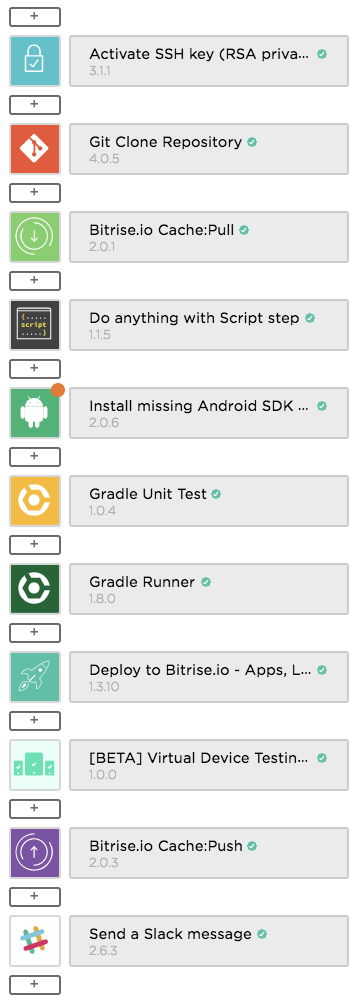
This looks like a lot, but let’s break down what’s happening here:
- Step 1: Activate SSH key
This step is required due to our private repository, activating the SSH key allows access to our repository so that the workflow can be executed. This step will be automatically added to your workflow if you used the setup wizard for your private repository.
- Step 2: Git Clone Repository
Next, Bitrise needs to clone our repository so that the workflow can be executed on it. This step is automatically added to the workflow if you used the setup wizard and uses the provided repository URL from that setup process.
- Step 3: Bitrise.io Cache:Pull
This step will load any cached builds into the workflow as an attempt to speed up the build process. Again, this is automatically added and you likely won’t need to touch this workflow step.
- Step 4: Script step
This step is automatically added to your workflow. However, we actually removed this as it is not required unless you need to execute some form of bash script for your project.
- Step 5: Install missing Android SDK
This one is automatically added to Android projects – it will helpfully check that we are all up to date with the latest SDK components in our workflow, awesome!
- Step 6: Gradle Unit Test
Because we want to run our Unit Tests before giving the green light for our build, this step allows us to run our projects unit tests. We can customise this step with several variables including setting the build path to be used for unit tests, the test task to be executed (e.g. the gradle test task) and any test flags you may wish to use.
- Step 7: Gradle Runner
This step is used to run the provided gradle task(s) and copy the APKs generated into the Bitrise
deploy directory. So for example, here you may want to build an APK for debug or release purposes and also to run your UI tests against – such as the app:assembleDebug and app:assembleAndroidTest tasks. You can also add additional options for the gradle tasks here if you need to.
- Step 8: Deploy to Bitrise.io
This step was automatically added and chances are you won’t need to change it. This workflow step has the responsibility of deploying the build APKs to the specified Bitrise deploy directory. This option also has the ability to email a given list of addresses if you wish to be notified when this has completed.
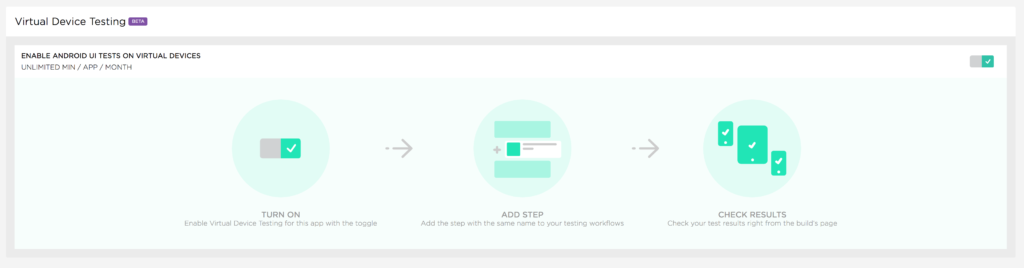
- Step 9: Virtual device testing
This step allows you to run your built APK UI tests within the Firebase test lab ?? We initially had some hurdles setting this up, but when it was up and running it works like a charm! To allow this step to execute you need to be sure you have enabled virtual device testing in your project settings (it doesn’t do this automatically).
Now, within the virtual device testing workflow step we have a few different options that we can configure:
- APK Path – The path to be used for the APK to run the tests with
- Test devices – The devices for the tests to be run on in Firebase (for example – NexusLowRes,24,en,portrait NexusLowRes,24,en,landscape)
- Test type – The type of tests being run (instrumentation, robo)
- Test APK path – The APK to be used when instrumentation tests are run
You can also customise the package ID and runner class if you wish, but by default, these will be grabbed from your manifest / build.gradle files.
We’ll look more at the testing feature after we have gone through the workflow ?
- Step 10: Bitrise.io Cache:Push
This is another workflow step you probably won’t need to touch. Its task is to update the build cache if required, for example, the Pull Request may fail so the cache won’ t be updated in this case.
- Step 11: Send a Slack message
Finally, when a build is successful (or even if it fails) we send a Slack message to our desired channel. From this workflow step you can configure:
- The Slack webhook url
- Target channel / group / username
- Message ‘from’ text (separate for success and error cases)
- Message text (separate for success and error cases)
- Message color (separate for success and error cases)
- Image, Icon and Emoji (separate for success and error cases)
For the textual parts of the message, Bitrise provides access to some variables such as the Pull Request name, build number, url etc so that you can provide sufficient information in the slack message.
Other useful workflow steps
There are many other workflow steps that you can add at any point of your workflow by hitting one of the ‘+’ icons within the workflow, here are some ones you might find useful:
- Update JIRA issues field – Update JIRA issues based on build statuses
- Sonarqube Scanner – Integrate Sonarqube CLI features into your workflow
- Sign APK – Sign an APK for when building release versions of your project
- Set Android Manifest-Version Code and Name – Automatically increment the version name and code number of your app for when building new release version for deployment
- Gradle Coveralls – Integrate Coveralls into your Bitrise workflow
- Google Play Deploy – Deploy builds to the google play console
- Git Tag – Perform Git Tag operations as part of your workflow
- File downloader – Download files during your workflow. This may be useful for keystore or secret files required to build your app
- CodeCov – Integrate Codecov into your Bitrise workflow
Skipping workflow steps if the build fails
Sometimes you may not want to run a workflow step if the build fails. If so, you can add the following to the workflow step in your bitrise.yml file:
is_always_run: falseVirtual Device Testing
Virtual device testing on Bitrise is still in beta, but so far it feels pretty stable to us once we got it set up. If you’ve setup Virtual Device Testing as outlined in the workflow section above, the testing should run automatically once your build (and unit tests) have run successfully.
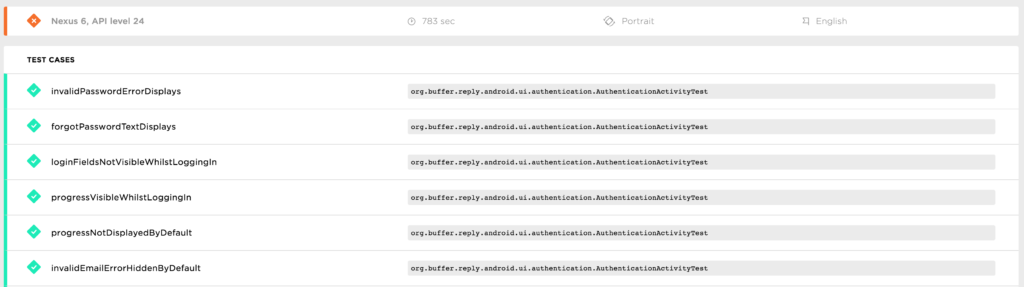
Successful UI tests are displayed for each device, this makes it clear and easy to see which tests have passed for the current build:
And if a build fails then you’ll see a clear stack trace as to what went wrong:

The Virtual Device Testing tab will also contain a video of the test run which is useful for debugging purposes. Another tab in this section allows you to grab copies of the APKs if required:

Conclusion
In this article we’ve taken a quick run through how we can setup Bitrise and the process of a workflow – I hope this run through has provided you with enough information to decide whether or not Bitrise might be right or not for your project (please do still explore the product though as there is plenty of features not covered here!). However, like all great products there are some things which are not quite there yet:
- Unit test results are hard to find. Unlike the Integration tests, we don’t have a clear breakdown of the tests that were successful or not. To find out why a build failed, in this case, we have to head into the logs and search for the failure reason – this can sometimes get a bit time-consuming.
- Build results aren’t always clear. Like the above, if a build fails our Dashboard only states that it failed – not the reason why it failed (UI test, unit test or build error?). Again, we have to dive into the logs (which can sometimes get pretty big) to find out what has gone on.
- We don’t get many logs back from Firebase Test Lab. Because the projects are run through Bitrise and the Firebase Test Lab, we don’t have access to the Firebase logs like we would do when we have access to the Firebase console. When setting up our UI tests we had some tests that were crashing when the tests were run (for some reason), but we weren’t aware of what was happening due to the lack of logs. Luckily their support managed to help us out with this!
- The Slack message integration isn’t quite there yet. The workflow step doesn’t provide enough detail as to which of their environment variables displays what detail – so building a sufficient Slack message takes a few goes to get it right. Not a massive issue, but I feel it is important to get enough detail to your team on this route.
We’re still early users of Bitrise so I’m sure we will find more pros and cons! If you’re already using Bitrise, are thinking of using it and have questions, or need some help getting set up, please do feel free to leave a response to this post ?
Try Buffer for free
200,000+ creators, small businesses, and marketers use Buffer to grow their audiences every month.


