

Header Photo by Alexander Andrews on Unsplash
When it comes to building android applications, there’s no doubt that we’ll need to include some form of navigation to move between the different parts of our app. With modularisation becoming more and more popular when it comes to android development, navigation becomes a big part of this process.
At Buffer we’ve begun creating a lot of shared code between our applications – some of these are utilities, widgets and even features (note, these are not yet dynamic feature modules, instead they are library modules). When it comes to features, often these will need to navigate to another part of the app – however, because these library modules are not aware of the base android app module they are unable to satisfy the navigational requirements in our app.
In this post we are going to explore a solution that not only solves this problem for us, but helps us to separate the navigational concern from the rest of our application, providing us with numerous benefits in the process.
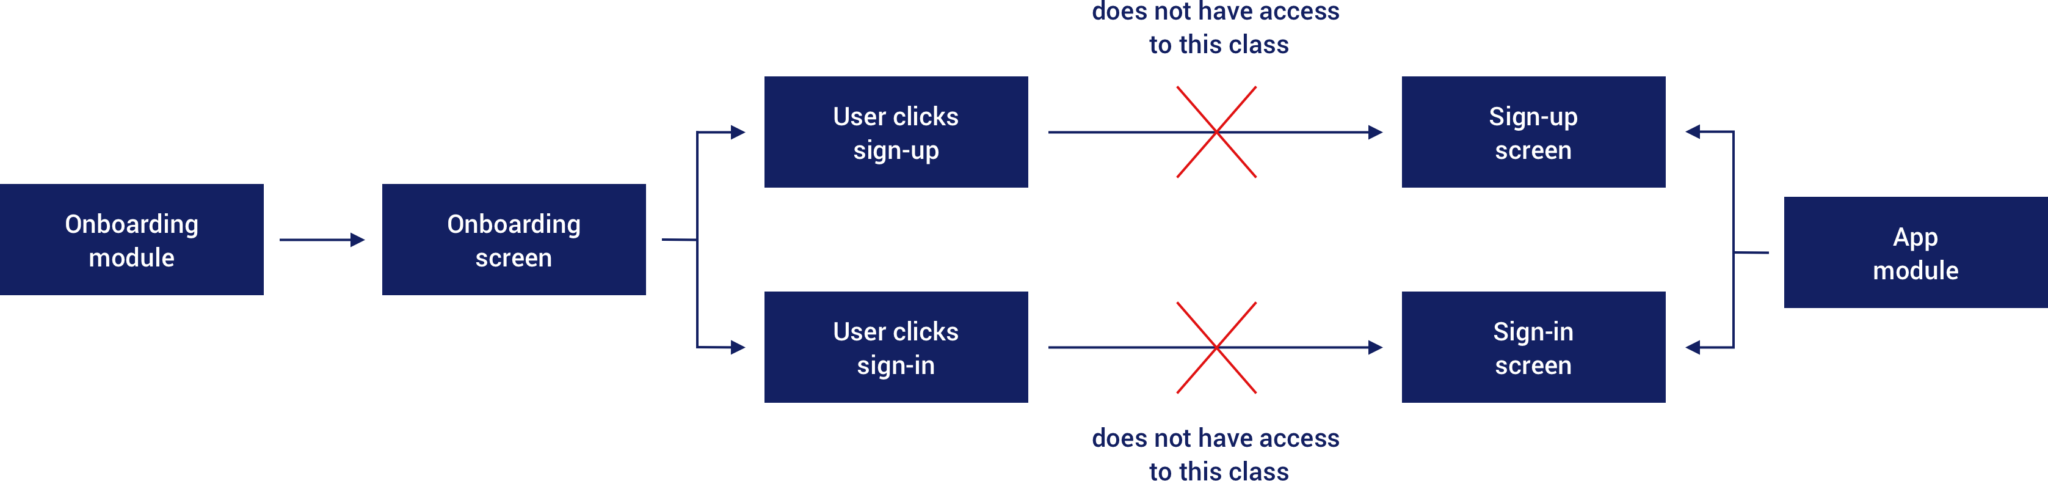
In the example we can see that we can’t easily navigate to some of the screens in our application, purely because we do not have a reference to them. Whilst we are forced to solve this initial problem here, this gets us thinking about navigation in general within our app. With single module applications we would normally handle the navigation by calling startActivity() , followed by passing in an Intent that has a direct reference to the Activity class which we were navigating to. However, this approach brings the question of whether or not our activities should have the knowledge of where it is they are navigating to? If anything, this leaks another concern & responsibility into the activity. As well as this, the class that is launching that activity now has a direct reference to it, which adds to the concepts that our launching class is aware of and being directly tied to that destination – which is something that a library (in most cases) cannot do. Finally, when it comes to the testing of our class, navigation also becomes a concern of these tests too – which reinforces the argument of there being another responsibility that is a part of our activity.
As it is becoming more common now to introduce modularisation to the mix, this is likely to become a common problem faced amongst applications. Because of this and the above issues, it may make sense in some cases to split out the navigation of our app to be handled by some classes outside of the ones which may be currently performing the navigation. Not only does this make navigation possible from these internal library modules, but it helps to separate the concerns of our navigation and it makes it far easier to test the implementations of navigation within our apps.
With all of this in mind, how can we achieve the above when it comes to navigation within our android apps? Let’s begin by taking a look at an approach that meets all of the above requirements.
Because we’re focusing in this post on library modules, let us begin by taking a look at a simple library module we have within our applications. Both of our apps (Publish and Reply) share the same on-boarding screens and because of this, we make use of a shared library that we import as a gradle dependency. This dependency shows a couple of on-boarding steps that the user can swipe through, but the important part here are the two buttons that are displayed to the user. These buttons allow the user to either Navigate to the Sign-Up or Sign-In screens – these are not part of the on-boarding library as currently these following screens are verify different for each of the apps. As previously mentioned in this post, the on-boarding library does not have (and cannot have) a reference to the base app module due to it being a library module. So as it is, it cannot navigate to the activities inside of the base app module – and because it is being reused for multiple apps, the paths to the desired activities will be completely different so this is not something that should be hard coded.
With this in mind, the Onboarding library is going to need to provide an interface which states the navigational requirements that are going to need to be satisfied. This allows the onboarding module to define and enforce these requirements without having any knowledge around the actual details of these actions.
From here, the application module using that onboarding library can implement the interface and satisfy the navigational requirements. So for example, the activity launching the screens of the onboarding library may implement that interface and when the methods are triggered, handle the navigation around sign-up and sign-in.
Whilst in the process of implementing this however, it got us thinking about the responsibility of navigation. Our activities and fragments are already handling other things, we could make an improvement here by removing this responsibility from these components and handling the navigation elsewhere.
For this reason, we decided to introduce a Navigation module. The purpose of this module is to encapsulate all of the navigational logic of the application – allowing us to remove this knowledge from our activities / fragments and make it far easier to test the navigational aspects of our app.
With this approach, the Navigation module needs to have a reference to the modules that contain the interfaces defining the required navigation. Whilst this module may end up having a reference to multiple modules, this is fine as its not intended to be reusable and is also fulfilling its purpose – it also removes the need to have these dependency references from within our app module itself (in most cases).
Whilst the Navigation module implements the navigation, the Publish module here still needs a reference to navigation for two reasons. First of all, we don’t have Navigation handling its own dependency injection – navigation becomes a part of our Dagger Component and Module that we have configured within our Publish module. This allows us to provide the required injections inside of the onboarding library – whilst this isn’t ideal having this injection requirement here, seeing as it is an internal library this solution works well for us at this point in time.
Another reason why the Publish module needs a reference to this Navigation module is to account for other navigation requirements throughout the app. Moving forward we will not be restricting this to library modules only – as we move to decouple more features within our application, these will use navigation interfaces within their corresponding packages (even if not yet modularised) – so having this reference to the navigation module helps us to achieve that.
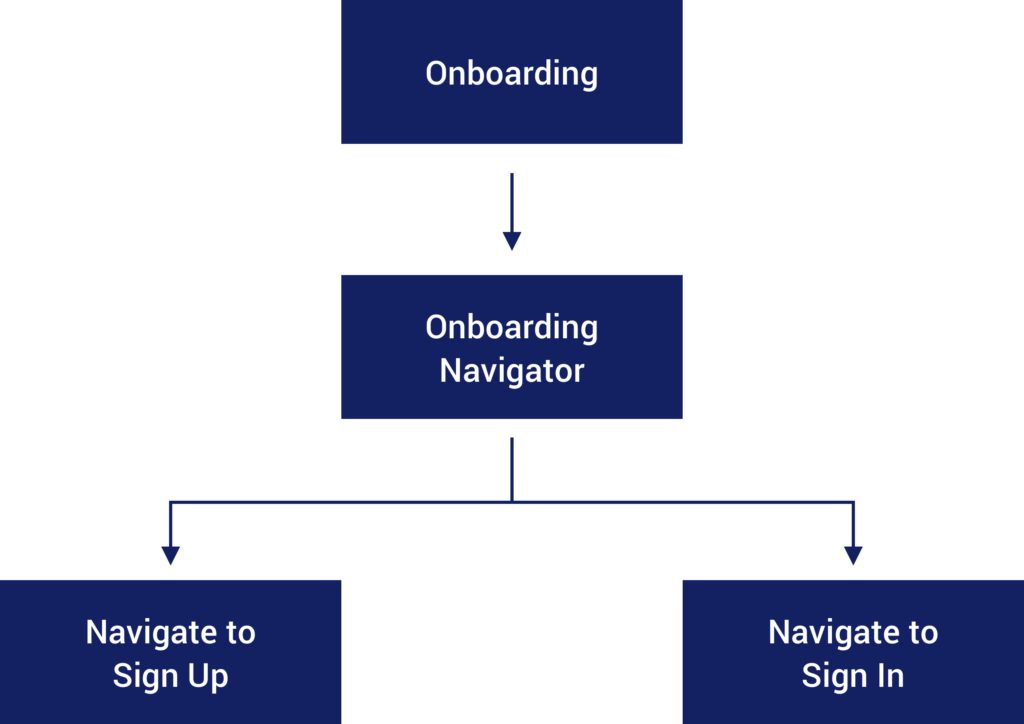
When it comes to this Onboarding module, as previously mentioned, it will define an interface (lets call it the OnboardingNavigator) that defines the the required navigation. This might look a little something like this:
interface OnboardingNavigator {

    fun showSignUpForm(activity: Activity)

    fun showSignInForm(activity: Activity)
}
We pass in the activity here so that the onboarding module can completely handle the navigation to the next destination. We do not want to navigate here using string declarations of activity paths, so some form of context is required here.
Within our Navigation module we’re going to want to provide an implementation of this interface – this allows us to implement the required functions and launch the required activities when those functions are triggered.
class OnboardingCoordinator @Inject constructor() : OnboardingNavigator {

    override fun navigateToSignUp(activity: Activity) {
        activity.startActivity(...)
    }

    override fun navigateToSignIn(activity: Activity) {
        activity.startActivity(...)
    }
}
Here we actually use the path of the activity to satisfy the intent. This way we do not need a reference to the base app module of our project within the Navigation module, the same goes for the other destinations that we might navigate to.

Then, when it comes to the library module, we can initialise a new instance of our coordinator inside of where it is used. If you are using dependency injection, you can inject this into the library module by injecting the interface type and then access the functions of that interface as desired:
@Inject lateinit var onboardingCoordinator: OnboardingNavigatorNow that we have access to the OnboardingNavigator reference we can make use of it to trigger the required navigation. So for example, here we have a click listener set on one of the buttons within the onboarding screens – when that button is clicked we can call the corresponding interface function.
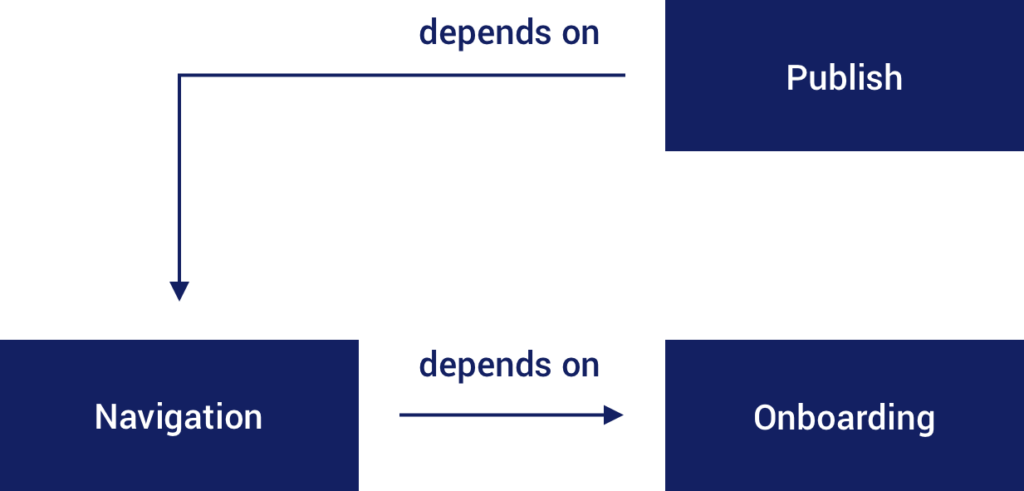
button_new_user.setOnClickListener { onboardingCoordinator.navigateToSignUp(this) }When it comes to these library modules in our applications, we will generally have the kind of structure that is stated below. This outlines the dependencies that will occur between the Navigation module and the specified feature Library module.

But for any feature library module that we have implemented, we’ll end with a similar approach regardless of what the feature is. With that in mind, we can summarise that the navigation for these modules will take on a general structure when it comes to handling navigation.
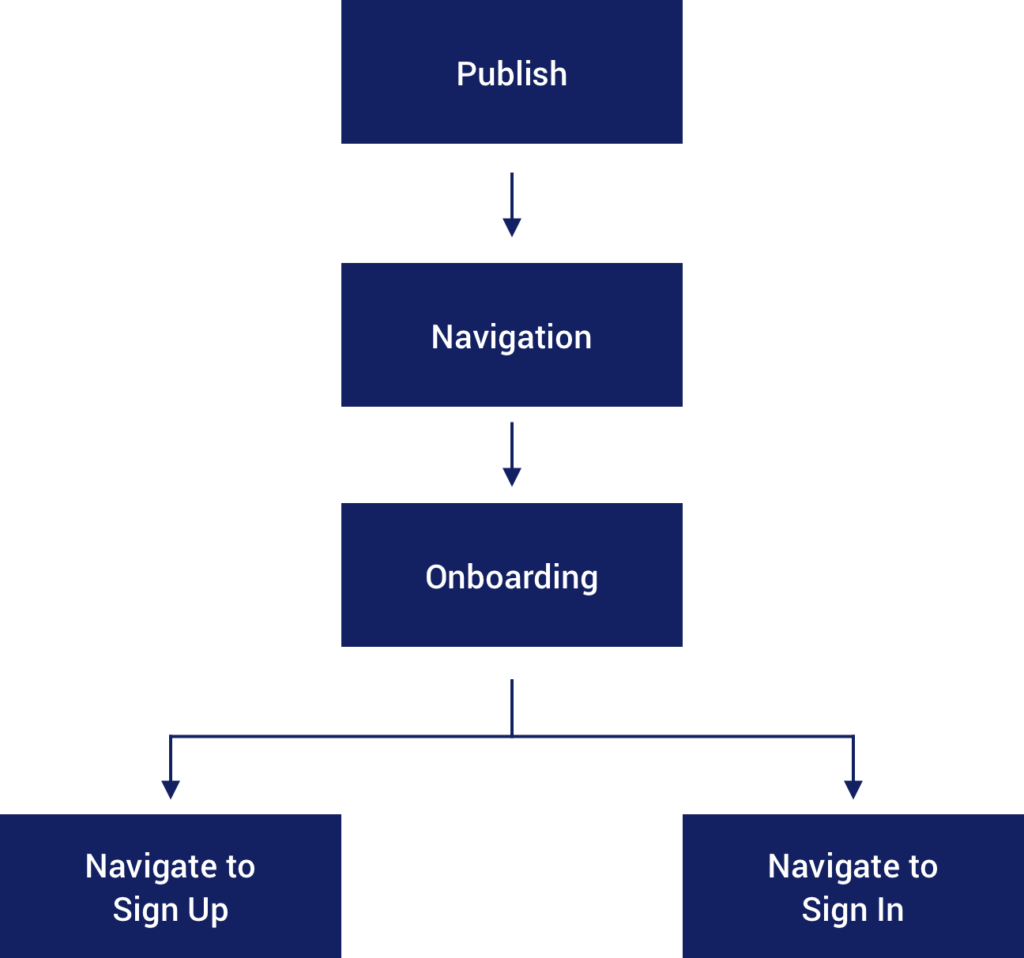
To conclude the above approach to handling navigation when working with android library modules, overall we end up with something that looks like this:
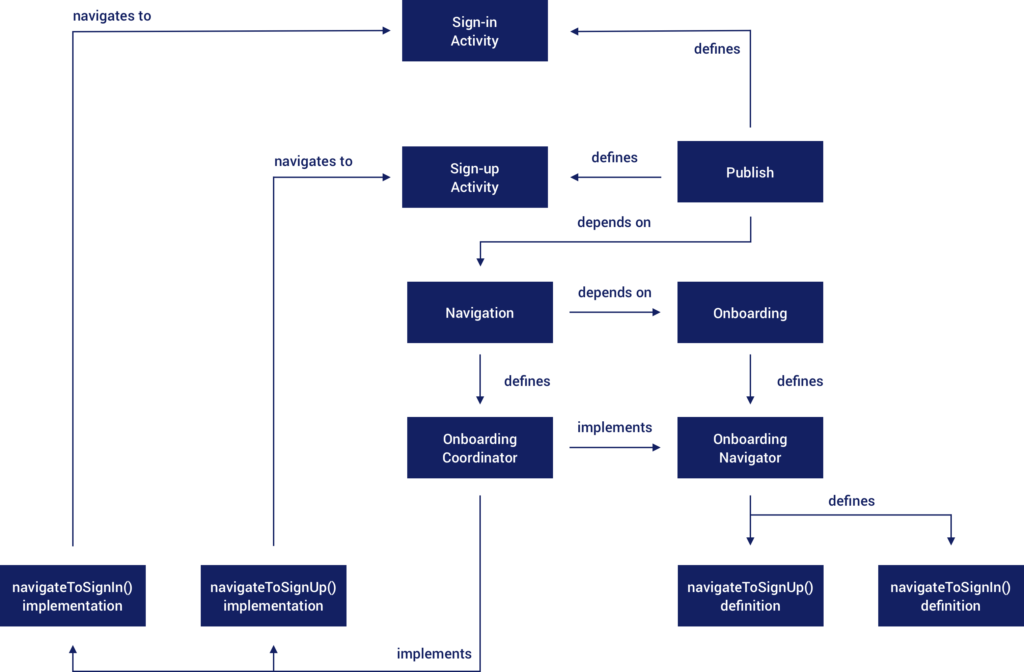
In this diagram it may look like there is a lot going on, but some of these boxes just represent the functions that we define within the interfaces, along with the implementations. We can see here the different steps of this article pieced together into a complete solution. To summarise this we end up with:
- A library module that defines the navigational requirements in the form of an interface
- A navigation module that is responsible for implementing the navigation that is defined within that library module
- An app module which configures this navigation module for dependency injection and also to provide navigation should any other parts of our project need it (this part is subject to your project structure)
With the three core concepts in mind, we can see that we now have a clear separation of responsibilities when it comes to navigation, keeping our classes more lightweight and focused. We also see the benefits when it comes to testing too, now our tests for our activities / fragments no longer contain checks for specific intents being launched – however, we can still test these behaviours for our coordinator classes. For example, we could write a small test for our coordinator to ensure that the correct navigation remains in place:
@Test
fun showSignUpFormNavigatesToEmailConnectForSignUp() {
    main.launchActivity(null)
    Intents.intending(IntentMatchers.anyIntent())
        .respondWith(Instrumentation.ActivityResult(Activity.RESULT_OK, Intent()))

    onboardingCoordinator.showSignUpForm(main.activity)
    intended(allOf(hasComponent(Activities.EmailConnect.className),
        hasExtra(EXTRA_CONNECT_TYPE, 0)))
    Intents.release()
}
We can also do a similar thing from UI tests. Whilst we are not testing here to check whether a specific activity is launched, we can still verify that the navigator instance was interacted with as expected:
verify(onboardingNavigator).showSignUpForm(...)As we move forward with features we will take the same approach that has been taken above to satisfy navigation throughout our app. Even for features that are not yet modularised (or able to be modularised, for example due to tight coupling) we will be able to take a similar approach by using the navigation module whilst experiencing all of the advantages listed above.
At the same time it’s important to note that this may not be applicable to all applications, before putting this in place (like any technical approach) it’s important to ask if you need this. When it comes to library modules where we cannot access specific classes it feels appropriate as we need some form of interface in place anyway. But for the case of your applications without this modules in place, yes it’s a benefit but is not the be all and end all.
Try Buffer for free
200,000+ creators, small businesses, and marketers use Buffer to grow their audiences every month.


