
Modularization in android applications is nothing new – I previously outlined the different types of modularization and the advantages they bring over in this post, and in this article we’re going to be focusing on feature modularization. When thinking about about modularization, at first it may appear as a case of moving a collection of files over. But what about the Dependency Injection setup? References to classes in different modules? How will the tests be configured? When it comes to modularization there are actually a lot of questions that may arise when it comes to your project. In the last few weeks I started to think and plan about how we can modularize our application into feature modules and in this post, I want to share some of the thoughts, steps and learnings that have come from this initial process of architecting for feature modularisation.
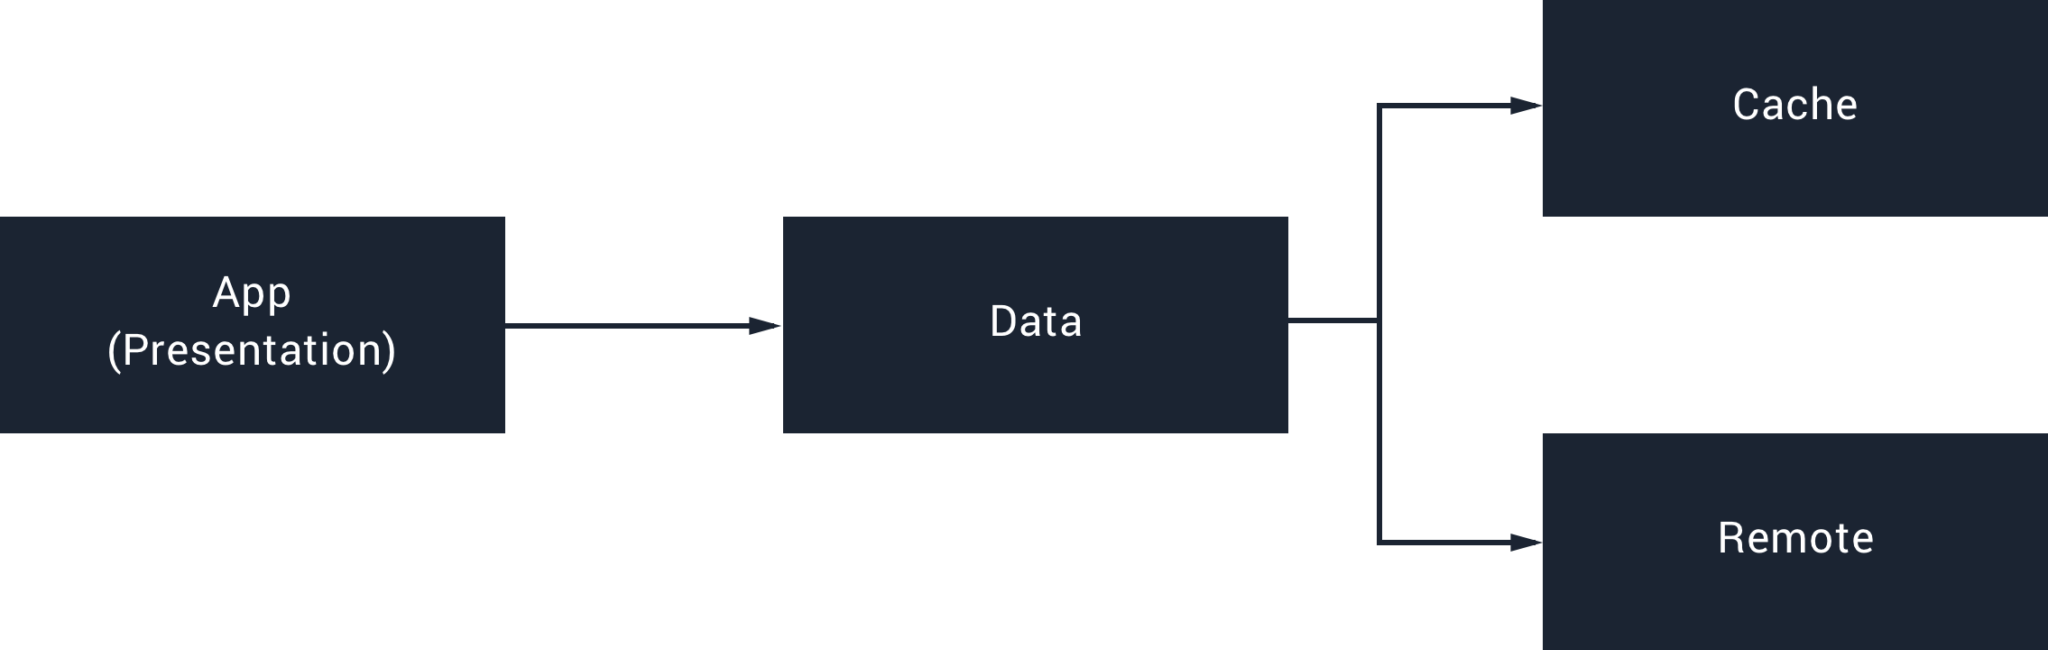
Whilst we already have a modularised application, the module structure we have is focused on the different layer responsibilities of our application. This in itself brings us many advantages to the project and currently it looks a little something like so:
As well as the advantages that already brings us, we also want to make the most out of feature modules to help us improve our codebase and product even further. And just to illustrate an example of what this may look like:
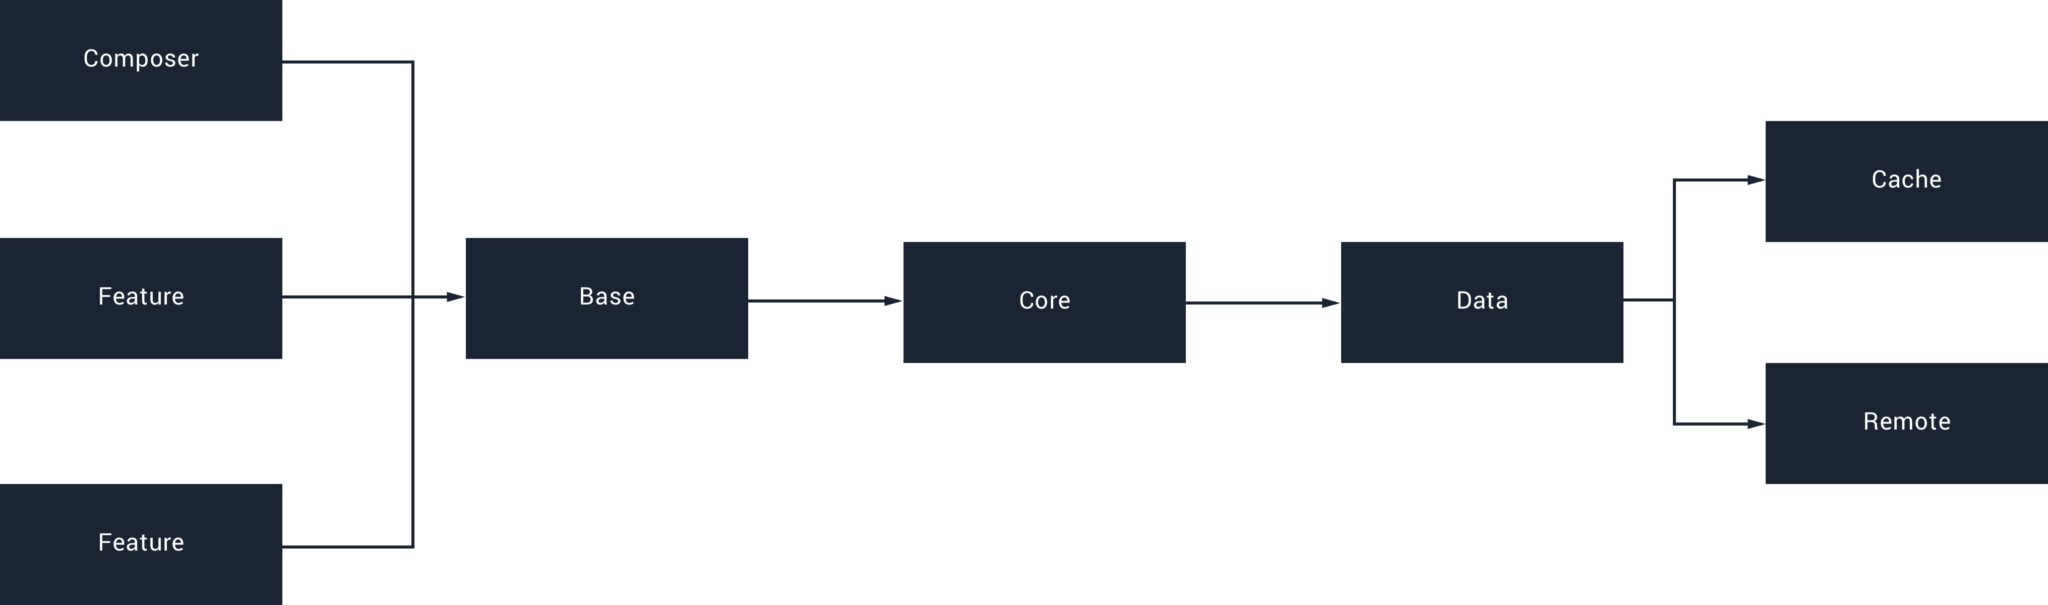
As you can see, this extra step in modularisation reduces the size of our main UI module and decouples the features of our application into their own corresponding modules. Not only will this gives us the same benefits that we have from layer modularisations, but it means that we can also make use of app bundles and dynamic delivery (where necessary).
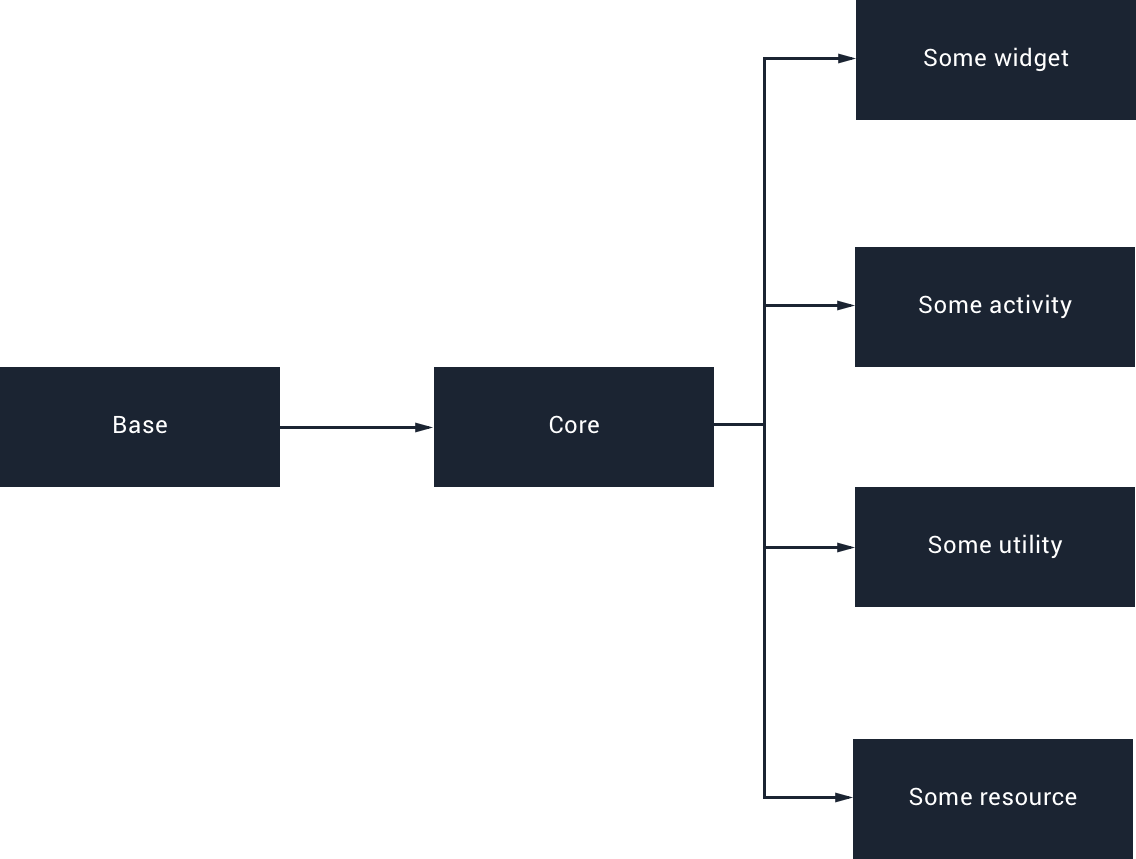
Before you start, it’s probably good to try and think of a vision for your feature modularisation. Yes you could just crack on and start moving things around, but without thinking about things first you may end up making mistakes and / or creating more work for yourself in the long run! Whilst for larger applications you will likely be start within a single module, thinking about this bigger picture will help clarify the “what ifs” and “hows” that you will likely encounter. For example, in the case of Buffer Publish our android app could eventually be split into these different feature modules:
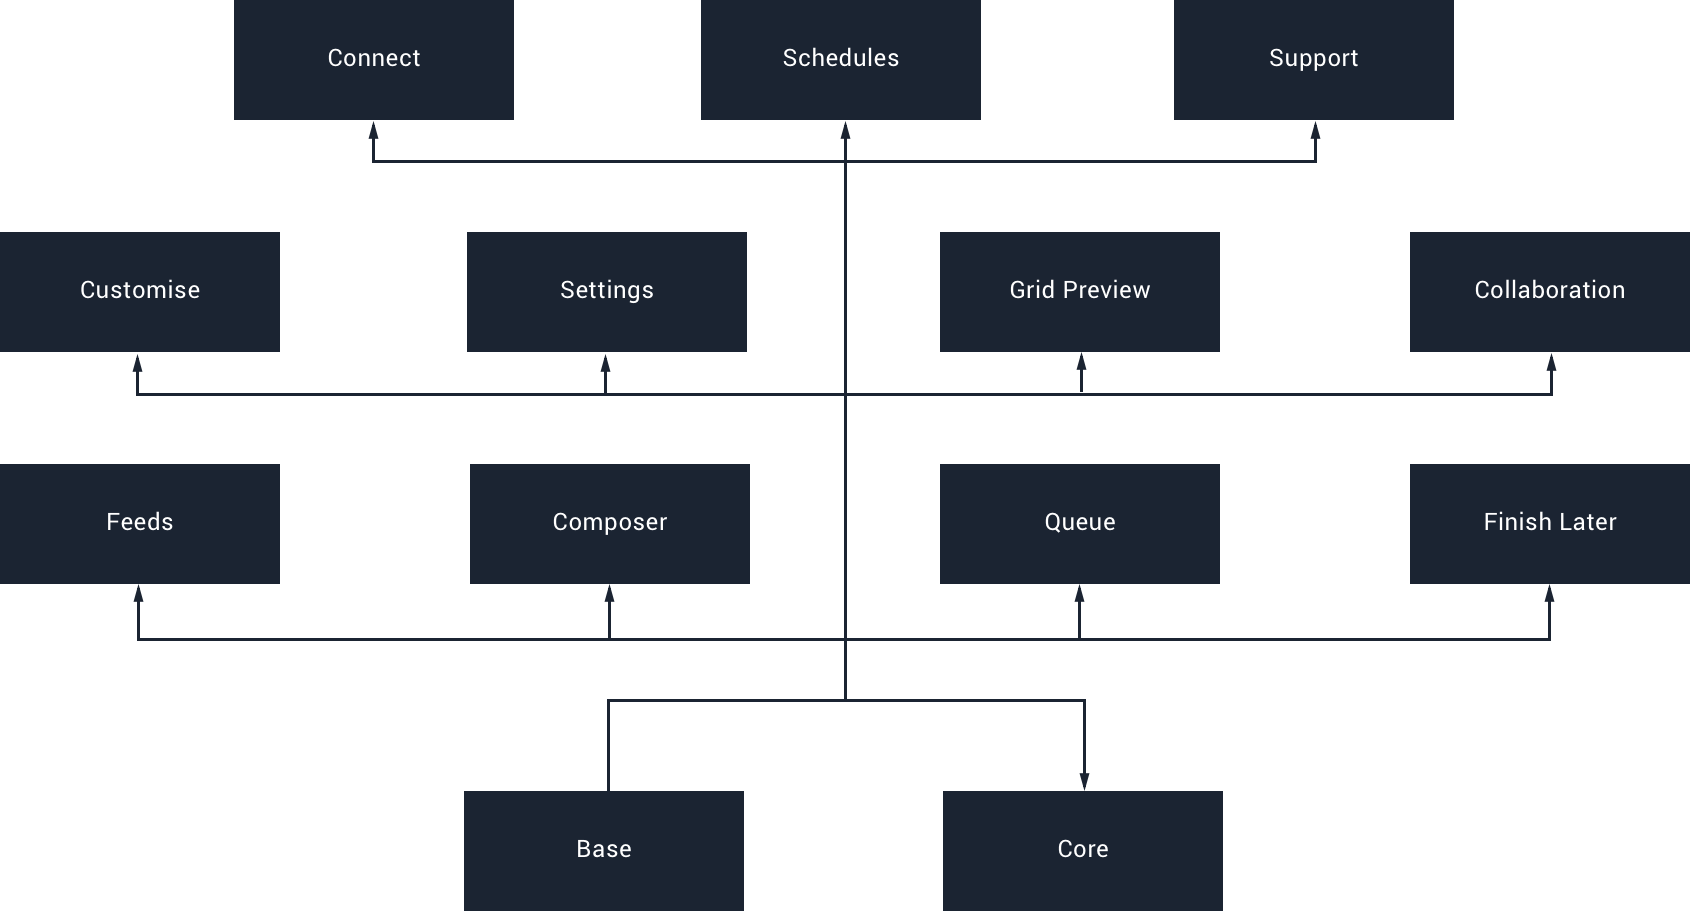
Whilst this seems like a lot, feature modules are not just about making use of app bundles. Having this modularisation allows you bring other advantages to your project too, such as a seperation of responsibilities, easier navigation, ownership and an overall easier to maintain / test project.
We approached this by beginning with the central point of our application – the Composer. This is also the most decoupled, so the task would be slightly less complicated than another part of the app.
Creating a Core Module
To begin with, the central part of our modularised feature application is going to be what’s known as the Core Module. As the name entails, it’s going to contain core parts of our application – be it models, widgets, utility classes, activities: anything that is going to be accessed by more than one of your modules and base module should live inside of the core module.
Note: During refactoring, it’s likely that you’ll end up with a lot of your project within this core module – this may be due to tightly coupled classes, or to help you move quicker and make it easier to avoid conflicts from other branches
Now we have created our core module we need to apply the android library plugin. This is because our core module is going to be accessed as if it is a library dependency and does not need to be executed as an application:
apply plugin: 'com.android.library'Within our core module we will need to declare some dependencies. The easiest way of doing this is by simply moving over the classes which will be used by your base and feature module, following by seeing what it is that needs to be declared as a dependency with IDE errors. Whilst it may be tempting to use the api declaration to declare these dependencies, this is known to slow down build times. We make use of a BuildSrc module that contains our dependencies, along with their versioning, so that all of our modules can access these.
Your core build.gradle file may also need to make use of build config fields – in our case we needed to move a retrofit service factory into our core module, due to it being accessed by some classes that were also moved over to the core module. In this case we needed to move over some API key references also:
buildConfigField 'String', 'BUFFER_API_KEY',
        "\"" + getKey('BUFFER_API_KEY') + "\""
And as well as the above, you’ll also need to move over any shared resources that are going to be accessed by multiple modules. As well as drawables, this is a good time to move any value declarations into the core module (such as dimensions, strings, styles etc) as that they will be in a single maintainable place.
When it comes to dependency injection, this will really depend on your setup. What we have done here though is create a CoreModule which is used to provide any of the classes inside of the core module. This can then be used by our base module to add the required dependencies to our dependencies graph.
At this point you may have a core module that contains a collection of files ready to share across your app. As you move along, it’s likely that you’ll discover things that are missing or things that don’t actually need to be in the core module. When dealing with larger / older codebases that’s more likely to occur as there can often be unknowns.
Feature Module
For this example, we’re going to be looking at the composer feature module that we now have. We chose to modularise the composer first for a number of reasons – it’s the central part of our application and it’s also the most decoupled part, which means the moving of the Composer logic wouldn’t be too much work. For feature modules we’re going to be making use of the dynamic feature plugin:
apply plugin: 'com.android.dynamic-feature'Now, we don’t currently plan on adding this as a dynamic feature as such – the composer is always shipped with the application. However, making use of the dynamic feature module now means that we will be able to take advantage of app bundles and also future proof our architecture – who knows what our app may look like along the line!
The next thing that we need to do is pull everything that is related to our composer into directories within our composer module. This will be activities, fragments, views and any resources that are used. Most of the time this should work as intended, we did notice a couple of things here:
- On a few occasions, references to custom widgets within XML layout files did not update their reference, meaning that this needed to be done manually
- Places where we had made use of R imports has not updated automatically to match the new reference within these moved files
At this point we have our files within our feature module, but we likely have a lot of errors. If we hop back over to our composer build.gradle file, we’re going to setup our configuration here. The contents here do not differ too much when compared to our current base build.gradle file – in the way that we declare the dependencies that are required by our feature module. The dependencies that you need will again be highlighted by the errors that you’re seeing within your class files.
As well as the above, you’ll need to move over any activity / service declarations into the manifest file within your new feature module. You’ll also need to configure the on demand options for this module:
<dist:module
    :instant="false"
    :onDemand="false"
    :title="">
    <dist:fusing :include="true" />
</dist:module>
Here we have several piece of information defined:
- We make use of dist:instant to state that our module is not available as an instant app module
- We state our module as not being available for on-demand install using dist:onDemand
- We don’t wish to apply a title to our module at the moment, so we set this to blank using dist:title
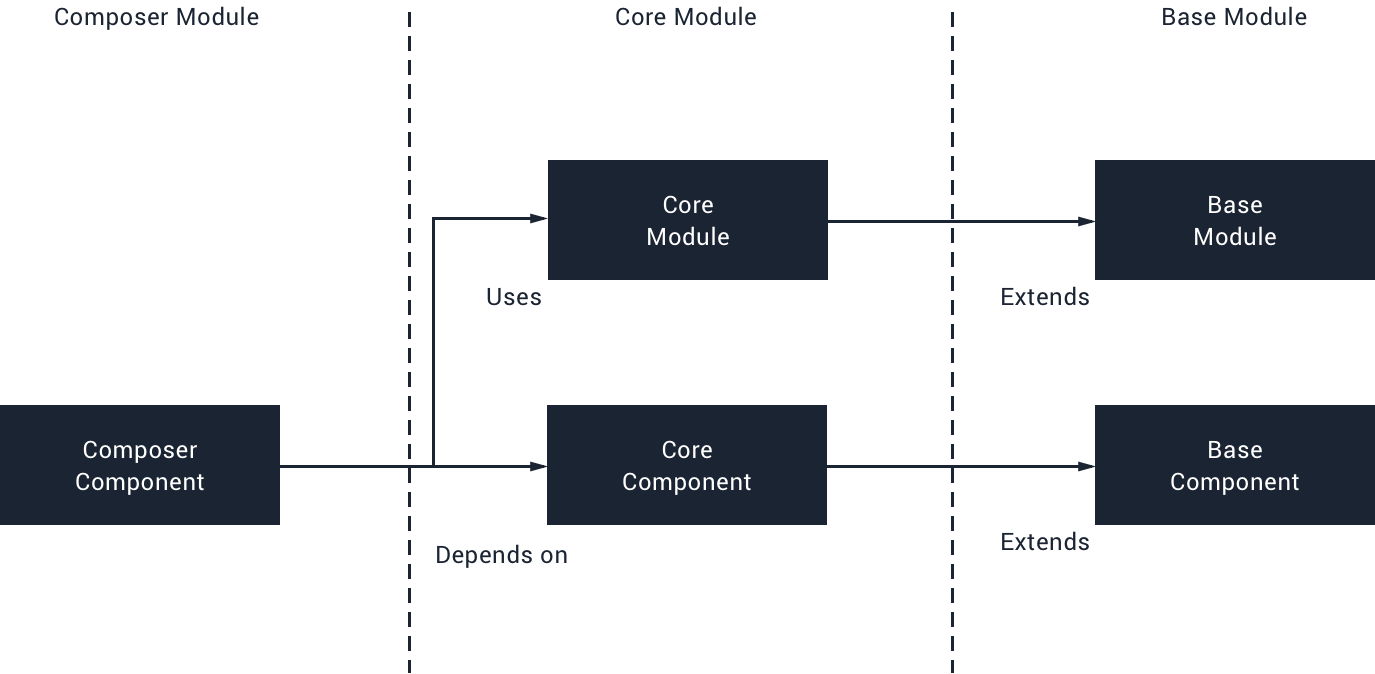
We now have our module all setup – the only thing that was left to do for us was fix our Dependency injection. Now I won’t go into depth here as every applications DI setup is likely to vary – but what we need to achieve is:
- For our feature module to be able to inject its own dependencies where required
- For our feature module to be able to inject core / base dependencies where required
- For our feature module to be able to achieve the above via the DI mechanism of our base module
We ended up with something looking like the below. Within our feature module we create a new component, which both has a dependency on the component defined within our core module and makes use of the dagger module inside of the core module, therefore giving us access to provided dependencies within that module.
As mentioned, this will likely look different depending on what you’re using for DI and how your DI is setup. I’m happy to try and help with any questions here if there are any!
Finally, you’ll also need to move over any tests that you have in place. Unit Tests were pretty straightforward – we had a couple of issues where classes from our base module could not be located, these needed to be moved to the core module in order for the unit tests to function. We’re still trying to nail down the reason why (the error messages weren’t very descriptive) but it’s likely due to an Android App module trying to be referenced from the Unit Test suit. When it comes to Integration Tests with Espresso, we’re still working on finishing this up – this will likely come as a separate blog post when ready!
Base Module
We can then add this to our base app as a dependency within the Android section like so:
dynamicFeatures = [":composer"]Now that we have our core module setup, we’ll want to go ahead and import it within our base module build.gradle file:
implementation project(':core')This gives us access to the contents of the core module – and currently we might have a collection of import errors due to having moved a collection of files to a different module (sometimes Android Studio might not catch everything that needs to be changed!).
At this point we have a reference to our dynamic feature module, but it’s not exactly a dependency of our base module – that means that you can no longer directly reference the classes or resources contained within that module. And if you open up a class that previously reference a part of this feature, you’ll notice that there are now IDE errors in place – so how do we no start our activities that we were previously launching here (in our case, the composer). To now be able to launch this activity we made use of the ActivityHelper class from Nick Butchers’ Plaid project, as this is exactly what we were looking to achieve.
Other than the above, the base module should not need to change (unless there is something specific to your project that causes issues during modularization).
Shared Test Modules
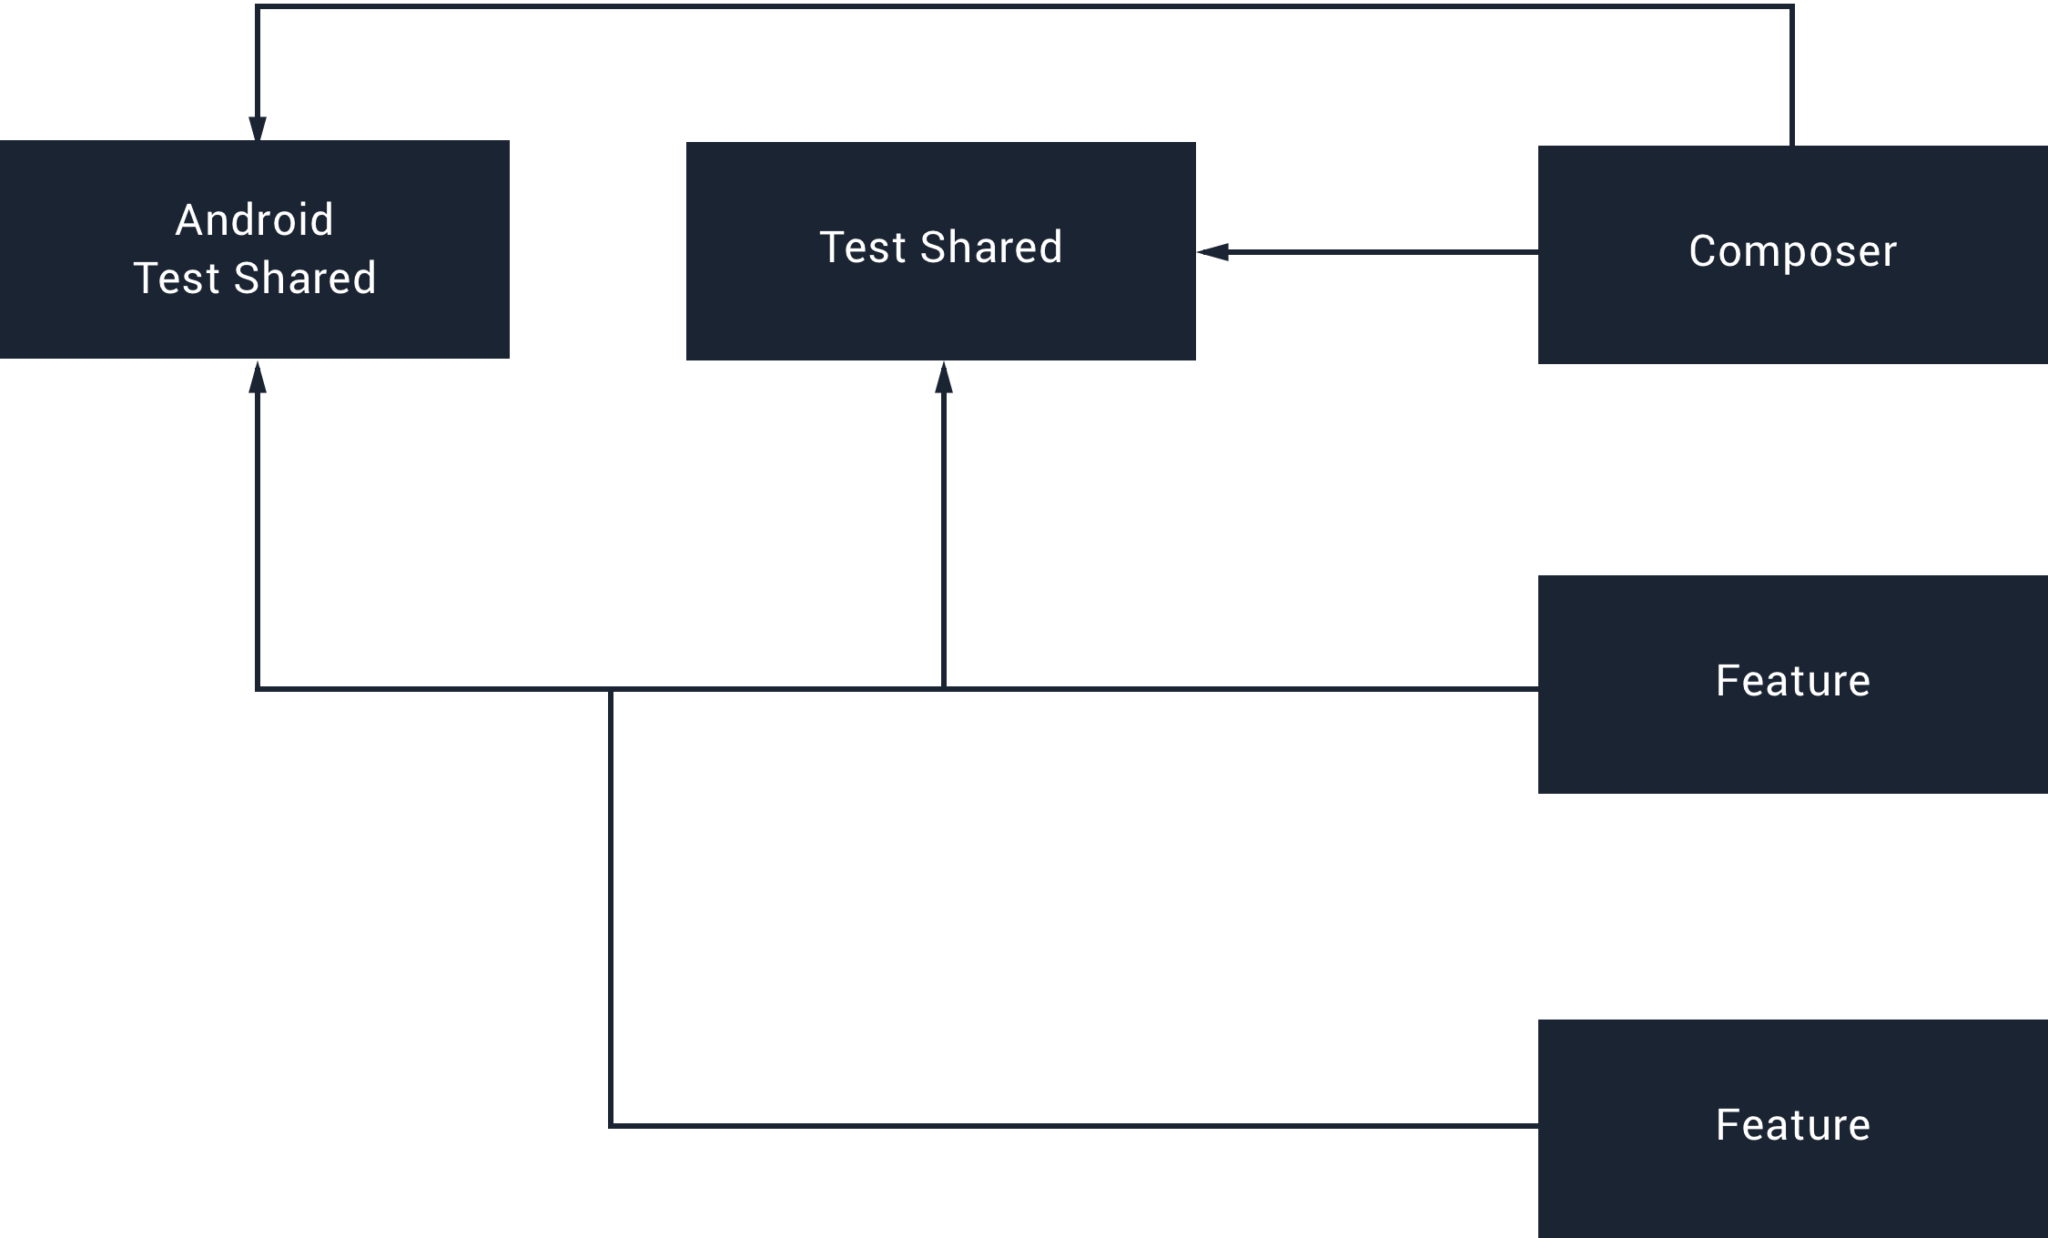
When it comes to tests, you’re likely going to have both unit and Integration tests scattered throughout different modules. Because of this, it’s likely that there’s going to be some crossover when it comes to Data Factory classes or Matchers used during Integration tests. For this it’s good practice to create two extra modules – one for shared Unit Test classes (Test Shared) and Integration Test classes (Android Test Shared). These can then be referenced as dependencies for your tests so that you can reuse this code throughout your project.
Conclusion
I hope this article has provided a brief insight into the process involved when starting to modularize your application into feature modules. From doing this, modularizing a project is not a small or simple task – especially for large projects with legacy code in place. However, with the right planning and patience, tackling the modularization process step-by-step will allow you to not only make use of App Bundles, but also help you to form a more clearly structured project that is easier to maintain and test also. This is only the start of our feature modularization journey and we’re excited to see it take shape within our app!
Try Buffer for free
200,000+ creators, small businesses, and marketers use Buffer to grow their audiences every month.


