

In my projects both at work and outside, I’ve always used Dagger for Dependency Injection. Not only am I familiar with it, but it’s a powerful tool that not only does everything I need it to but there is also a great community around it if I’ve ever got stuck or needed some help on something. I’ve been seeing Koin quite a bit online recently, and like any new libraries and frameworks I was curious to see what it was all about. For this reason I decided to take our existing boilerplate project and replace the use of Dagger 2 with Koin – I felt this would be the best way to get a feel for what Koin is all about.
After playing with Koin, I want to start by saying that I did really enjoy using it. It was so simple to setup and I think it has a much lower barrier to entry. To play with Koin, I took an Android boilerplate of ours and converted it from Dagger to Koin, you can find the repository for this code here. In this post I want to run through the Koin related parts of this project and compare the differences from where Dagger was used. This isn’t meant to be a complete tutorial for the ins and outs of Koin, but more a quick look at how DI is implemented using it – that way, you can use it to compare with the DI that you are currently using. With that said, let’s get started ?

Now, Koin isn’t exactly the same as Dagger. Whilst it’s not strictly Dependency Injection (it uses the Service Locator pattern), it can be used for it. The main difference for me that I have noticed so far moving from Dagger, is the more manual nature of Koin. For example, in Dagger if I want to make some class injectable then I can do so by simply adding the @Inject annotation:
class SomeClass @Inject constructor(val someHelper: SomeHelper) { }With Dagger, this will simply allow me to inject a SomeClass into another class where it is required. Here our SomeHelper class will also need the @Inject constructor, but this whole process is handled automatically once we’ve added these annotation. Now, you don’t quite get the same simple approach with Koin – here we must define this class inside of a Koin module so that it can be provided for injection:
var someModule = module {
    factory { SomeHelper() }
    factory { SomeClass(get()) }
}
You can see from this that there is a slightly more manual process than what we are required to do with Dagger. It’s not a huge task for us to define each of our classes for injection in this module, but having to declare each constructor for our required classes is a more manual approach to DI.
Whilst the @Inject annotation is a standard annotation for handling injection (from the javax package), not requiring to have this in our code means that we decouple our code from this dependency. Maybe we don’t want injection logic in one of the modules in our project, this manual DI approach allows us to achieve this – this is still possible with Dagger, but this was it is enforced.
With that in mind, our boilerplate project uses a single file to house our DI module for Koin. You’ll notice in this file that we have defined two different koin modules.
val applicationModule = module(override=true) {

}

val browseModule = module(override=true) {

}
These modules are similar to the modules that you’d define when using Dagger. You can define a module per-responsibility / feature etc and then house the dependencies to be injected within that area. Marking a module as override=true is required if you wish to be able to replace that module at anytime (such as in tests).
Now that we have our modules defined, we want them to be used in our application. For these we can hop on over to our Application class to start Koin:
startKoin(this, listOf(applicationModule, browseModule))Here we simply call the startKoin function, passing in a context and a list of the modules which we wish to initialise Koin with. Now that we’ve done this, our module dependencies will be injectable into our project. But before we can do this, we need to add some classes which we wish to inject:
val applicationModule = module(override=true) {
    factory { BufferooEntityMapper() }
    factory { BufferooDataRepository(get()) }
    factory("remote") { BufferooRemoteImpl(get(), get()) }
    single { PreferencesHelper(androidContext()) }
    viewModel { BrowseBufferoosViewModel(get()) }
}
From this you can see that we can inject a new instance of a class:
factory { BufferooEntityMapper() }Inject an implementation of an abstract interface, where BufferooRepository is the interface and BufferooDataRepository the implementation:
factory { BufferooDataRepository(get()) }We can also do this but for named injections:
factory("remote") { BufferooRemoteImpl(get(), get()) }We might also want to inject Singleton instance of classes, such as Database and Preference classes. Here, we use the androidContext() to provide a context to our Preferences class using Koin:
single { PreferencesHelper(androidContext()) }And because we’re using the viewmodel component of koin, we can easily inject a specific viewmodel instance:
viewModel { BrowseBufferoosViewModel(get()) }In all of the above, the use of get() is used to satisfy the constructor requirements. Note: Any instances that are provided using get() must also be defined in a module.
You can see the complete list of dependencies defined for each module over in the class here – but the above brief explanations cover everything that is there.
Now that we’ve defined these dependencies, we need to actually access them within our classes. For constructor arguments, these are provided for us already as we have manually defined them in our module. For example, in the BrowseBufferoosViewModel class the GetBufferoos instance is provide here through constructor injection as we used get() to provide it during our module definition:
viewModel { BrowseBufferoosViewModel(get()) }For non-constructor injections we need to explicitly declare the injection of a component. For example, if you hop on over to the Browse Activity you’ll notice we inject like so:
val browseAdapter: BrowseAdapter by inject()You’ll also notice here that we use the bindScope() function to bind our scope to the Android Lifecycle using Koin. This means that our scope will behave accordingly based on the Android Lifecycle events:
bindScope(createScope("Browse"))There are other ways in which you can inject into classes, if you wish to know these you can check out the documentation here.
When it comes to testing, Koin also allows us to inject mocks into our test classes. For this example we’re going to take a quick look at the BrowseActivityTest class.
One thing that you might notice first is how our test class now extends KoinTest:
class BrowseActivityTest: KoinTestFor any test class which you wish carry out injections in, your test class must extend this if you wish to use Koin DI. Whilst with Dagger we don’t need to do this, it’s not a huge task and we are already tying the class to Koin in these examples. However, if you somehow prepared your injection logic outside of the classes to keep your tests clean, then having this declaration would cause this coupling.
Now that we can inject dependencies into our test class, you’ll notice we do so here when injecting the BufferooRepository class:
val mockBufferooRepository: BufferooRepository by inject()As this is, we are just getting back the same representation of the class that we would do in our application-level classes, which isn’t too useful for our tests as we want to mock the responses from this class. For that, we can declare a dependency as a mock class within our @Before annotation function:
declareMock()Now, when our Activity is launched by Espresso and our dependencies injected, the BufferooRepository will be a mock instance. This is because we’ve used declareMock to tell Koin that when this class is injected we want it to be mock representation of the class – it’s that simple! In the @Before annotated function we can also load alternative modules for our tests:
loadKoinModules(testApplicationModule)Because our application class may already be using startKoin() we can use loadKoinModules to load new modules (or overwrite existing ones) for specific use during our tests. Remember, as mentioned previously we must declare things we wish to overwrite as overidable. For example, modules must be written as:
val applicationModule = module(override=true) { }Or dependencies as:
val applicationModule = module {
    factory { BufferooEntityMapper() }
    single(override=true) { PreferencesHelper(androidContext()) }
}
When it comes to build times, I don’t feel like this is the right project to really base an opinion off of – it’s just a small and simple boilerplate. But I imagine people will want to see the build times – so on the left we have the version with Dagger and then Koin on the right:
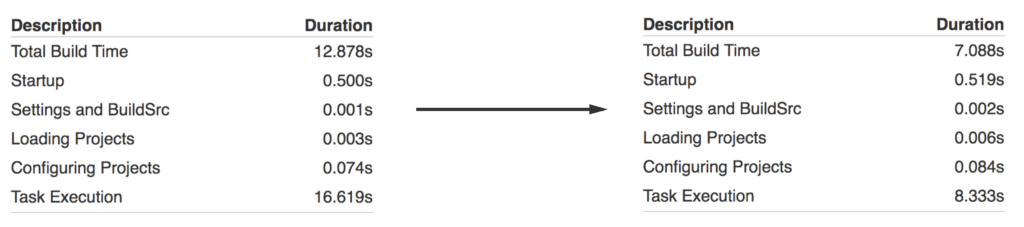
Now, if the project was a lot larger with more DI in place then I am sure the build times would be very different. Even if the scale wasn’t quite the same, the timing could still be large. For example, say these builds took four times longer on a large project then Koin would end up being 20 seconds quicker to build. Obviously this is just an example and is not tested, so until I have had this in a large project for comparison (or seen several examples) my opinion won’t be too swayed by this. And as well, build time is only one part of the DI you use – you have to also think about the other elements that make up the choice.
Whilst this article hasn’t aimed to be a complete tutorial on how to use Koin, I hope that it’s shown enough for you to be able to take it for a test run yourself. It’s still early days for me to have a strong opinion, but I did really enjoy using Koin – it was super easy to setup and very easy to use. I know at first Dagger can be a bit of boilerplate to setup, but once it’s done then it’s done – after that Dagger is pretty easy to work with also. And saying that, I do enjoy using Dagger and to be honest, I will probably end up using both of these in different projects of my own to continue building my opinion on the two. The build time difference is nice and to be honest, I really don’t mind the manual DI – obviously it would be nicer without that, but this is a trade-off you make to achieve some of the nice things that Koin brings in.
The most important thing to remember though is to use what works for your team and what works for the project. If you are using Dagger and there are no issues, everyone is happy and comfortable with how it is working out then there isn’t an urgent reason to change – spend your time elsewhere! On that note, it’s also important to think about future hires and team changes – Dagger can be complicated to understand and configure at first, and I feel like the approach by Koin would help to remove this learning curve for developers. Like anything, I would encourage you to have a play with Koin and decide for yourself where to go from there ? Maybe the idea of a more fluent framework, faster build times and quicker setup would be appealing to everyone.
Try Buffer for free
200,000+ creators, small businesses, and marketers use Buffer to grow their audiences every month.


