


By using Live templates, you can insert frequently-used constructions into your code.
– JetBrains.com
When using Live Templates, you can start typing a shortcut, and by pressing Enter/Return the editor inserts most of your code for you!
You can make your own for any code snippet you find yourself writing often. One of these that I have is for creating a test function with the @Test annotation.

Creating a Live Template
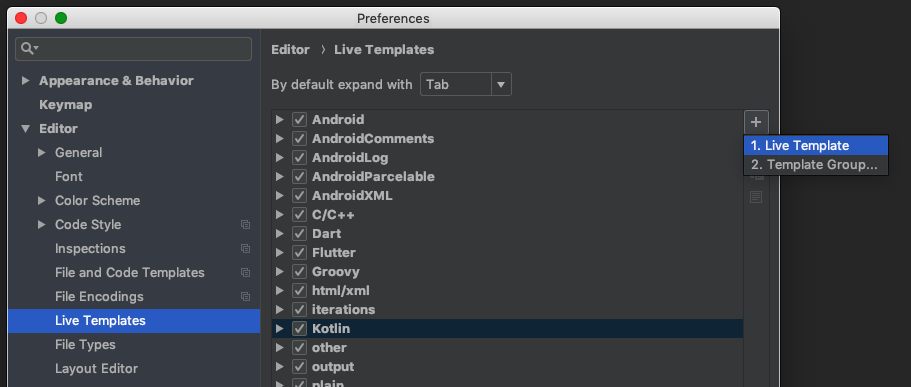
To create a Live Template, in Android Studio or IntelliJ open Preferences ‣ Editor ‣ Live Templates. In this window, you can explore some of the existing templates you can use, what their shortcuts are, and edit the shortcuts and generated code. This is also where you can create a new template. You do this by selecting what group you want it in, and clicking the “Add” button.
To create this test function template, here you need to add
- An abbreviation: This is the shortcut you’ll type to trigger the autocomplete of the template.
- A description: This is a description of what the template is to show in the autocomplete dropdown.
- Template text: This the the main logic for what is included when you use the template
- Applicable context: This is where you can use the template. I generally default to anything Kotlin, but you can be as specific as you want.
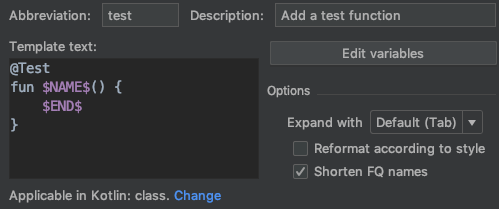
The abbreviation and description can be whatever makes sense to you. I like using test for my shortcut here.
As for the template text, most of what you see is inserted as is, with the exception of the variables. The variables are what you see surrounded by dollar signs ($<variable_name>$). These are what allow your input when using it, and two are here.
- The first,
$NAME$, is where the test function name will go. When inserting the template, the cursor will jump there to enter the function name. These variables can be whatever you want them to be. - The second,
$END$is a special keyword variable. This one says that after you complete all the other variables, end with the cursor here. It is optional, but make sense to add it here so you can start writing the test right away! If you omit this variable, the cursor would be at the end, after the closing curly brace.
This is a good starting point, but I wanted more. This is a very simple thing, but how can I use Live Templates for some of the more complex things?
Advanced Live Template Options
In our tests, we use Mockito, which means we’re often making mocks, and stubbing functions. We have helper functions to use throughout the tests for this. I wanted to make creating these stub helpers quicker.
val mockUpdateHelper: UpdateHelper = mock()

private fun stubUpdateHelperCalculateCustomScheduleTime(value: Long) {
    whenever(mockUpdateHelper.calculateCustomScheduleTime(anyOrNull<Profile>(), any()))
            .thenReturn(value)
}

@Test
fun editUpdateScheduledTimeCalculatesScheduledTime() {
    stubUpdateHelperCalculateCustomScheduleTime(TestDataFactory.randomLong())
    // Rest of test
}
There are some things to notice here when looking at stubUpdateHelperCalculateCustomScheduleTime(). In addition to the structure of the method syntax, there’s duplication of the mock object name, and the method that’s mocked in the function signature. We also see the input variable value used both where it’s passed in, and where it’s used. It seems like a good candidate for a Live Template.

Now there is A LOT going on here. To break it down:
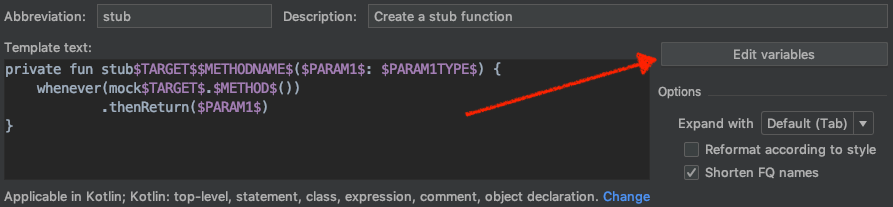
$TARGET$is the name of the mocked object, “UpdateHelper” from the above example. Notice that “mock” is in the template instead of being input with the variable. This is to keep the pattern of using “stub” in the function signature, but “mock” in the variable name. The template uses$TARGET$in two places, once in the function signature, and once as part of the input to thewhenever()call.$PARAM1$is the name of the input parameter, “value” in the above example. This is used as the input parameter to the stub function, and then passed into thethenReturn()function.$PARAM1TYPE$is only used the one time, and is so you can specify the type of the parameter.$METHODNAME$takes a bit more explanation. I want it to be the same as$METHOD$, so one option would be to just use that. However, I want the first letter to capitalized in the function signature, but lowercase when it’s called. This is where we get into a little more complex templating.
Live Templates has some predefined functions you can use. One of these is capitalize(). Perfect! But it’s not straightforward how to use them. To use this function, you need to open the “Edit variables” window.
There are a number of rows and columns here. JetBrain’s website explains all of them. I’m only going to talk about “Name” and “Expression”.
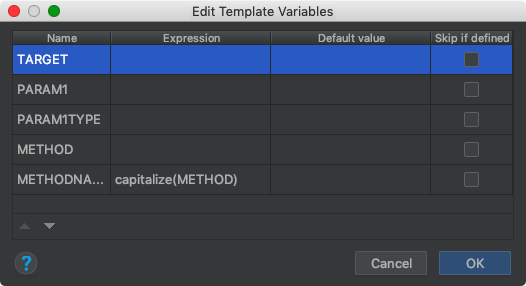
To start, it has a list of your variables you’re using. One of the most basic things you can do is change the order they will be filled. You do this by selecting a variable, and using the up and down arrows at the bottom of the window.
I need the $METHOD$ variable filled before I can evaluate the $METHODNAME$ variable, so I’ll move $METHODNAME$ down below $METHOD$. By using this order I can also make sure I have autocomplete for my function name.
Now in the “Expression” column I can use the predefined function. In this column you can use “String constants in double quotes, the name of another variable defined in a live template, or predefined functions with possible arguments.” I use capitalize(METHOD) so it takes the value in $METHOD$, passes it to the capitalize() function, and uses the result for $METHODNAME$.

Live Template Uses
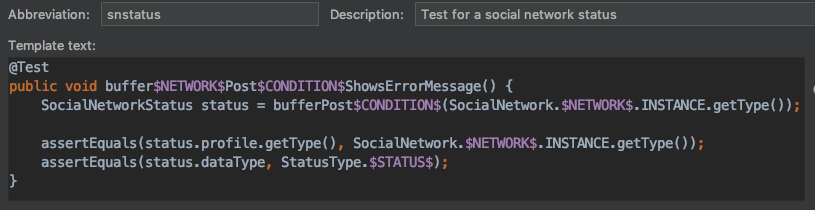
This is one way I make writing tests quicker, easier, and less tedious. There are plenty of places where you can use Live Templates, both in your tests and other code. I often start by copying an example of the code I want to generate into the template text window, then start replacing things with variables. I’ve even used them to create temporary templates that I might be making a bunch of that day, but not many after. For example, this one to test a function for a number of different social networks, for a number of different inputs.
@Test
public void bufferPinterestPostWithVideoShowsErrorMessage() {
    SocialNetworkStatus status = bufferPostWithVideo(SocialNetwork.Pinterest.INSTANCE.getType());

    assertEquals(status.profile.getType(), SocialNetwork.Pinterest.INSTANCE.getType());
    assertEquals(status.dataType, StatusType.STATUS_ID_MISSING_TEXT);
}

I hope this was helpful! Is there a place where you like to use Live Templates?
Header photo by Sergey Zolkin on Unsplash
Try Buffer for free
140,000+ small businesses like yours use Buffer to build their brand on social media every month
Get started nowRelated Articles

We recently launched a new feature at Buffer, called Ideas. With Ideas, you can store all your best ideas, tweak them until they’re ready, and drop them straight into your Buffer queue. Now that Ideas has launched in our web and mobile apps, we have some time to share some learnings from the development of this feature. In this blog post, we’ll dive into how we added support for URL highlighting to the Ideas Composer on Android, using Jetpack Compose. We started adopting Jetpack Compose into ou

With the surprising swap of Elasticsearch with Opensearch on AWS. Learn how the team at Buffer achieved secure access without AWS credentials.

At Buffer, we’re constantly experimenting with ways we can improve our products and try out new ideas. We recently launched Start Page , a beautiful, flexible, mobile-friendly landing page that you can build in minutes and update in seconds. As a Software Engineer on Buffer’s team I’ve tackled a long list of fun projects, including Start Page. One thing I love about this project, is that as we foray deeper and deeper into user-generated content and customization, w