
Imagine a place where you can stay updated on your college roommate’s life, get book recommendations, discover new brands, and learn more about anything you like.
That’s exactly what Instagram is for you, for me, and for over one billion other active Instagram users.
In this beginner’s guide, I’ll share everything you need to know about Instagram — from getting started by creating an account to growing your business or personal brand on the platform.
What is Instagram?
Instagram is a photo and video-sharing app. You can use this social media platform to create, edit, and publish anything visual. Your followers react to your posts by liking, commenting, sharing, and saving.
Is Instagram free?
Instagram is free for everyone — the only requirement is you have to be over 13 years old. You aren’t charged a penny whether you want to create an account, post content, interact with other people, or promote your business.
You’re only charged if you run Instagram ads or boost an Instagram post (which also runs like an ad).
Is Instagram available on desktop?
You can access Instagram on any web browser, but there’s no desktop app for Instagram yet. Certain features — like searching via Instagram hashtags or broadcast channels — are limited or absent in the desktop version.
That said, Instagram is continually improving the desktop experience. For instance, you can now post on Instagram from your computer.
Use Instagram on your laptop if you’re a desktop person. But I’d recommend using it in conjunction with the mobile app since Instagram is a much better user experience (with more features).
How to create an Instagram account in 5 steps
You need to create an Instagram account to post anything on Instagram. Without signing up, you also can’t access many of Instagram’s features — like seeing all comments on a post, viewing anyone’s Instagram Story, or scrolling through an Instagram feed.
Here’s how you can create an Instagram account in five simple steps:
Step 1: Download the mobile app
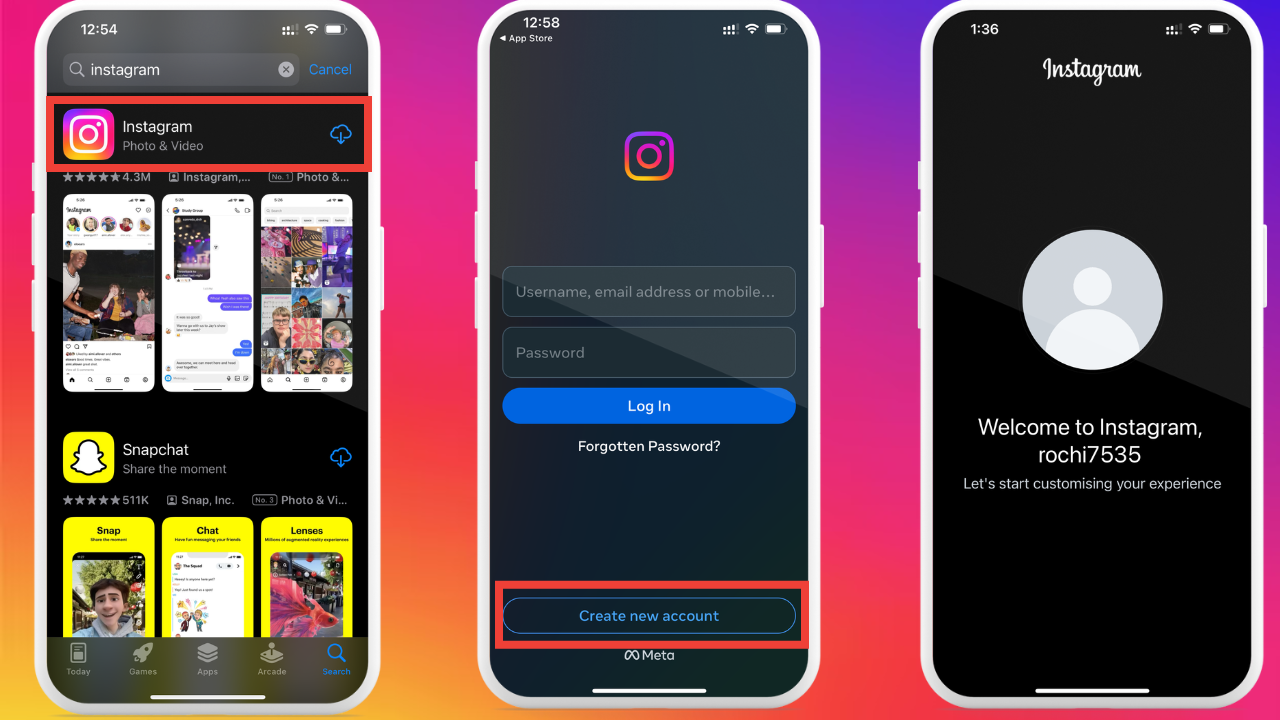
Instagram is available for Android and iOS in the Google Play Store and App Store, respectively. Type “Instagram” in the search bar, spot Instagram’s logo, and click “Download.” Or, you can also use these links to download the Instagram app on your mobile:
- Google Play Store (for Android)
- App Store (for iPhone)
If you want to sign up via desktop, go to this Instagram website and start entering your details.
Step 2: Create your account and choose a username
Once you open the app, you’ll get the login screen. To create a new account, click the button “Create new account” at the bottom of your screen.
Instagram will ask you to:
- Enter your name — type your business name if you’re creating an Instagram account for your business
- Create a password — it should contain at least six letters, a number, and a special character
- Select your date of birth — because you need to be at least 13 years old to sign up for Instagram
- Create a username — enter your business name or your full name to be identifiable in searches
- Verify your identity — by entering the code received on your phone number or email
- Agree to its terms and policies
- And voila! You now have an Instagram account.
⚡ Pro-tip: Use your name or username to add keywords to your profile page. For example, if you’re a fitness coach, enter “your name | fitness coach” as your username. This will improve the discoverability of your profile and will also give everyone an idea of what your Instagram content is about quickly.
Next, Instagram makes it easier for you to find your community by asking you to:
- Sync your phone contacts: This way, you’ll be able to find people you already know easily and follow them.
- Connect your Facebook account: Since Instagram is a Facebook app, you can sync your Facebook with your Instagram app by signing into your Facebook and merging the Account Centre. Both accounts will have the same login information, name, username, and avatar.
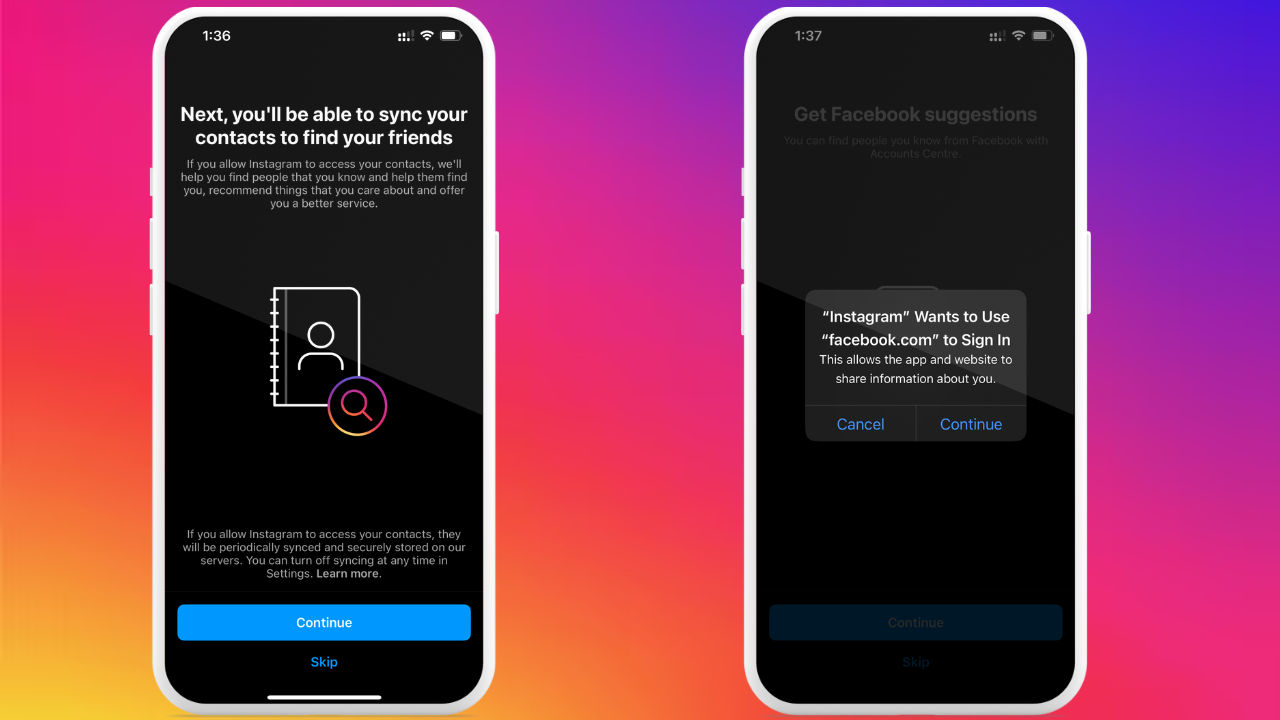
You can use both options or skip them, depending on your preference. For instance, if you’re creating an Instagram account for your business and not for personal use, it might not make sense to sync your phone contacts.
Step 3: Set up your profile with a picture, bio, and links
Your Instagram account is created in the two steps above. But to ensure you get discovered by your audience, you need to set up your profile by:
- Adding a profile photo: If you’re running an Instagram account for your business, use your logo as the profile photo. If you’re a creator, use your own image. Remember to keep the image high-quality — if it’s your face, it should be zoomed in to be clearly visible.
- Crafting your Instagram bio: Your bio tells anyone looking at your Instagram profile who you are and what you do. The limit for Instagram bios is 150 characters. Instead of trying to keep your Instagram bio clever, describe your product or service in the simplest way possible. Using keywords in your bio will improve your discoverability and also give people a clearer idea about you.
💡 Learn more: The Science Behind the Best Instagram Bios - Adding links to your Instagram profile: Instagram lets you add up to five links to your profile. But the four links drown in “xyzlink and 4 other links” — which is not ideal if you’re trying to reduce friction for your audience. Instead, use Buffer’s Start Page to not only host all your links, but also make them pretty, on-brand, and trackable.
To add all of the above to your profile, click the profile icon at the bottom right on your Instagram app. Tap on “Edit profile” on the page. From there, you’ll find the option to add or edit your profile picture, bio, and links.

You can also create and add an avatar (a customizable 3D persona of your face) from here to use later in your Instagram Stories.
Step 4: Choose the most suitable type of Instagram account
Instagram has two types of accounts: Personal and professional. The professional accounts are further subdivided into business accounts and creator accounts.
- Personal account: This is the most suitable type of account for you if you’re using Instagram solely to connect with friends and family. Your profile is locked — meaning someone has to request to follow you to see what you post. You can either accept or deny follow requests in notifications.
- Business account: This is Instagram for business — the most suitable option for any and all businesses on Instagram. An Instagram business account gets additional call-to-action buttons (CTA) like “Shop Now” to entice people to buy.
- Creator account: This is the most suitable option for content creators on Instagram. You don’t get the extra CTA button, but this profile type is meant to help you build a community through features like a label name below your display name.
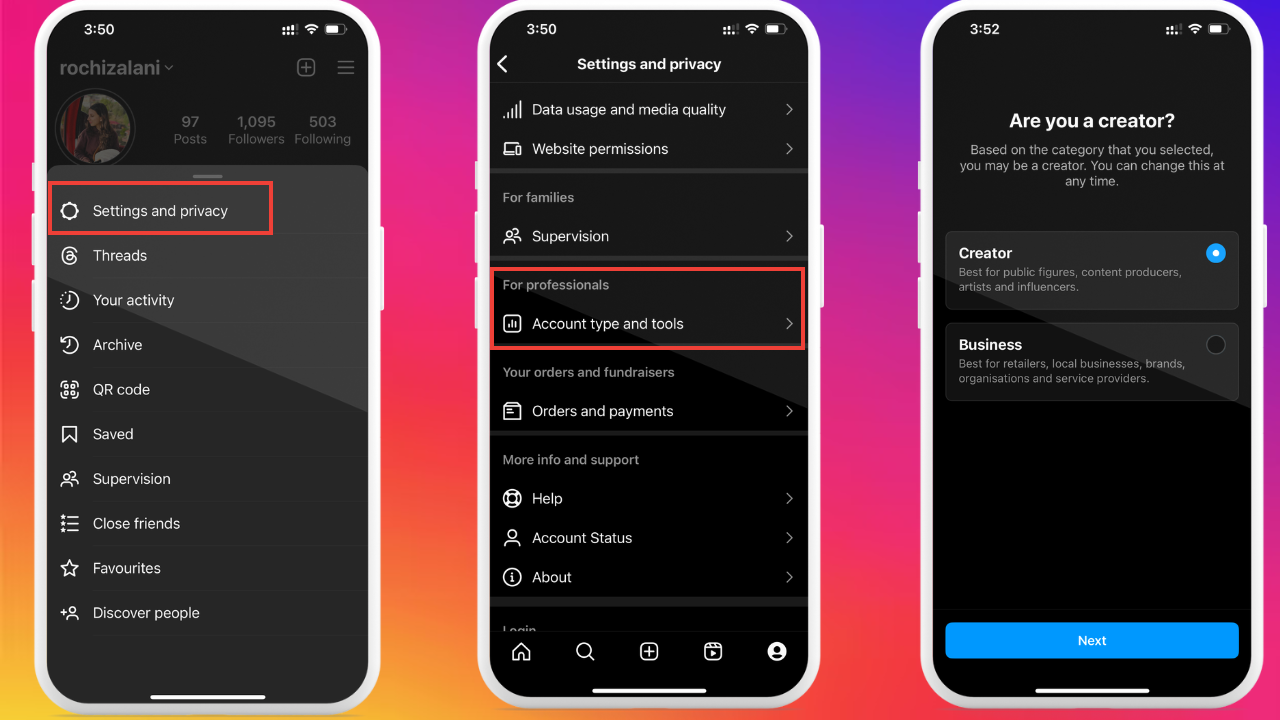
By default, your Instagram profile is personal. To switch from one account type to another:
1. Go to your profile and tap the three horizontal lines in the top right corner
2. Select “Settings and Privacy” and scroll down to “Account type and tools”
3. You’ll find the option to “Switch to a professional account”
Once you tap it, you’ll be asked to choose a category that describes your account best — like writer, entrepreneur, or shopping & retail. Finally, you can choose between a creator or business account.
The business and creator accounts are not that different anymore. Earlier, only Business accounts had access to certain post insights and features, but all of those features are now also available for Instagram Creator accounts.
💡 Helpful resource: Now You Can Use Buffer With Your Instagram Creator Account
Step 5: Customize the notifications you want to receive
Instagram sends you a lot of notifications — when someone tags you, when someone sends you a message, when someone likes your posts, when someone follows you, and so on.
It can get overwhelming real quick. To customize what notifications you receive, go to your profile’s settings. Click “Notifications” and start customizing what alerts you want to receive and what you don’t.
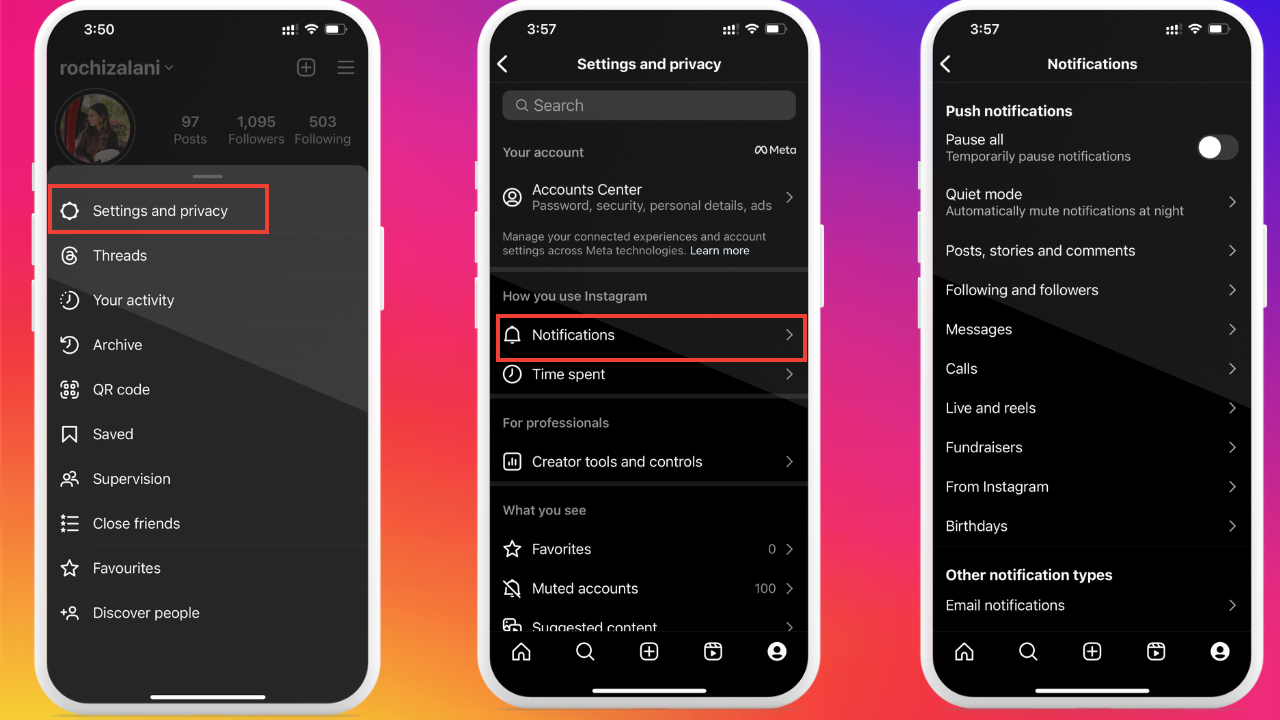
There’s an option to pause all notifications temporarily if you wish to or a “quiet mode” to pause all notifications for 12 hours.
The difference is someone who wants to message you will know you’ve silenced all notifications in quiet mode because your online status and auto-replies (if set) will display it. But if you’ve paused all notifications temporarily outside the quiet mode, no one knows except you.
What kind of content can you post on Instagram: A breakdown of 7 types of posts
Instagram is a social media platform with one of the most versatile types of content. You can post single photos, carousel photos, videos, go live, and post content that’s only live for 24 hours. Let’s explore the seven types of posts on Instagram:
1: Single-image posts
When you post a single image with a caption, it’s a single-image post. These posts are best for product photography, sharing announcements, reposting Tweets or Threads, or highlighting customer testimonials. Single-image posts should be supplemented by the perfect Instagram caption that explains, adds, and continues the conversation started via the image.
An example I love is cosmetic company PERL sharing their Thread post as a single image on Instagram.
2: Carousel posts
Carousel posts are multiple images posted at once. Instagram allows you to share up to 11 slides of such images. Carousel posts are best for sharing a story, teaching something to your audience, putting a spotlight on something, or doing a before/after type of post.
A word of caution: Don’t use large blocks of text in carousel posts — Instagram is very much a visual platform. White space, bright colors, and small sentences are best for carousel posts.
💡 Helpful resource: Why You Should Use Instagram Carousels + 10 Ideas to Get You Started
One of my favorite carousel posts is by Hair Syrup — where they did a recap of their August month via Instagram Carousels.
3: Instagram Reels
Instagram Reels are by far the most popular type of Instagram posts. You can upload videos of up to 90 seconds on your profile. Reels allow for a lot of creative freedom and can be used for pretty much anything — product launches, talking about a topic to your audience, hopping on trends, showing the behind-the-scenes of your product, using your product in action, and so much more.
💡 Learn more: Instagram Reels: Instructions and Ideas for Small Businesses
An example for your inspiration: Software company Tl;dv uploads top-notch, funny, and relatable Reels for its audience — enacting a skit between various roles in a company.
4: Instagram Stories
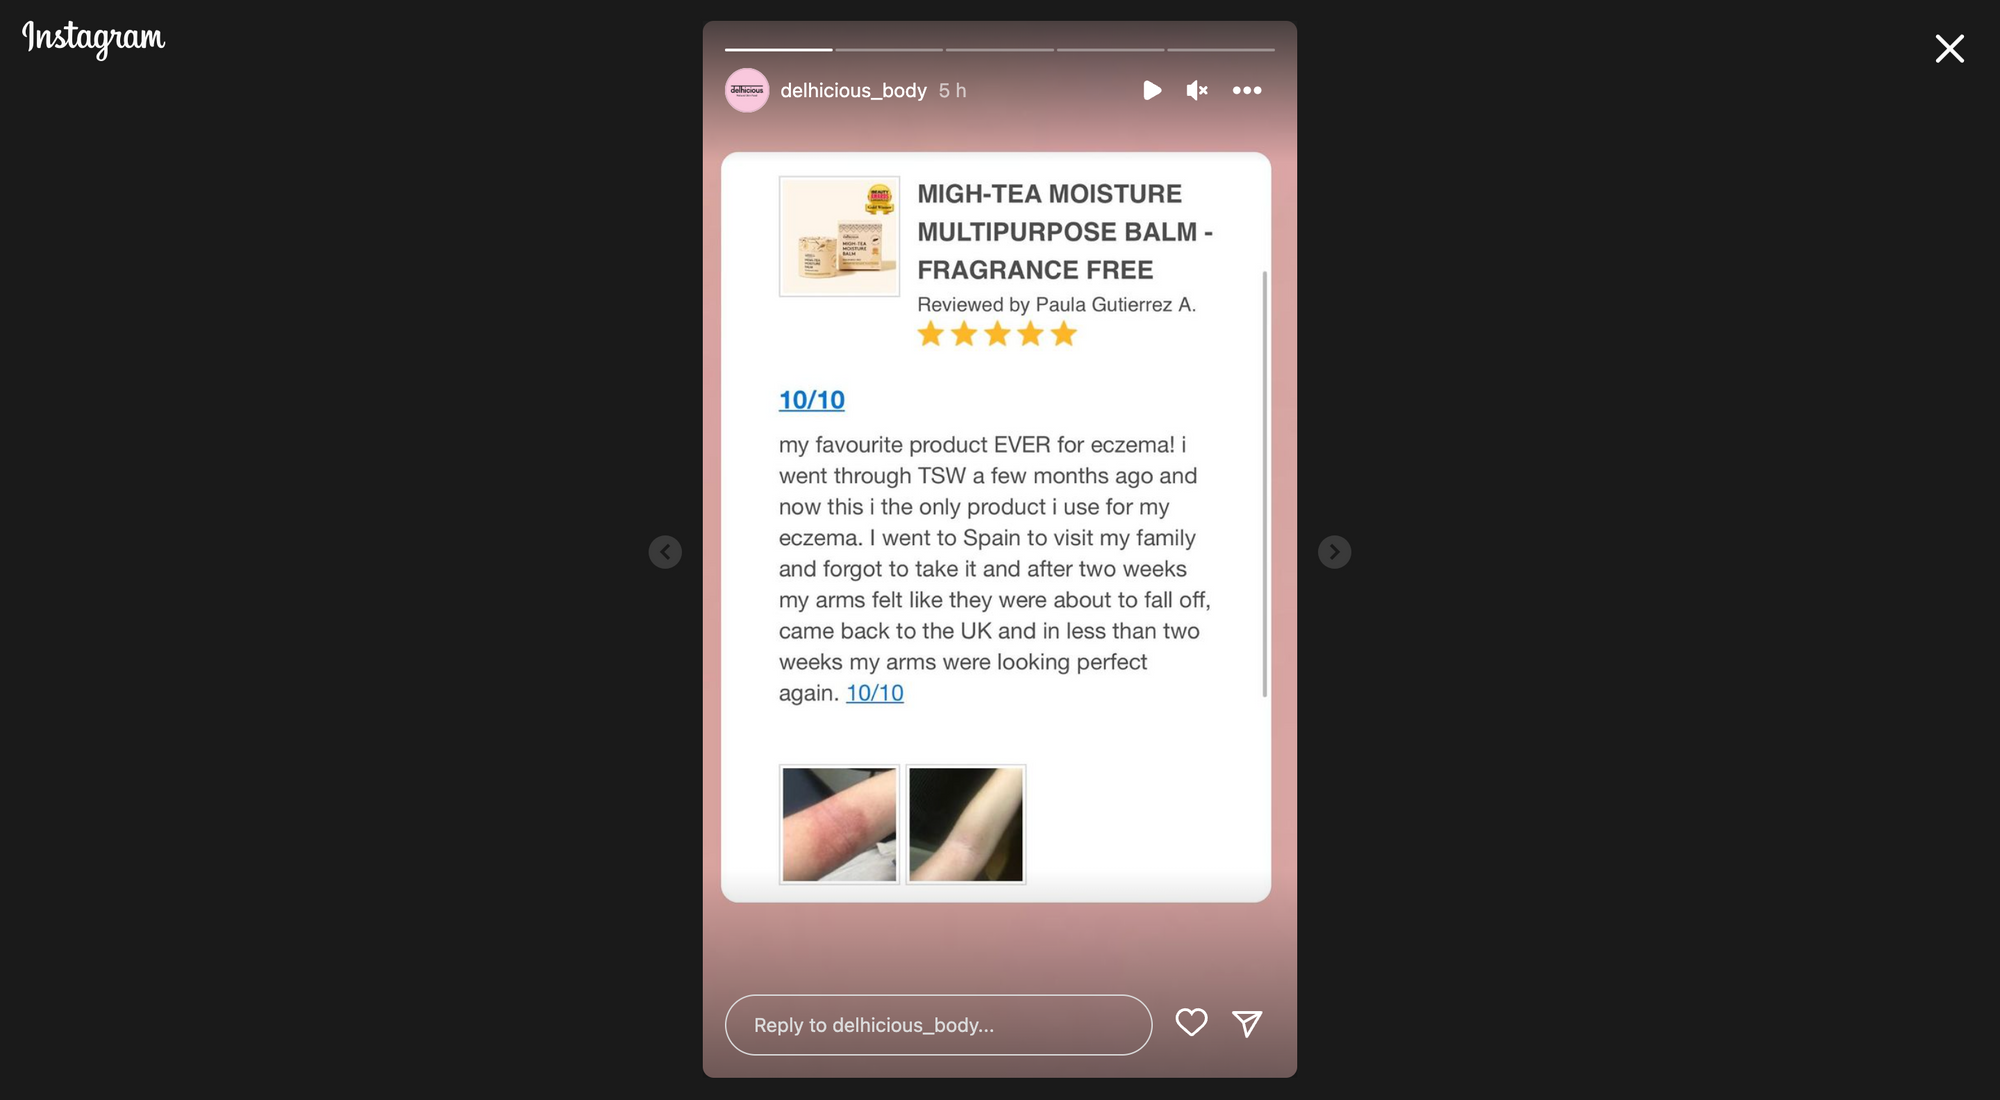
Instagram Stories are image and video content that only last 24 hours — a chapter out of Snapchat’s playbook. There are many features like polls, stickers, and multiple-choice questions that make Instagram Stories perfect for boosting your engagement. Instagram Stories are best for showing behind-the-scenes of your life, communicating with your audience, and teasing upcoming content.
Skincare brand delhicious is a good example of how to show up regularly on Instagram Stories.
If you want to extend the life of your Instagram Stories, use Instagram Highlights. These are Instagram Stories that’ll be displayed on your profile forever (unless you delete them). You can categorize these Stories into various sub-headers like — company announcements, employee stories, customer testimonials, and more.
💡 Helpful resource: How to Quickly Create Great Instagram Stories with Templates
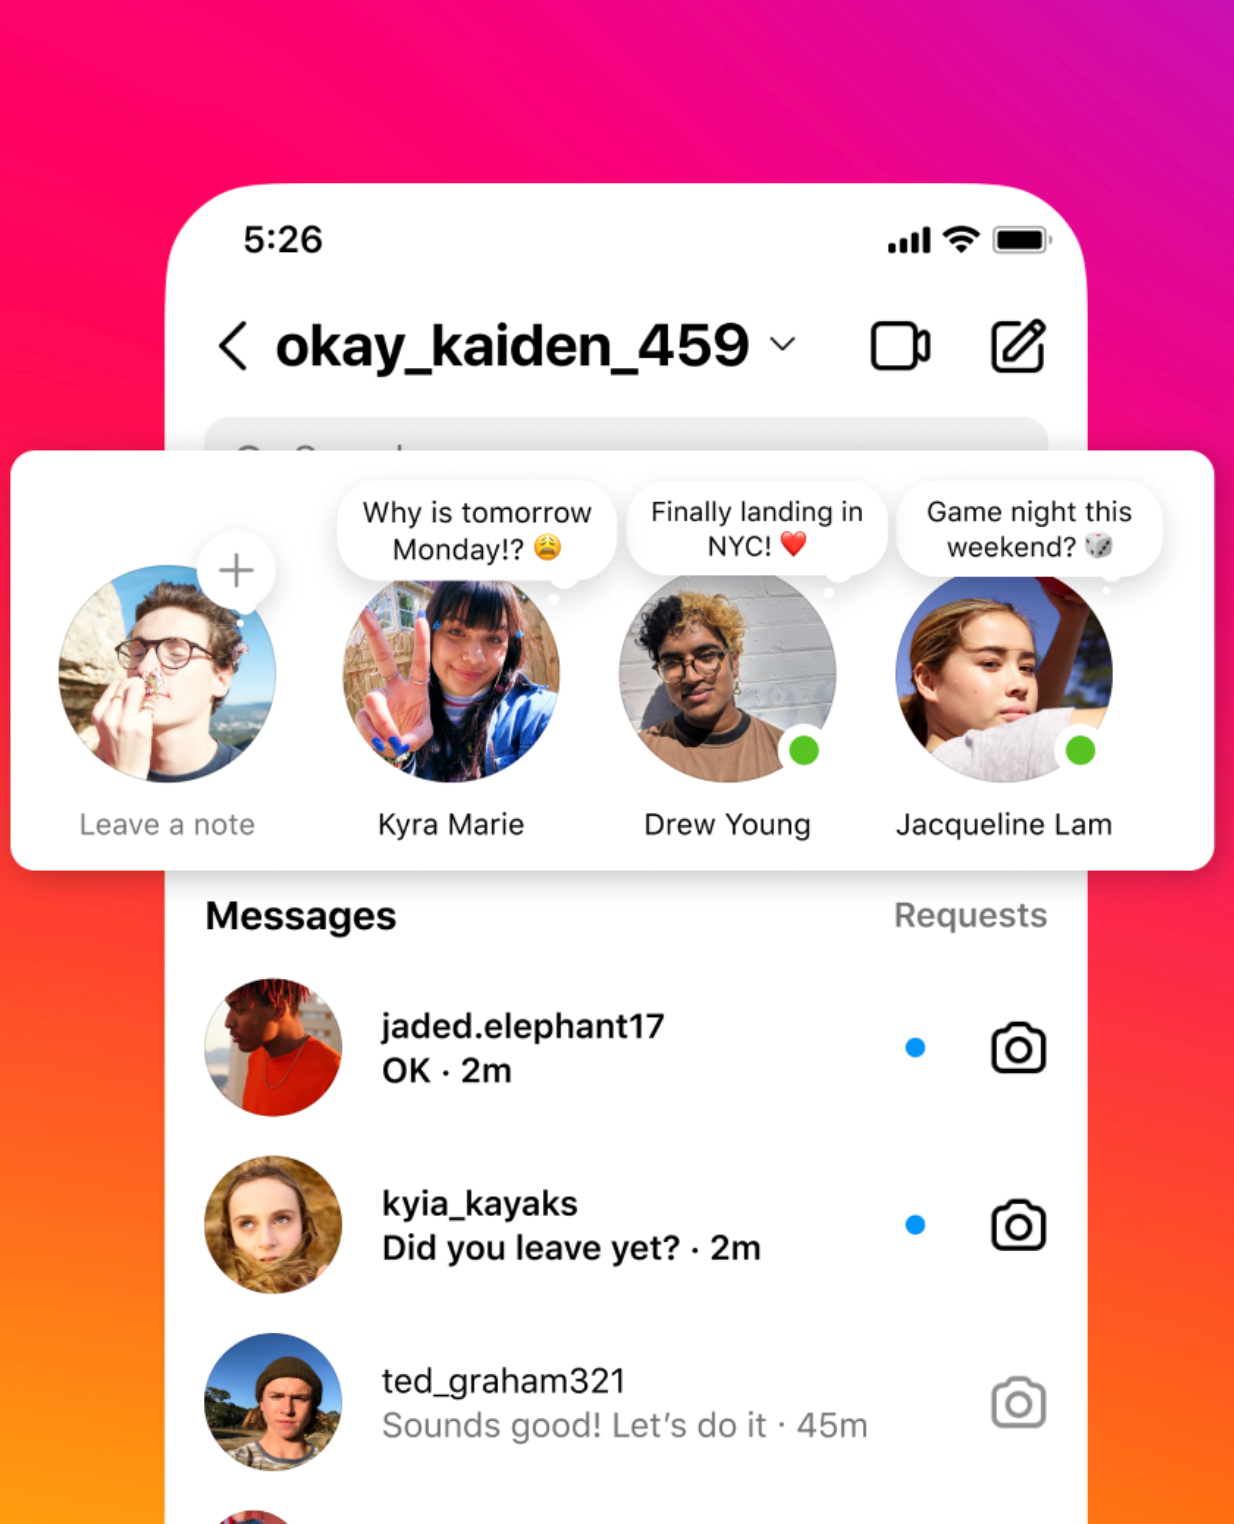
5: Instagram Notes
Instagram Notes are a unique kind of short-text post. They appear in your Chats list and allow you to share a thought via text in 60 characters. You can tag someone in your Notes, and you can also add music to your notes in some countries. Like Instagram Stories, Notes only last for 24 hours.
You can use Notes to ask for recommendations from your followers, start a conversation with your audience, or share a quick update.
6: Instagram Live
Instagram Live is exactly what it sounds like: You go live on video using the Instagram app. You can inform your audience in advance using Stories or posts about when you will go live so they can join and ask their questions in real-time.
Live is great for product walkthroughs or tutorials, doing an ask-me-anything session with your audience, and collaborating with another creator (one account can invite another to go live together — a maximum of three people can go Live together). If you wish to, you can turn off commenting for your Instagram Live.
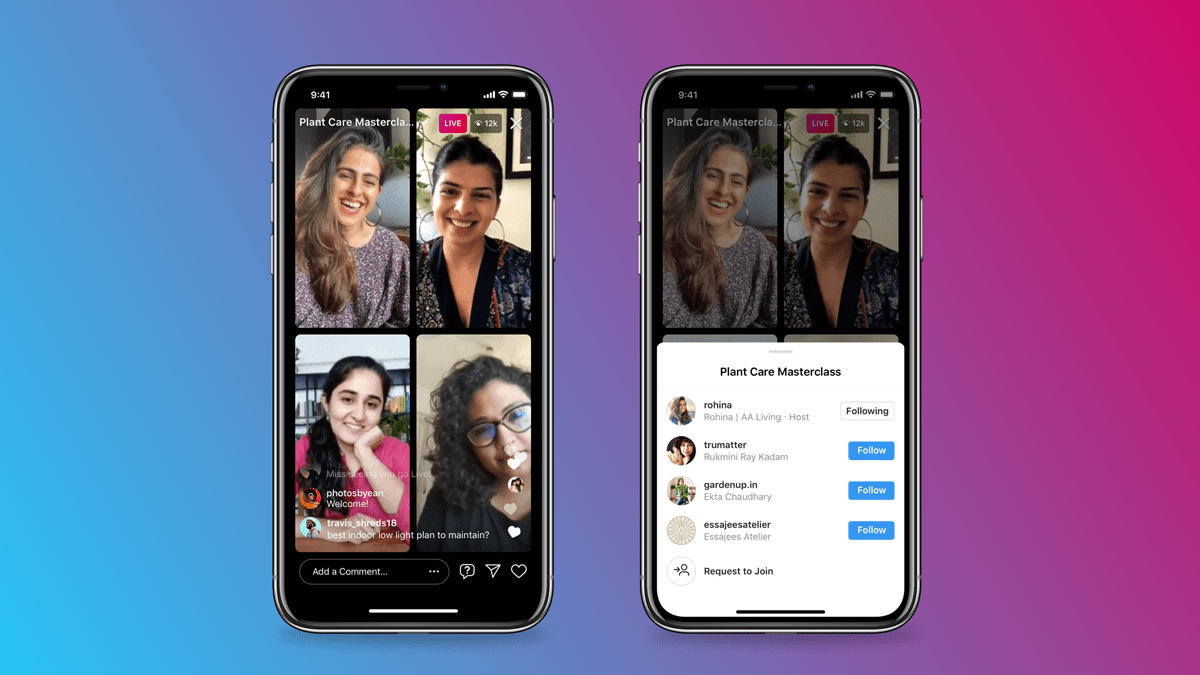
For those who couldn’t catch it, you can also share a replay of your Instagram Live on your feed.
💡 Learn more: Here’s All You Need to Know About Instagram Live Video
7: Broadcast channels
Broadcast channels aren’t a strict post-type, but it’s another way to communicate with your followers via Instagram Direct Messages (DMs). Think of it as your group that anyone can join using the invite link.
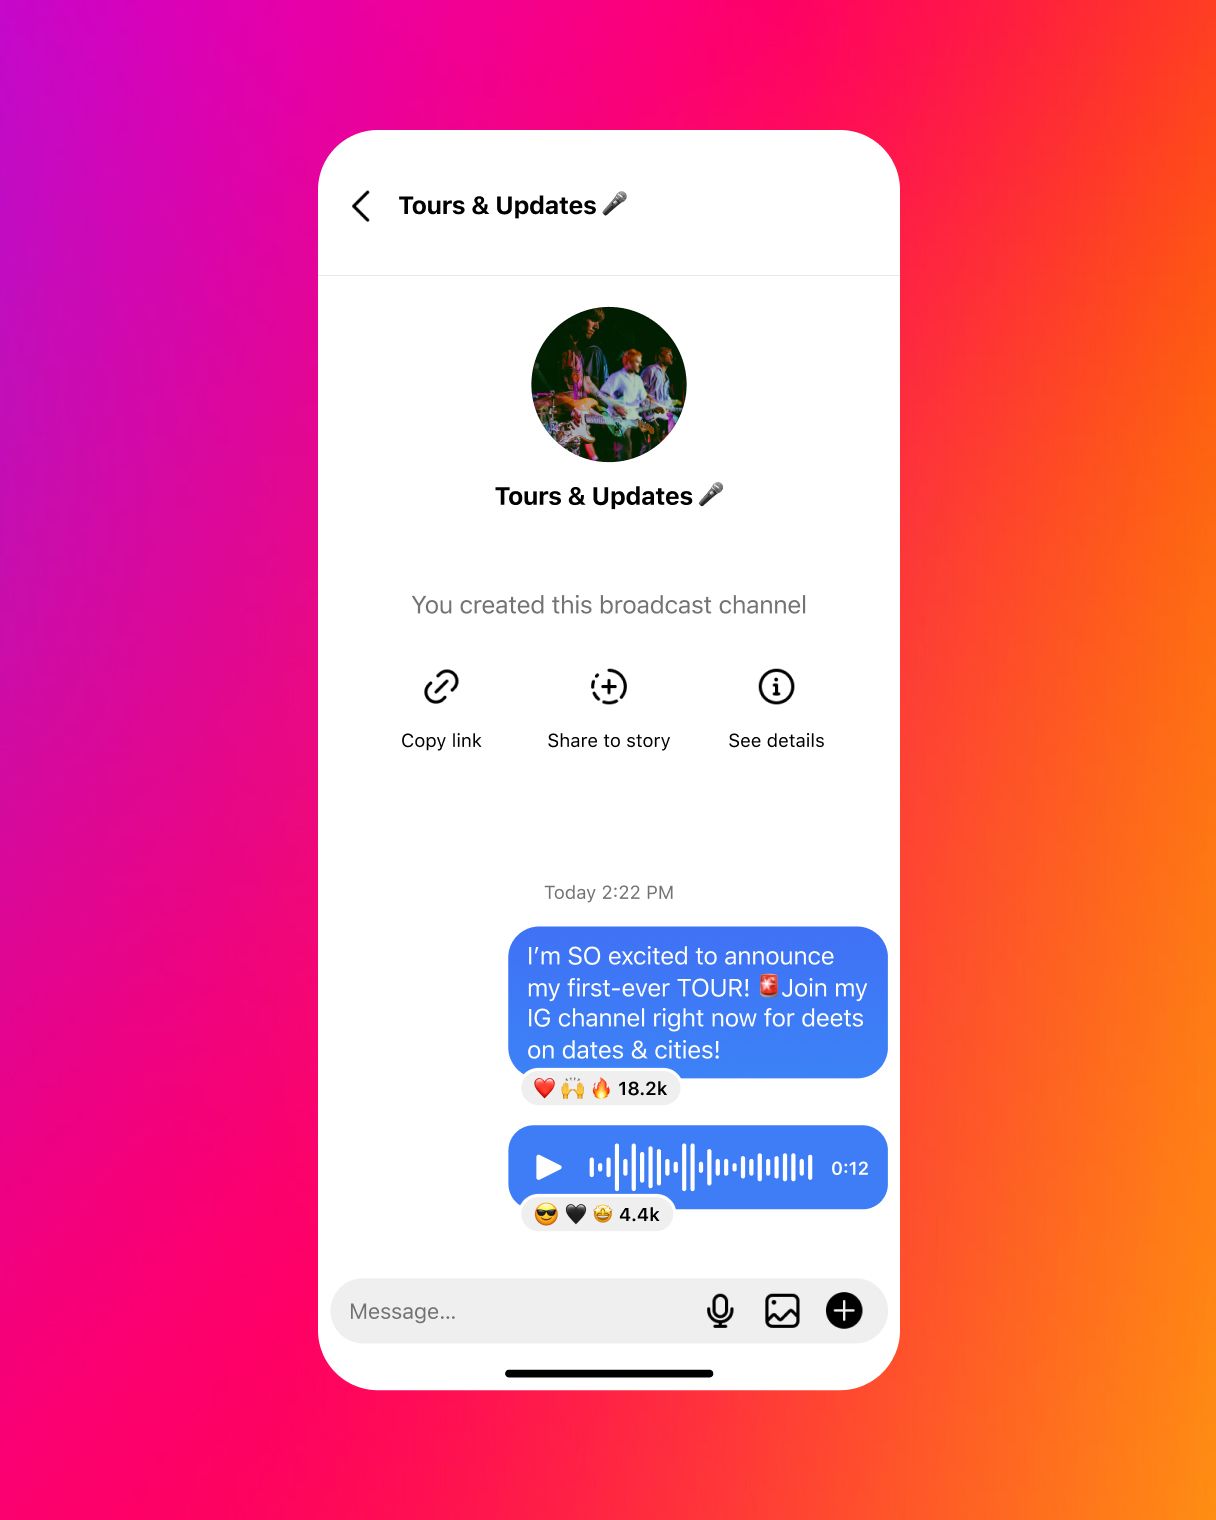
⚠️ Note: Broadcast channels aren’t available on the web version of Instagram yet. You can only create and access Broadcast channels via the Instagram mobile app.
Followers can react to your messages, participate in your polls, and listen to your voice notes. You can share a link to your Broadcast channel on your Instagram Stories. Broadcast channels are best for sharing announcements with your audience, asking for their opinion, and keeping them in the loop about your business or services.
💡 Helpful resource: What You Need to Know About Instagram Broadcast Channels (And How to Create Them)
How to use Instagram: Navigating the features of the Instagram app
Despite the minimal learning curve, Instagram can be a lot to absorb all at once. There are so many content types you can use, ways to interact, and features you can optimize.
Let’s tackle how to do everything step-by-step — minus the overwhelm.
How to share content on Instagram
For sharing Instagram Stories, Reels, single-image posts, Live, and carousels, follow these instructions:
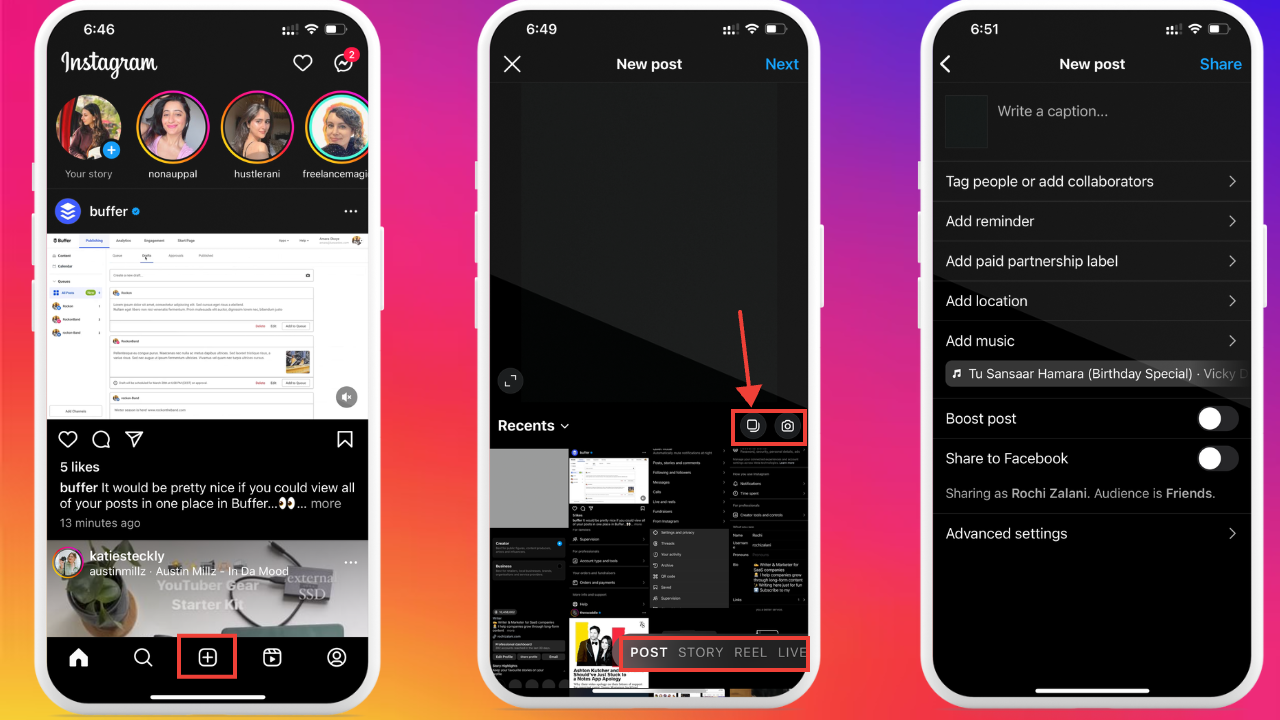
1. Open your Instagram app and click the plus icon at the center.
2. Choose the kind of post you want to share — post, Story, Reel, or Live. You can either select existing media from your camera roll or click on the camera button to use Instagram’s camera for recording or clicking. If you’re sharing a carousel, select the “multiple photo button” next to the camera to select multiple images.
3. Apply any filters to your post or add any text or interactive stickers on your Stories if you wish.
4. Write a caption for your post. You can also tag people if relevant.
5. Share, and your post is live! 🎉
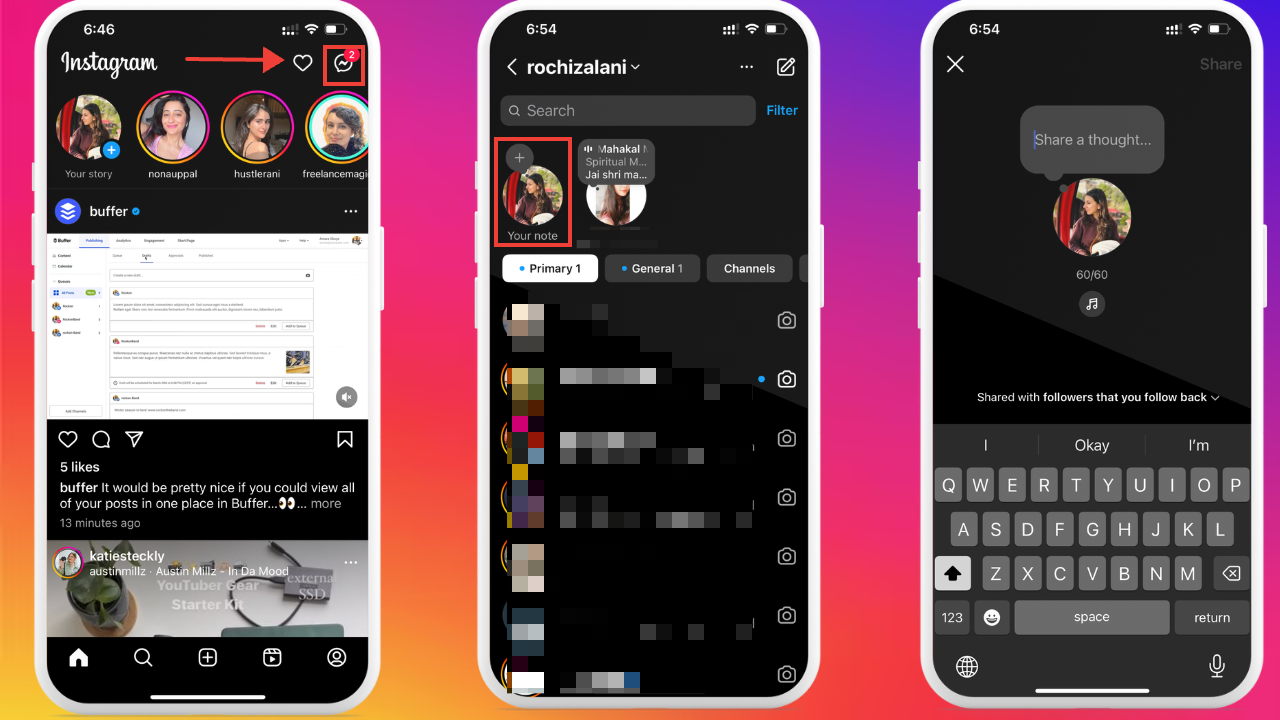
To add a new Instagram Note, follow these instructions:
1. Click on the message icon at the top right corner of the Instagram app.
2. Tap the plus (+) icon against your profile picture to add your note.
3. Type your note and add music if you wish to.
4. Click on “Share” to post your note.
To open your own broadcast channel, follow these instructions:
1. Click on the message icon in your feed.
2. Tap the pencil button at the upper right corner.
3. Select “Create Broadcast Channel.”
4. Give your Broadcast Channel a name and choose whether you want it to be visible on your profile.
5. Select “Create Broadcast Channel” again and you’re done.

Now, you’ve learned how to post content on Instagram. But building a community on social networks isn’t a one-way street. You have to raise your hand and be a part of the conversation.
How to interact with Instagram content
You can like, comment, share, save, and repost the content you see on Instagram. But to see content on your feed, you have to follow people or brands on Instagram.
If you have synced your contacts or Facebook account with Instagram, the platform will recommend people to follow. If not, tap the magnifying glass at the bottom, and you’ll land on the Explore page. Here, you can type in the search bar or scroll through the content Instagram recommends.
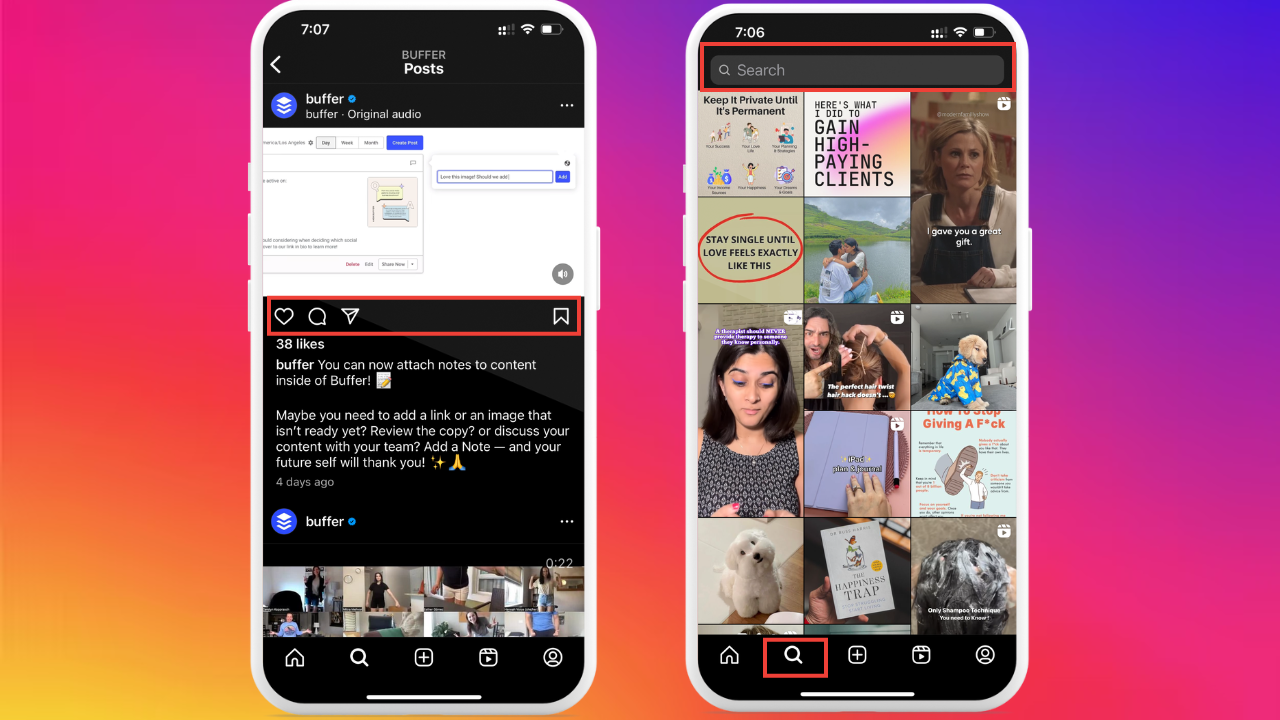
Interacting with the Instagram content by liking, commenting, sharing, and saving is the best way to let Instagram understand your preferences. The Instagram algorithm will soon pick up on the kind of content you like and show more of it in your feed, Explore Page, and Reels.
How to elevate your Instagram experience
Posting and interacting are fairly straightforward ways to use Instagram. But how do you make your Instagram scrolling experience more enjoyable?
Here are my four favorite tips:
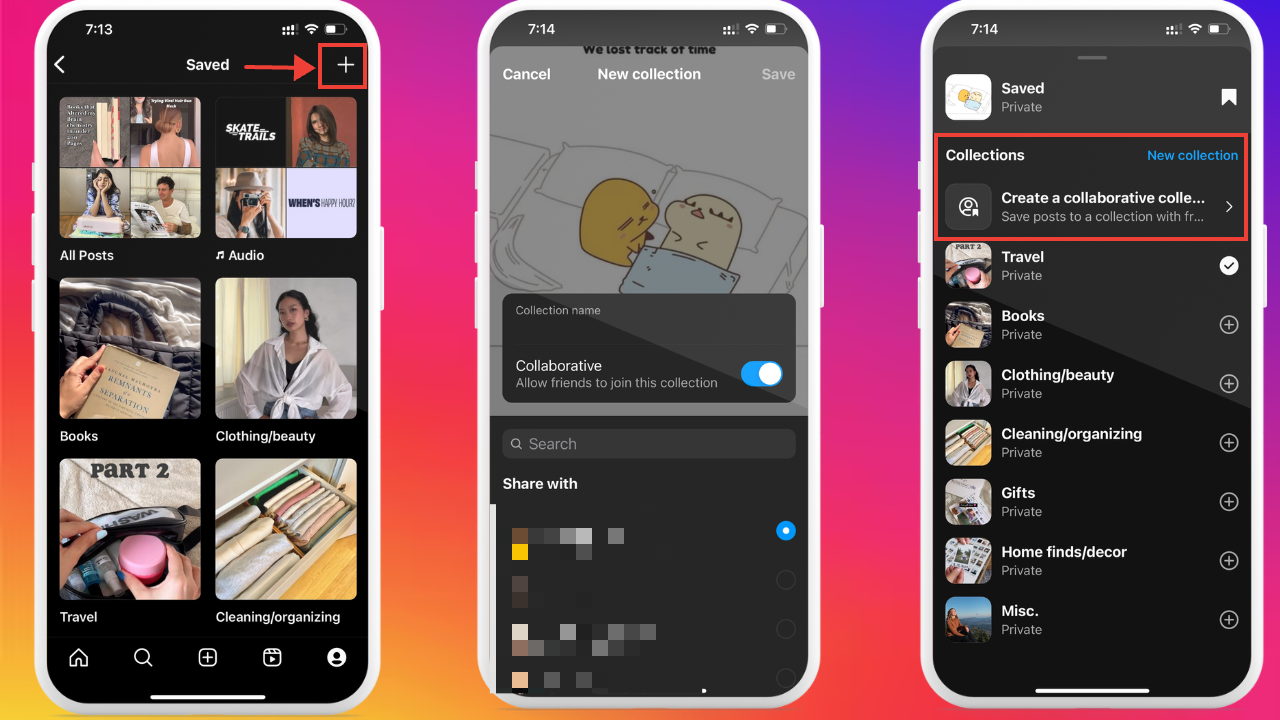
1: Categorize and collaborate on your Saved posts
You can categorize and collaborate on the content you Save on Instagram.
1. Go to your profile and click the three horizontal lines.
2. Choose “Saved,” and you’ll find a plus (+) icon on the top of the screen.
3. Tap on it to name a new collection. Now, you can save posts to a specific category and also collaborate on the collection if you wish.
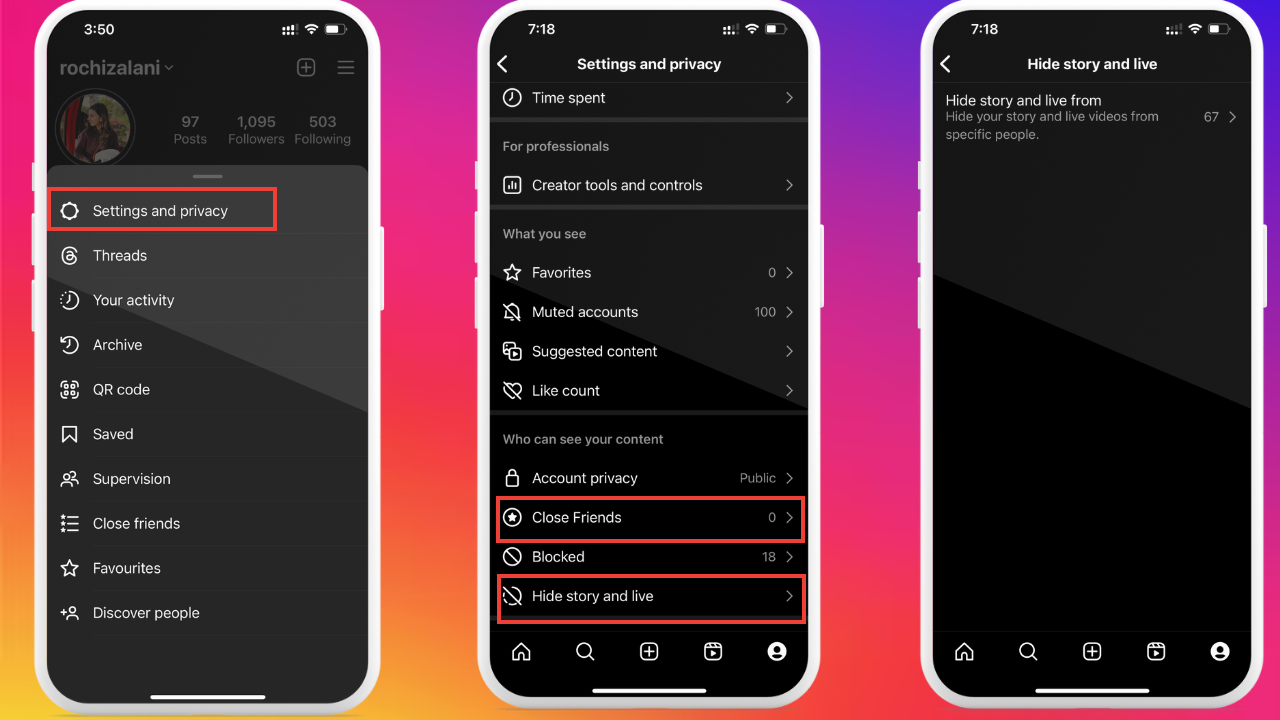
2: Add people to your Close Friends list to post exclusive content
If you want to post content on Instagram only for a certain group of people, add them to your Close Friends list.
1. Go to your profile and select “Settings and Privacy” from the three horizontal lines.
2. Tap on “Close Friends” under “Who can see your content.”
3. Alternatively, you can also select “Hide story and live” to hide your Instagram Stories and Live from a handpicked list.
Right now, the Close Friends feature is only available for Instagram Stories and Notes. But Instagram might be working to also get the Close Friends feature in the in-feed posts, according to TechCrunch.
💡 Learn more: How to Use Instagram Close Friends
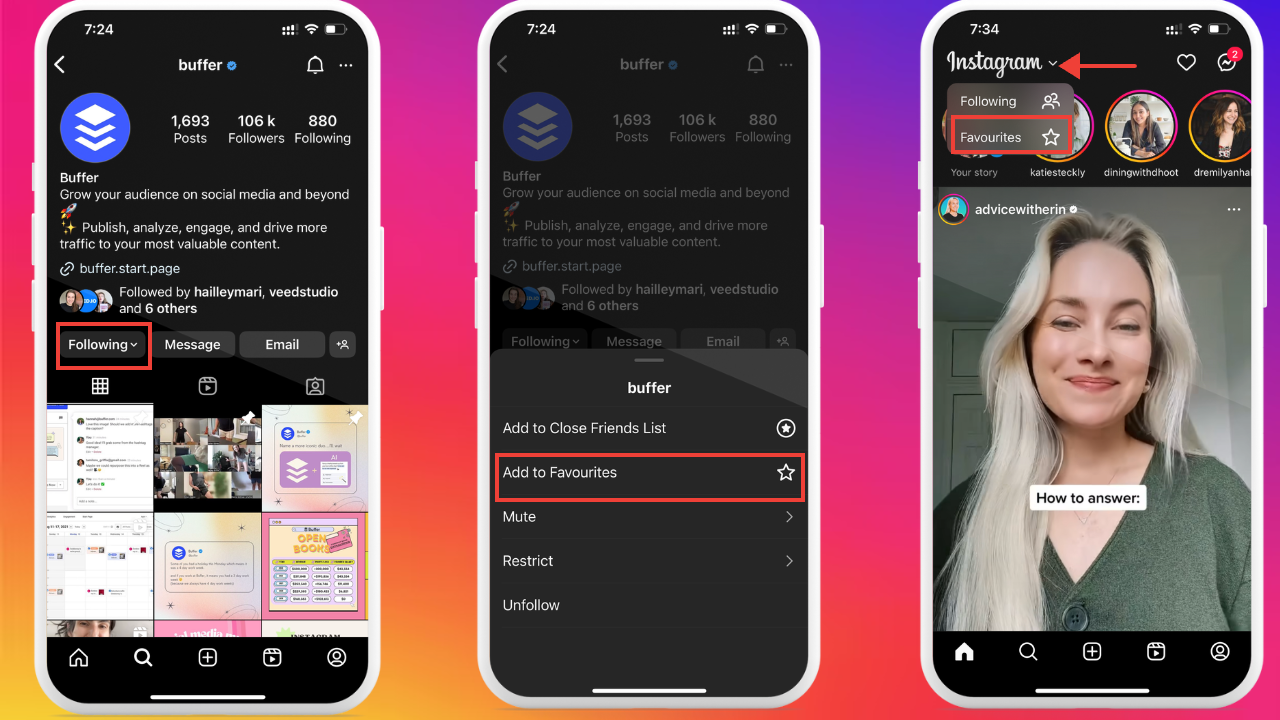
3: Moderate who you interact with by adding them to your Favorites List (or your Muted list)
What if you like someone’s content a lot and want it to appear at the top of your feed every time they post? Add them to your favorites list:
1. Go to their profile and tap the “Following” button.
2. Select “Add to Favorites” to add them to your list. You can have up to 50 accounts in your Favorites list.
3. Favorited accounts show up at the top of your feed with a star icon. You can also scroll through your favorites specifically by tapping the Instagram text on your home feed and selecting “Favorites.”
On the flip side, what if you don’t want to interact with someone’s content? You can:
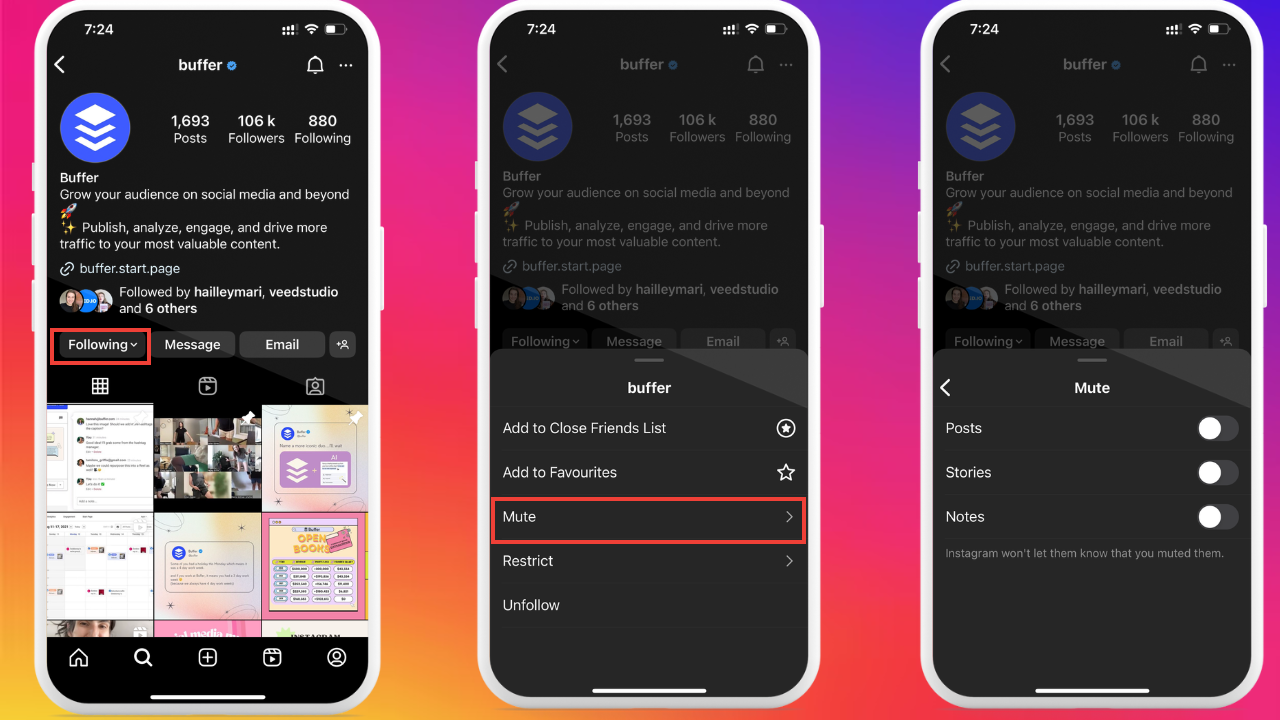
Mute them: Go to their profile and tap the “Following” button. You’ll find the option to Mute them. You can choose whether to mute their Stories, posts, or Notes. They will no longer appear in your feed, but you’ll still follow them. They’ll also never know that you’ve muted them.
Restrict them: The difference between muting and restricting is that the latter is a bit stronger than the former. When you restrict someone, they can’t know that you’ve restricted them, and you’d still follow them — just like when you mute someone. But when you restrict someone, they can’t see if you’ve read their messages, and their comments on your posts will be visible only if you approve them. To restrict someone, go to their Instagram profile and tap the three dots in the upper right. Select “Restrict.”
Block them: Blocking is when you can’t see someone’s content, and they can’t see what you post either. You have the option to block someone’s current account or block their existing account, and any other Instagram accounts they create in the future. The option to block someone is right below the option to Restrict someone.

💡 Note: You can always unmute, unrestrict, and unblock accounts on Instagram. Don’t worry about anything being set in stone.
4: Mark posts as “Not Interested” when you don’t want them in your feed
There are plenty of ways to tell Instagram what you’d like to see less of in your feed.
1. Long press a post on your Explore page and mark it as “Not Interested” if it’s not what you’d like to see in your Instagram account.
2. Mark “Not Interested” in bulk on the Explore page. You’ll get the option to “Hide more” once you hide one post on your Explore page.
3. You can also select “Not Interested” while scrolling if you see a “Suggested for you” post by clicking the three dots next to the post.
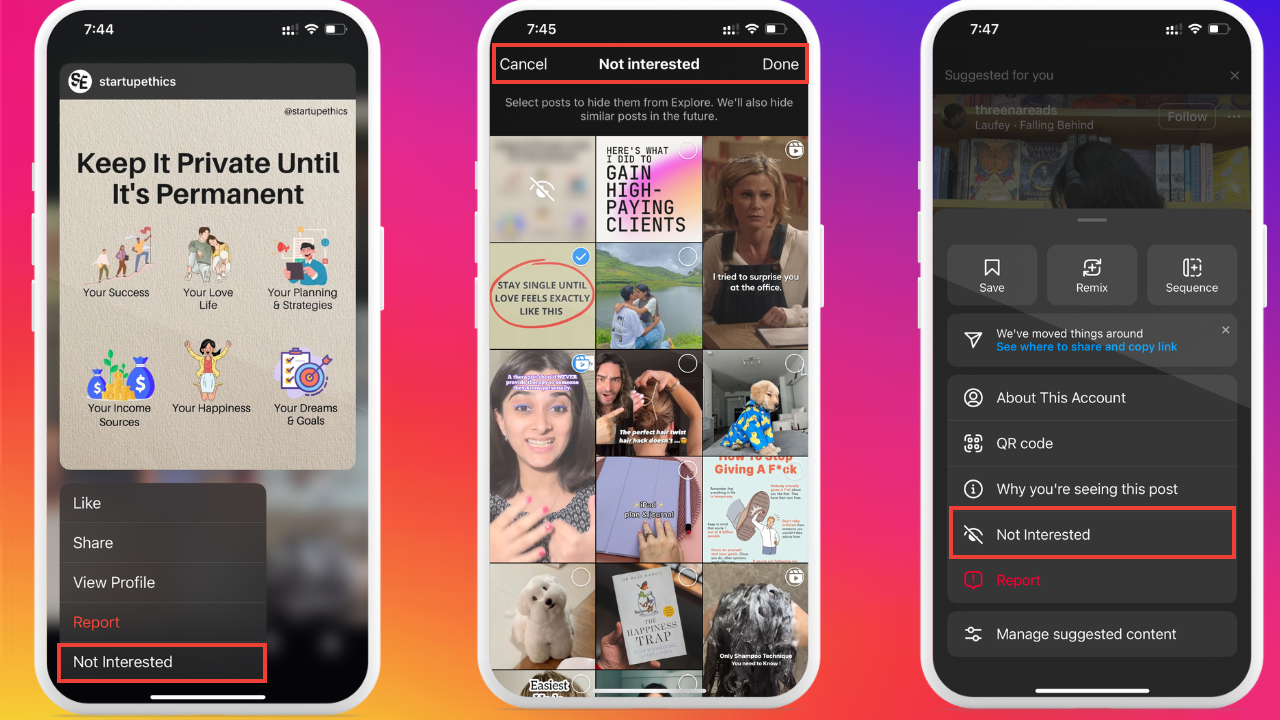
When you mark posts as Not Interested, Instagram understands what you like and what you don’t and improves its recommendations — making for a more pleasurable scrolling experience.
3 tips for using Instagram to grow your business or personal brand
Learning about a platform from scratch and feeling the pressure to grow on it as soon as yesterday is daunting. But it doesn’t have to be so scary. Here are three straightforward tips you can use to grow on Instagram faster:
1: Post high-quality content on Instagram every day
If you read that and rolled your eyes, I don’t blame you.
Posting high-quality content consistently is one of the surefire ways to grow on Instagram — and every other social media platform. But saying that alone isn’t actionable enough, is it?
- What kind of posts should you share with so many content types?
- Where do you find new content ideas for posts each week?
- How do you keep track of posting so many posts?
- When should you share each post?
Let’s solve one problem at a time.
Problem 1 solved: What kind of posts should you share with so many content types?
A mix of trial and error will tell you which types of posts your audience enjoys the most. In the beginning, follow the Head of Instagram, Adam Mosseri’s advice and post at least two feed posts and two Instagram Stories daily.
Once you start to get in a rhythm, check which types of posts are getting the most engagement. And engagement isn’t the number of likes or comments alone. It should also factor in how many shares and saves you get.
Want to make it easy on yourself? Sign up for Buffer, and you’ll get this data at your fingertips without doing all the math yourself.
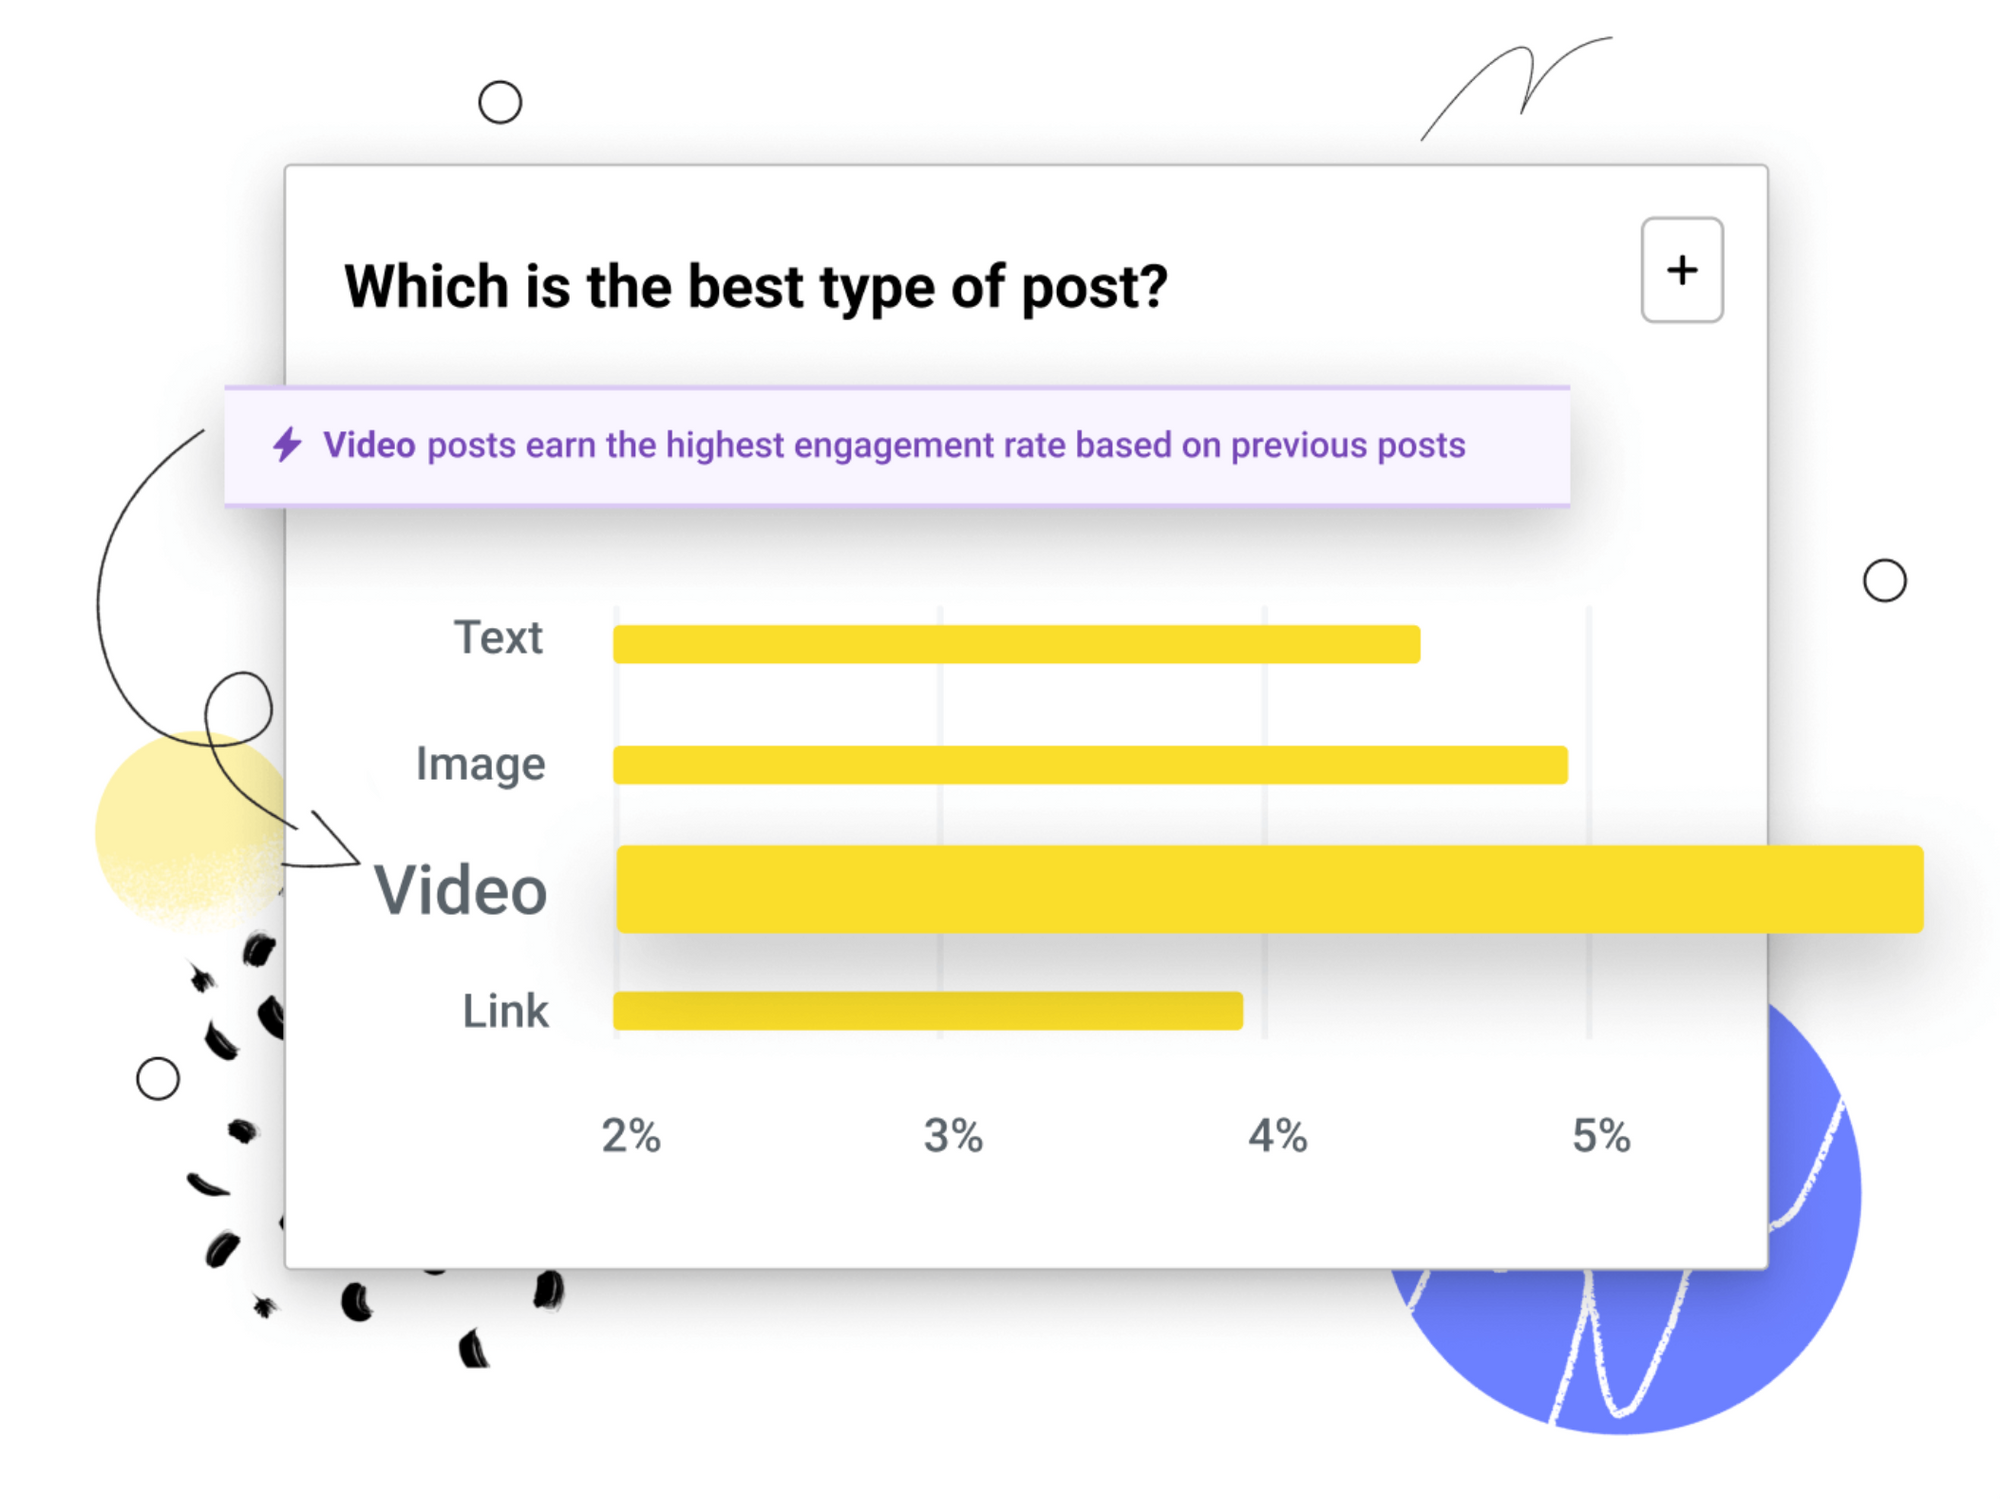
Not just this: Buffer also tells you audience demographics to ensure you’re reaching the right audience and insights for boosted posts so you can compare paid vs. organic results. Pretty solid, huh?
Problem 2 solved: Where do you find new content ideas for posts each week?
Find yourself scratching your head for what to post on Instagram? You’re not alone. I’d suggest looking at these three places for ideas:
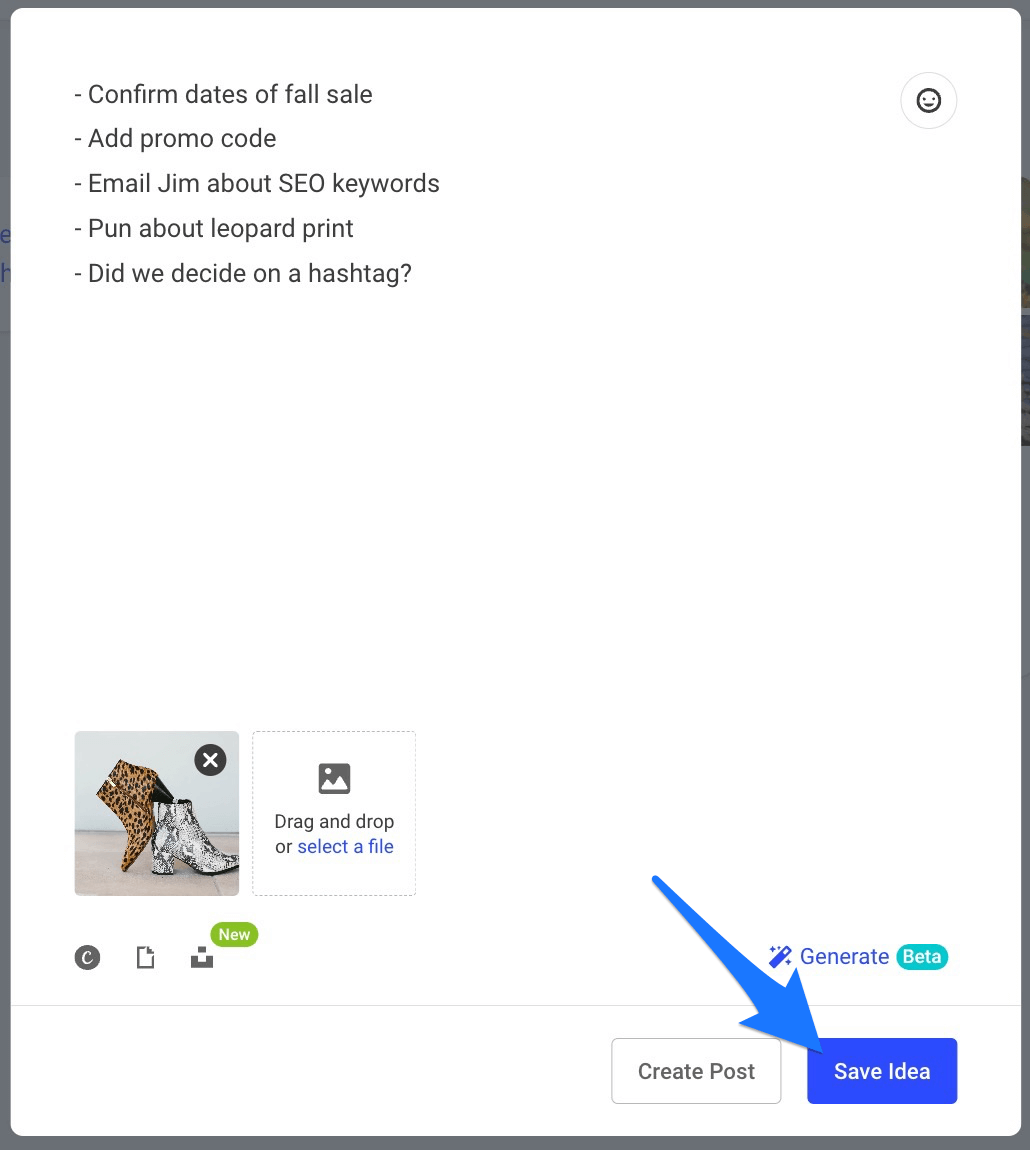
Your audience: You don’t have an in-built audience on Instagram yet. But you have a rough idea of what they’re struggling with. Jot these ideas down and create content around it. If you already have a following on another social media platform, ask your audience about their struggles on that platform and create content for it on Instagram. But you can’t expect yourself to remember all these ideas. Use Buffer’s Ideas feature to note your ideas as they come to you using the mobile app, browser version, or browser extension.
Hop on trends: Use Instagram for a while and you’ll understand certain “trends” — whether it’s an act or a sound. Repurpose these trends to fit your niche and create content around it. Trends are popular and will increase your Instagram reach because they’re pushed by Instagram, too. You can also stay updated on the latest trends by following the @creators account on Instagram. They regularly publish a trends report to help you stay up to date.
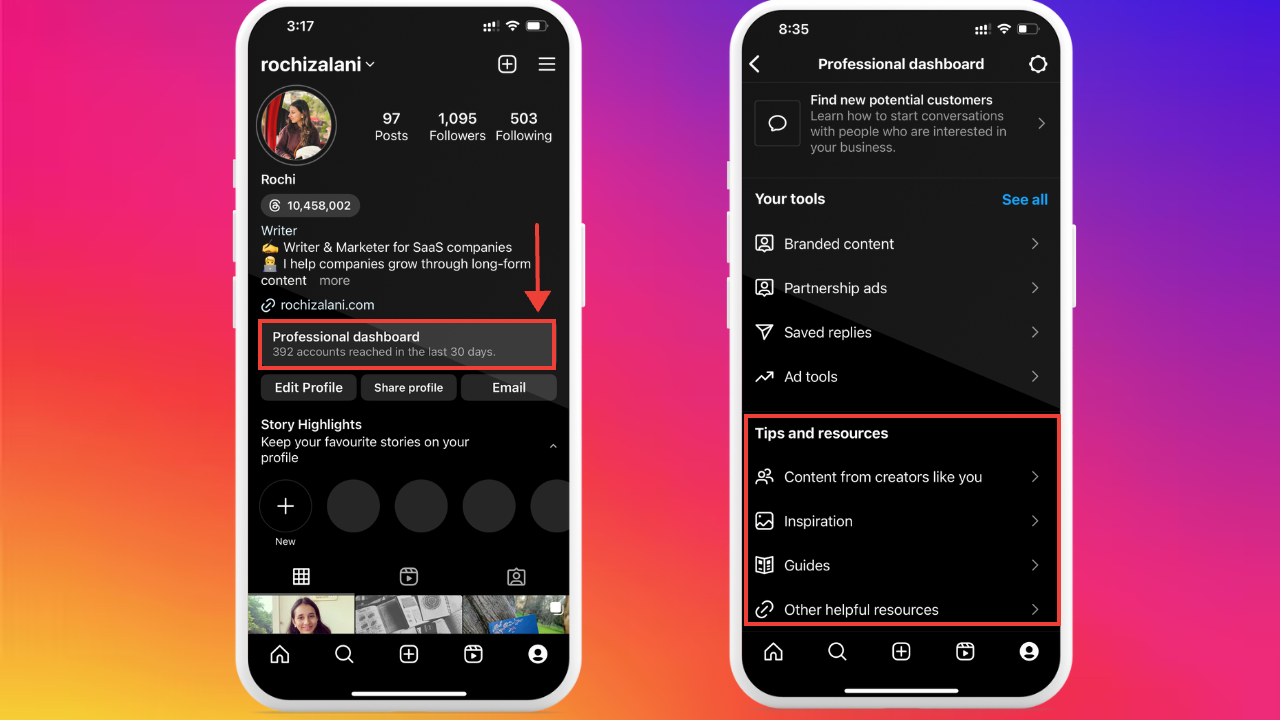
Instagram has also launched various features to help you in the Professional Dashboard. Go to your profile and tap on “Professional Dashboard.” You’ll find a “Tips and resources” section to inspire you here.
Remix a Reel: Instagram now lets you add a clip of your own onto a Reel or post of someone else. You just have to tap on the three dots in the right corner of a Reel or post and select “Remix” to add your own video.
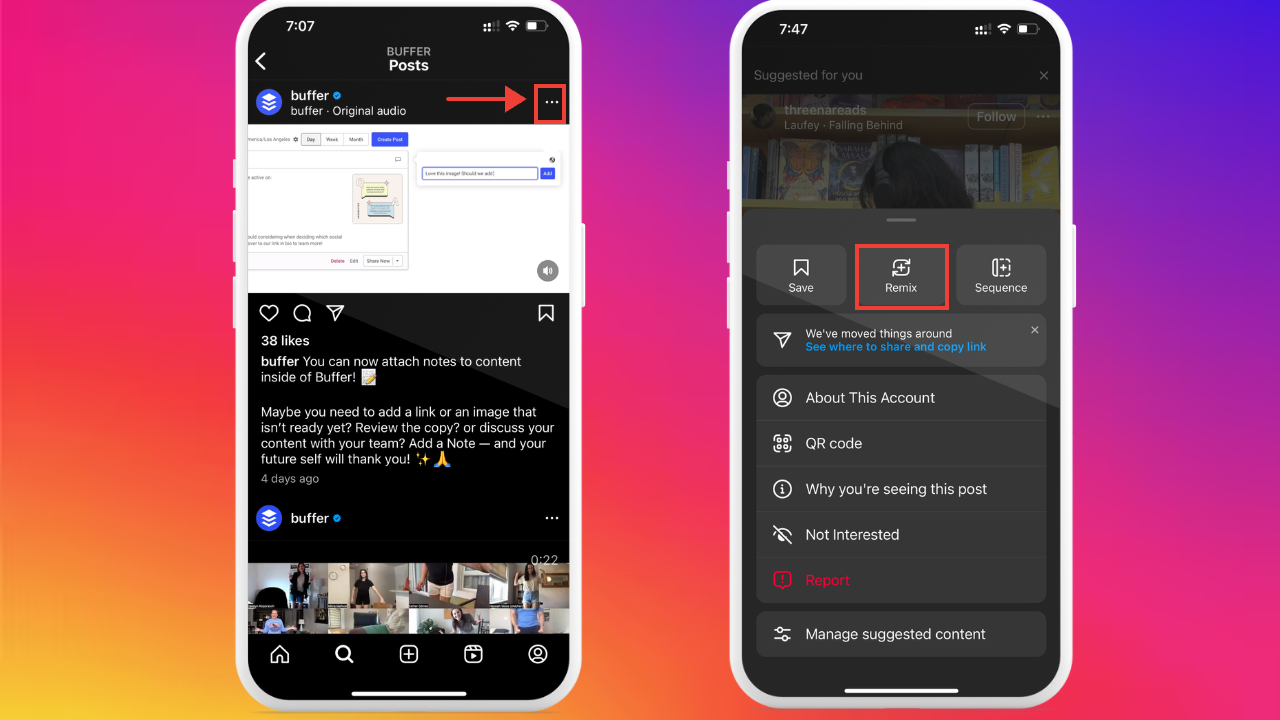
This way, you extend someone else’s idea instead of beating up yourself to think of one. Remix posts with a lot of likes, comments, and shares to increase your reach.
💡 Helpful resource: 19 Examples from Small Businesses That You Can Make Your Own
Problem 3 solved: How do you keep track of posting so many posts?
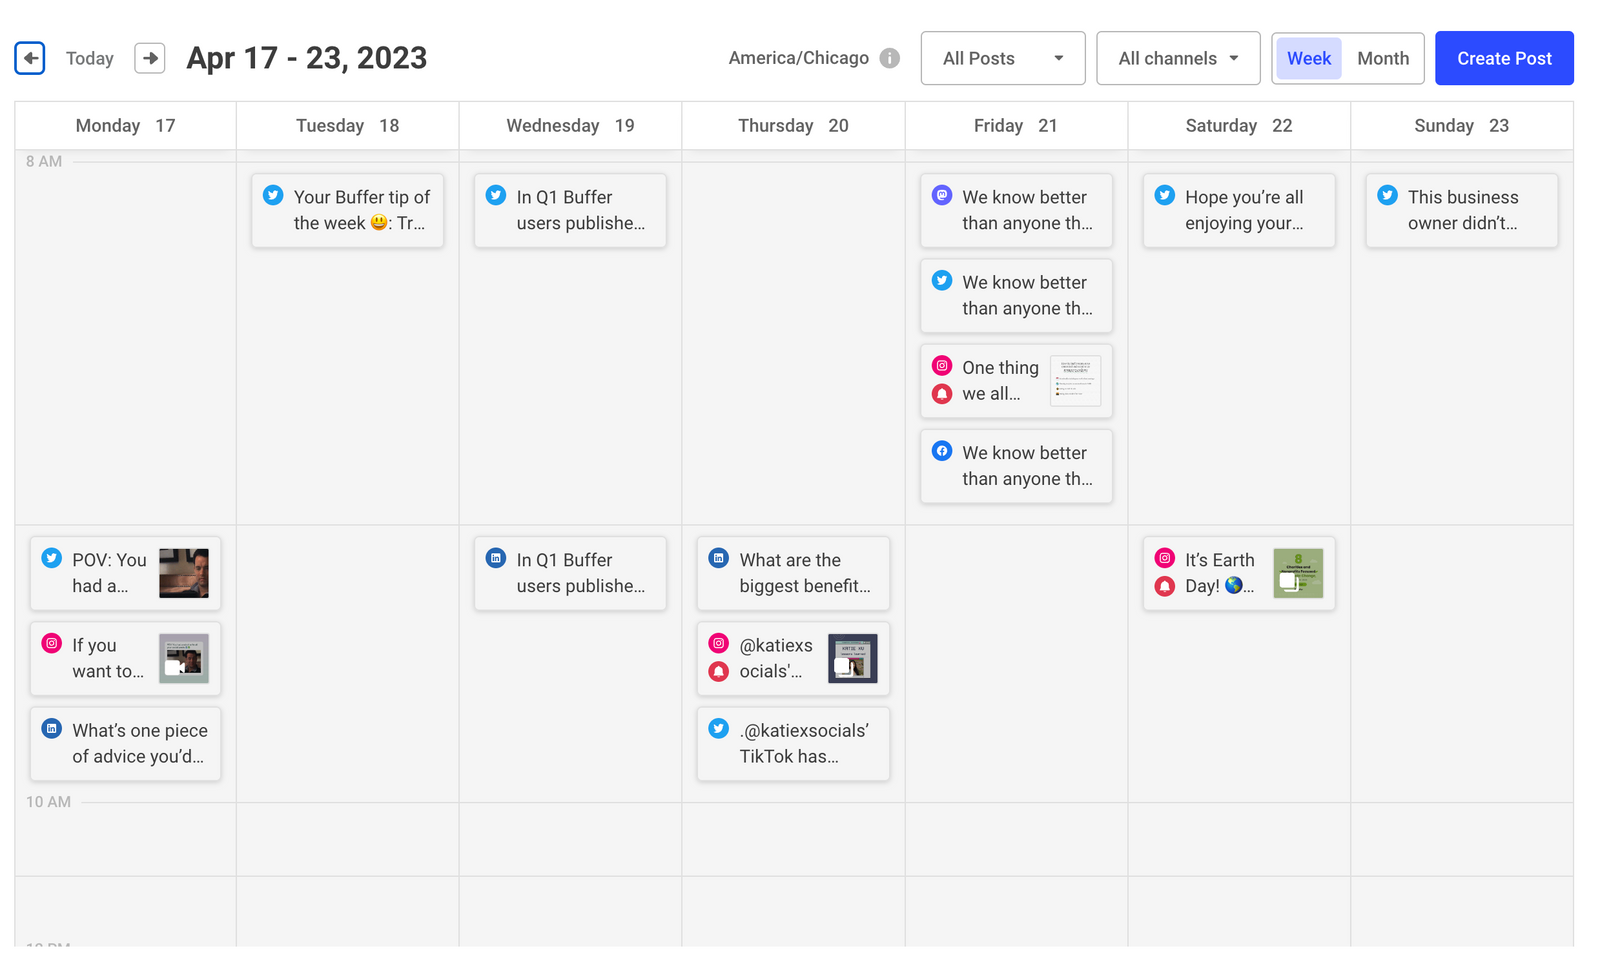
Simple: Schedule it in advance. It’ll take the load off your shoulders, and you can focus on deep work instead of remembering to post something you created.
Instagram has native scheduling now, but the analytics are limited, and you can’t have a calendar view of all that you have to post. Instead, use a social media scheduler like Buffer to schedule your posts and see them at a glance — along with various useful analytics.
Problem 4: When should you share each post?
You can’t post all your Instagram content of the day at the same time, right? But there’s no universal right time to share your posts. The right time is just when your audience is online.
Buffer does the legwork for you and calculates when you get the most engagement — day, time, and all that jazz.
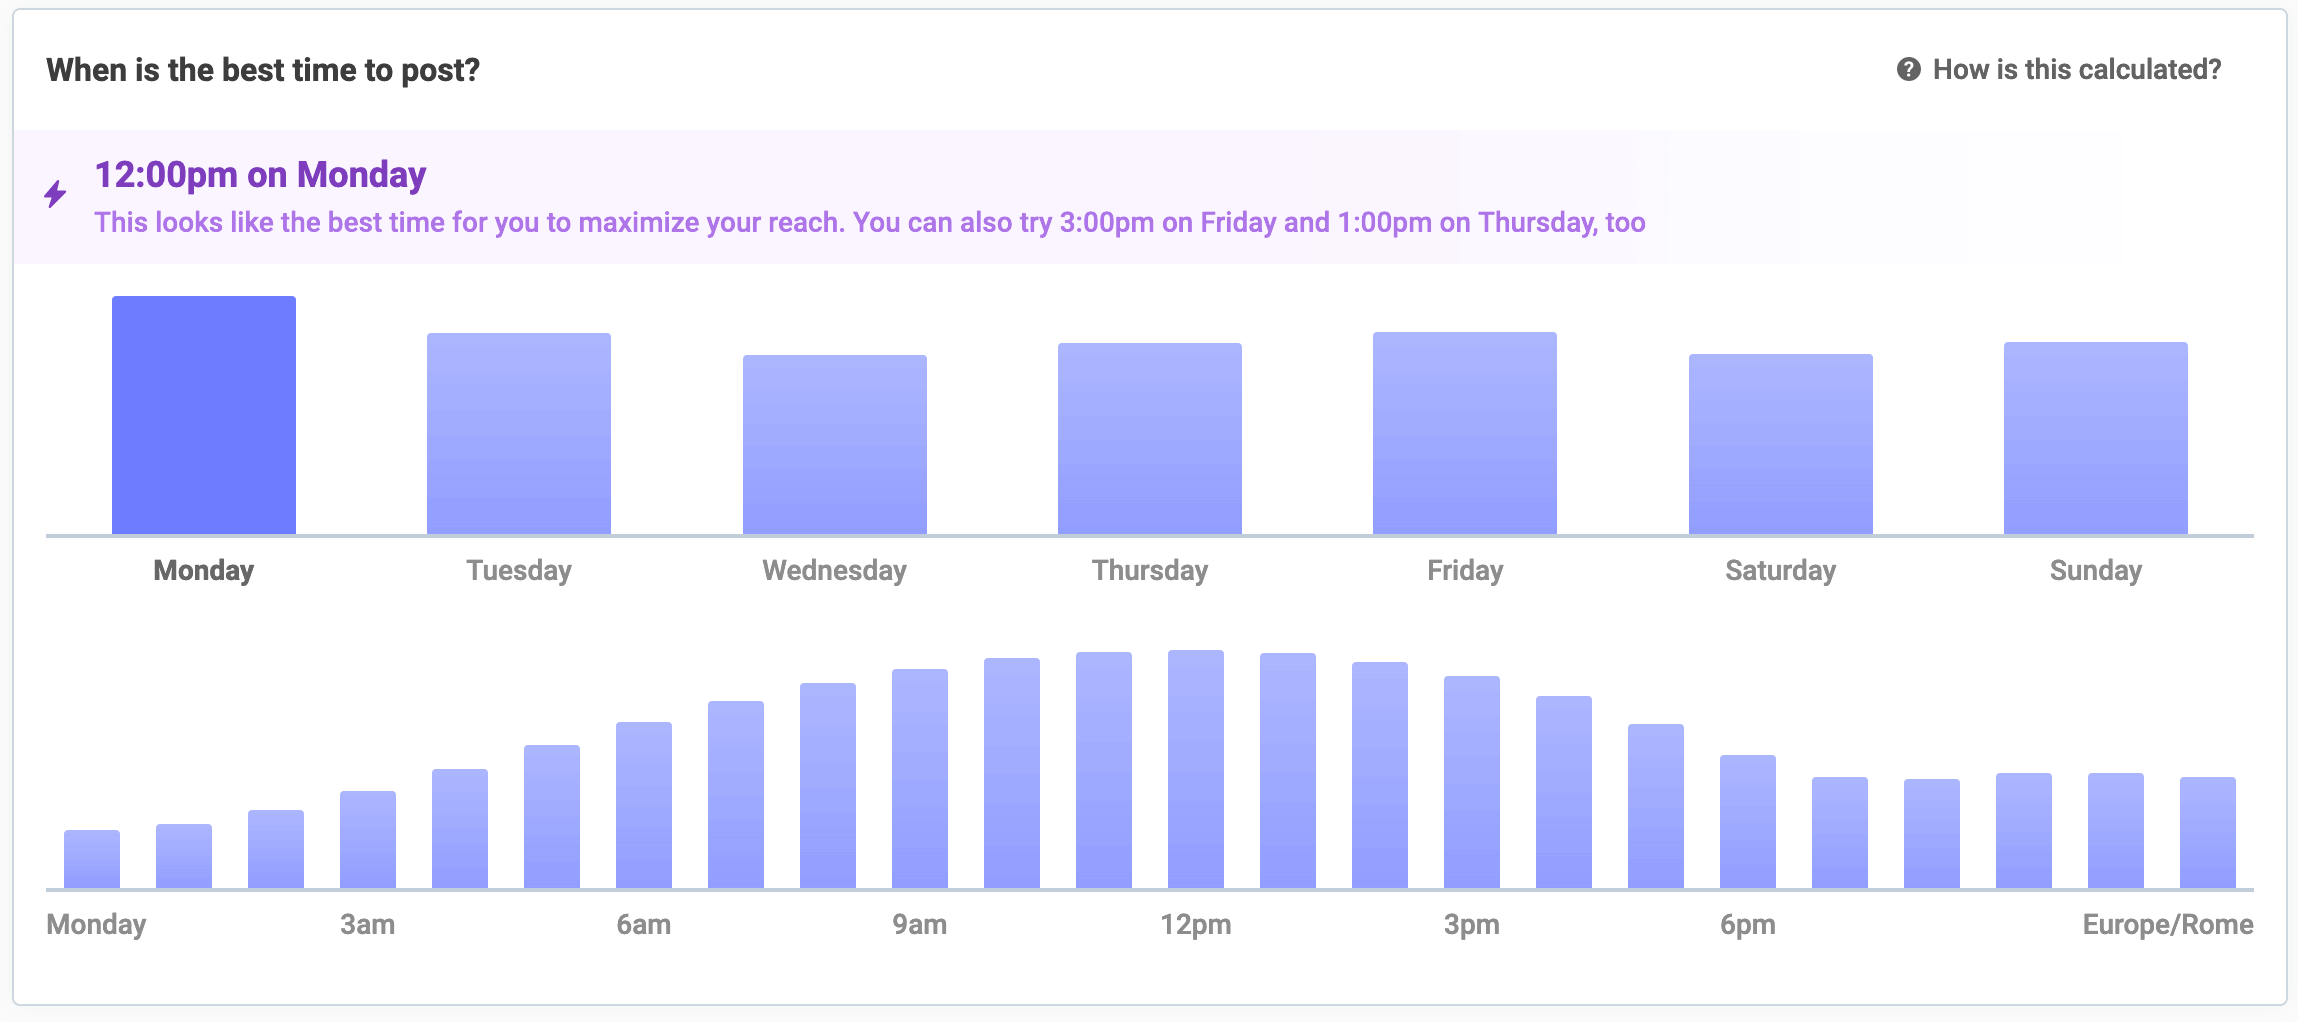
No more wondering about which posting time gives you the best engagement.
2: Use Instagram DMs to connect with your followers
Instagram Stories are an underrated goldmine for connecting with your audience. The most underdog feature? Saved replies and Frequently Asked Questions (FAQ). It’s a templated response to answer your audience’s most common questions or send all your followers a similar message.
Let’s say your audience often asks you about your product’s shipping timelines. You have a standard answer of two to six working days, depending on location.
- You can save that and whip it out without copy-pasting it from your Notes app or retyping it.
- Or you can save it in your Frequently Asked Questions, and your audience can get a response to it without you even entering the conversation.
To start saving your quick replies and frequently asked questions, go to “Settings and Privacy.” Tap “Creator tools and controls,” and you’ll find the option to add “Saved Reply” and “Frequently Asked Questions.”

The only difference between a saved reply and a FAQ is your FAQs appear automatically whenever someone tries to DM you. For saved replies, you have to type the shortcut you’ve set and press send manually.
3: Use relevant keywords and hashtags to show up in front of a relevant audience
Instagram is constantly improving its search capabilities. It’s scraping the keywords inside carousel posts, Reels, captions, and hashtags to rank content. The best part? Instagram’s search engine is still in its early stages — meaning making the most of the basics can fast-track your growth.
Here are three simple things you can do to ace Instagram SEO:
- Use relevant keywords in every post’s text, subtitle, and caption
- Use three to five relevant hashtags per post to categorize your content
- Add your industry and niche keywords in your Instagram profile — like in the username and bio
💡 Helpful resource: How to Make the Most of Hashtags for Instagram
Have fun with Instagram
You’ll enjoy learning how to use Instagram if you have fun with it.
Instead of seeing posting and interacting as a chore, make Instagram a place you look forward to stepping in every day. Customize your feed and build a community you’d want to come back to.