
Deploying mobile applications tends to be a fairly different process than when it comes to web applications. On the web we can push updates and fixes regularly without the concern of versioning, and at the same time our users can access these changes almost instantly from within their browser.
When it comes to mobile applications, things work a little bit differently. First of all, we don’t have the luxury of instant changes — for example, if we need to push a change to our android application then it can take at least a few hours for our users to get the change on their device. And if they don’t have automatic updates enabled, then this process may take even longer as they have to manually download the updated version. Whilst we can automate this process on our CI service, there are a number of different things to think about when it comes to the automatic deployment of mobile applications from a third-party service.
What we have now on the Android team (or at least we are trialling it now it is all setup) is an automated Continuous Deployment flow. This is what this looks like:
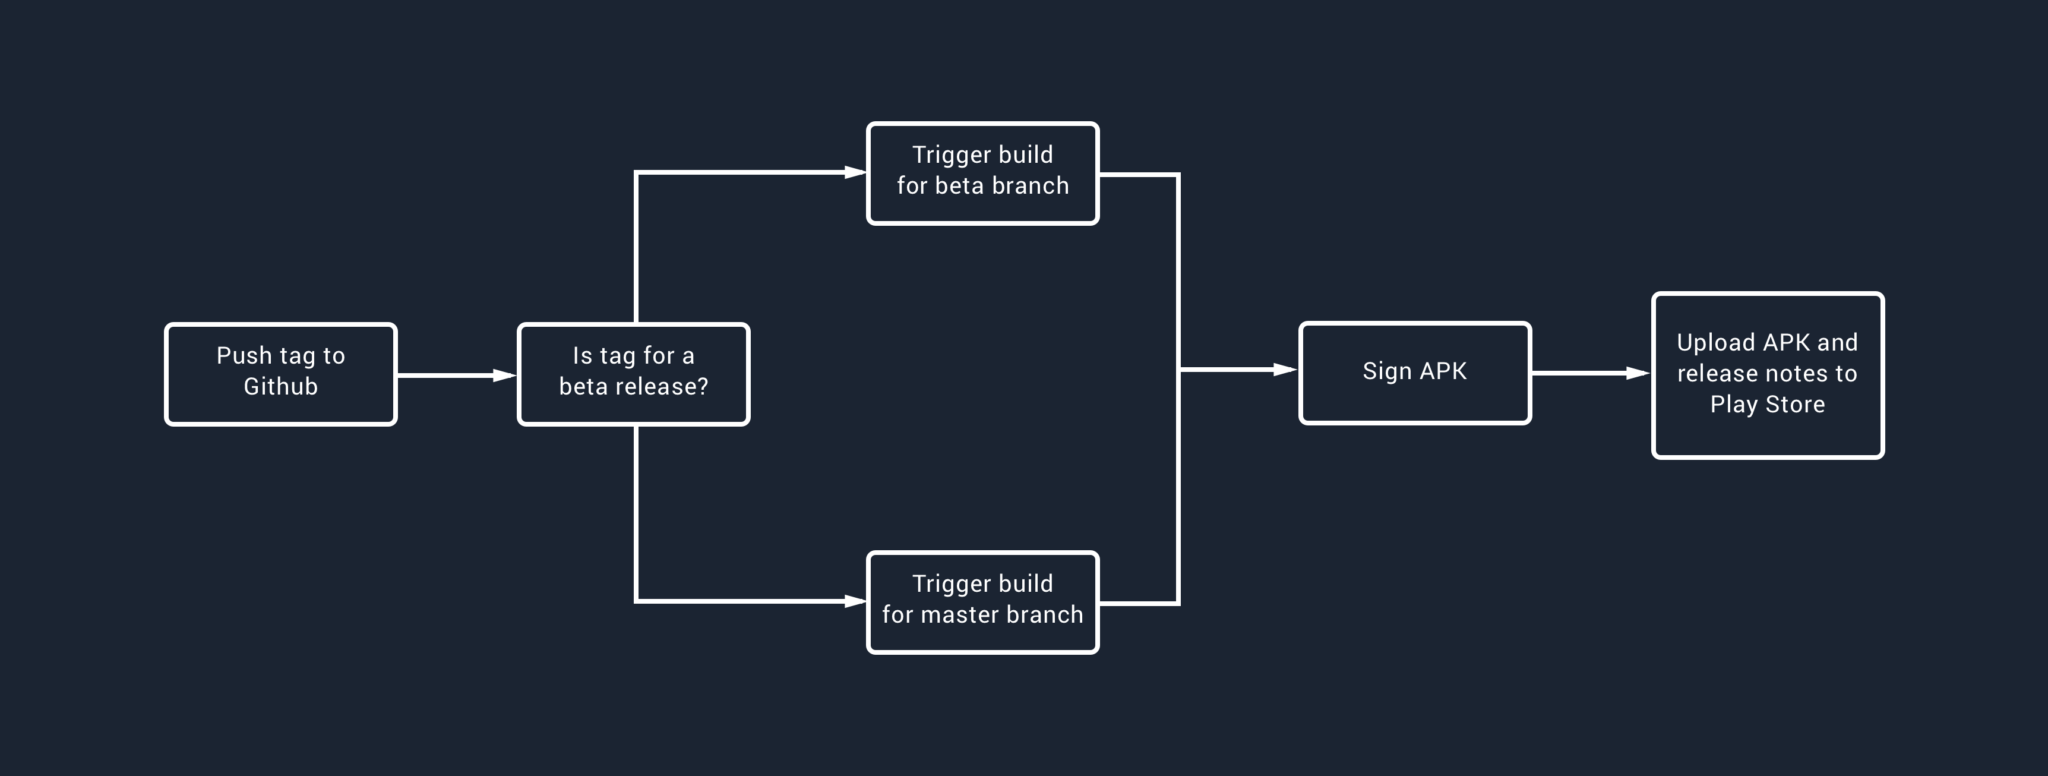
- Every Tuesday and Thursday, Bitrise will kick off a build on our beta branch. It will take the current version (e.g 7.0.16-RC1) and increment the RCX value to use for the app version value. This build will then be uploaded to the play store beta track, along with the release notes held within the whats-new.txt file. Note: This process will only run if there have been commits since the previously shipped commit to the beta track.
- Every Wednesday, Bitrise will kick off a build on our master branch. It will take the current version (e.g 7.0.16-RC1), strip the -RCN representation and increment the minor version number.
In this post I want to take a look at how we can fully automate and schedule our deployment process for our android applications with the use of Bitrise CI. This article will be split into two sections:
- Deploying builds to the Play Store using Bitrise — We’ll first look at how we can use GitHub tags to trigger Bitrise builds to then be deployed to the Play Store. This process requires both manual versioning and tagging, but allows us to shift the responsibility of building and deployment from the developer and onto our CI service.
- Running scheduled builds and deployment — Now that we have configured bitrise to build our desired APKs for release, we need to add some further configurations so that our versioning and build process is fully automated for our chosen schedule.
Note: It’s important to note here that we are only going to be using this scheduling process for minor releases. Bigger features or major releases are not so ‘scheduled’ so we will still manually ship these by pushing a tag ourselves.
The great thing about having each of these steps as an individual workflow means that we can still manually trigger releases if we want to. And because of the way which the versioning is being handled, if we trigger things manually then the automated process will continue to work as intended.
On the Android team at Buffer, we’ve always had a manual release process in place. Whilst manually releasing updates might not be classed as a trivial process, there are several factors that we could bear in mind when it comes to this topic:
- Human error — Whatever the task, there is always room for human error. And whether your building, uploading or releasing an update to the play store, there is plenty of room for error here. Maybe you end up building on the wrong branch, maybe you don’t have the latest commits or maybe you forgot about the local changes you made and they accidentally end up in the release build. Whilst these may seem like obvious things to some people, everyone has bad days or a change of circumstance so we can’t rule them out completely.
- Responsibility silo — In some teams, it’s common to have a single person responsible for the release process. Whilst this focuses the responsibility, it also creates both a knowledge and responsibility silo for this process. What happens if this person is on vacation, falls ill, leaves their job or for some other reason is not around for a release. In these situations it get’s tricky as the responsibility may then be pushed onto someone else who may not know how release work — which could introduce more problems.
- Keystore distribution — And if you don’t have the above issue to worry about (and aren’t using Google Play App Signing) then key distribution will likely be present. Even having your application signing key on one developers machine is a security / liability risk.
- Machine configuration — Having machines which may change configuration, or multiple machines which have different configurations already, manage the build process of your application could end in unexpected results (be it based off of the above points or not). Having a single machine and configuration responsible for this process greatly reduces any mishaps which may happen from a difference in configurations.
- Cognitive load — And finally, a manual build and release process requires us to be aware of when updates need to go out, set aside time to handle that process and stick to that plan. It can be too easy to get caught up with “Let’s just get this fix in there too”, or getting caught up in another task and before you know it your day is up. Automating the entire release process can help remove the cognitive load that may be introduced with a manual release process.
To summarise all of the above points, fully automated continuous deployment allows for a more professional practice when it comes to the software development lifecycle for our applications. This not only enables our teams to becomes more flexible and focused, but also allows our users to benefit from more frequent updates to our apps. This in turn improves their experiences and accelerates the feedback loop for our product.
Manually Triggering Release builds using Bitrise
The first thing that we need to configure with Bitrise is the ability for it to sign and release our APKs. When I started to automate our release process I decided to first put in place triggered releases when a tag was pushed to GitHub. This meant that builds no longer needed to take place on my machine and I could shift that responsibility onto our CI service. What we want to achieve is something like this:
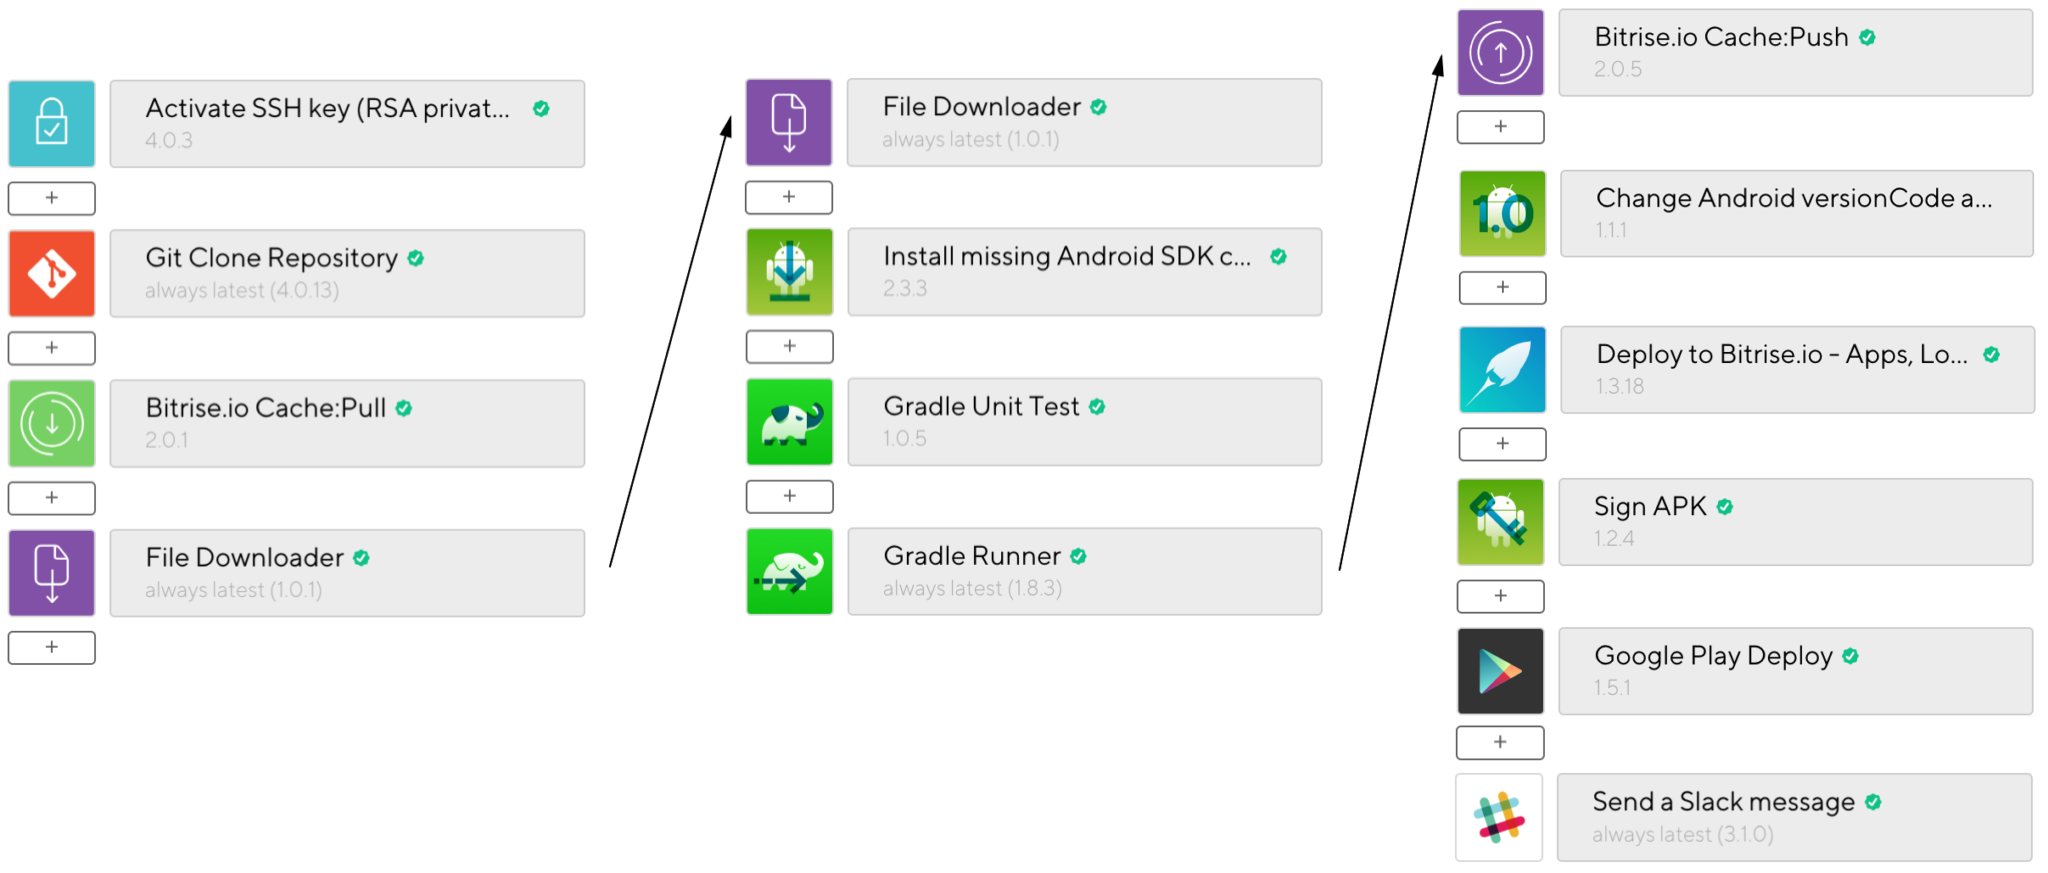
The setup process for having Bitrise deploy builds for you doesn’t actually involve too much. For our beta releases, the Bitrise workflow currently looks a little something like this:
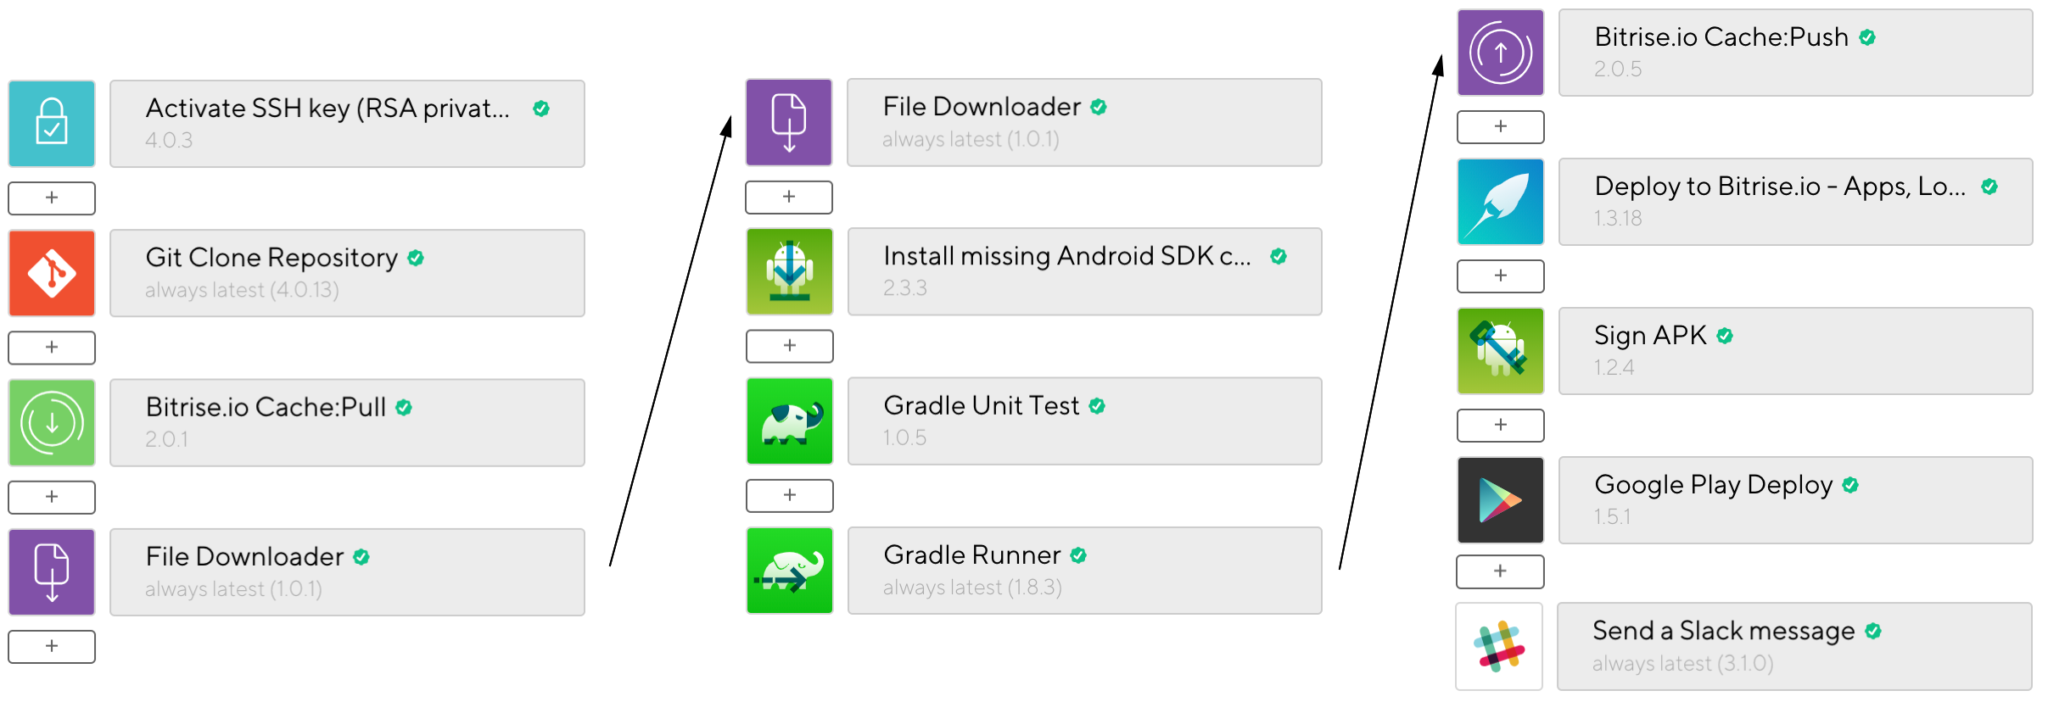
You can see here that there are a number of different steps required to publish an APK to the play store. Let’s look at setting up our own release workflow:
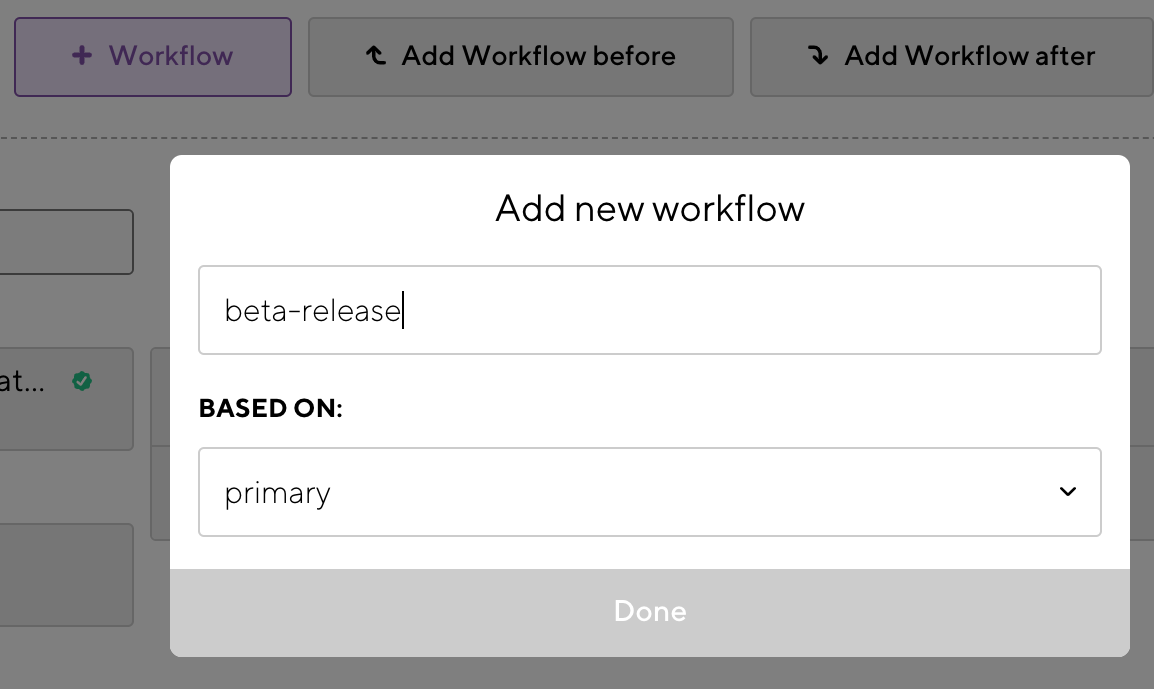
- First of all, we need to create a workflow that will handle the building and deployment of our APK. What we’re going to do here is select + Workflow and create a new workflow based on an existing one — this saves us adding the same configuration details over again.
- Now that we have our workflow, we can tidy it up a bit. While setting this up you may want to remove your UI and Unit Tests so that you can get things working a bit quicker. When it comes to the actual real world use of your workflow though, it is up to you as to whether or not you run tests here. If you are running tests on every single Pull Request and never merge anything in without tests added and passing, then you may be alright to skip it here if you decide. For us, we run Unit and UI tests on every PR that is opened – so theoretically the master / beta branch should never be broken. For that reason, we’re currently just going to run the Unit tests on our build workflow.
- The next thing we need to do is give Bitrise access to our keystore so that it can sign our APK for release. If we head on over to the Code Signing tab at the top of our workflow editor section. Here you can upload the keystore file and enter the credentials also. Once this has been done, we can add a new File Downloader step to our release workflow.
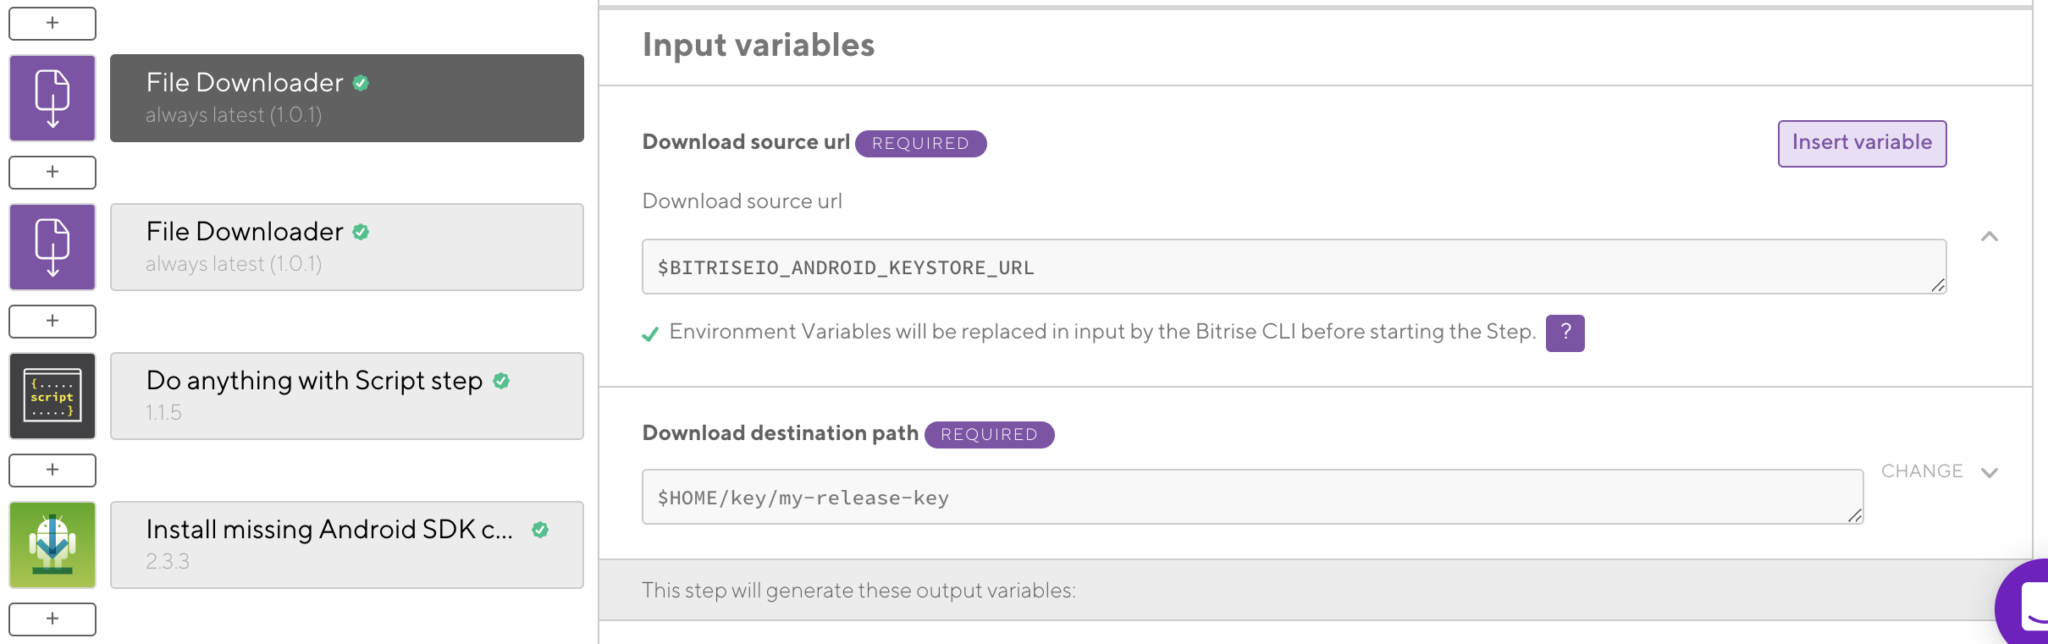
We’ll configure this using the $BITRISEIO_ANDROID_KEYSTORE_URL environment variable that we created when uploading our keystore, followed by the destination which our key should be placed at. Now that this step has completed, Bitrise has the ability to sign our application.
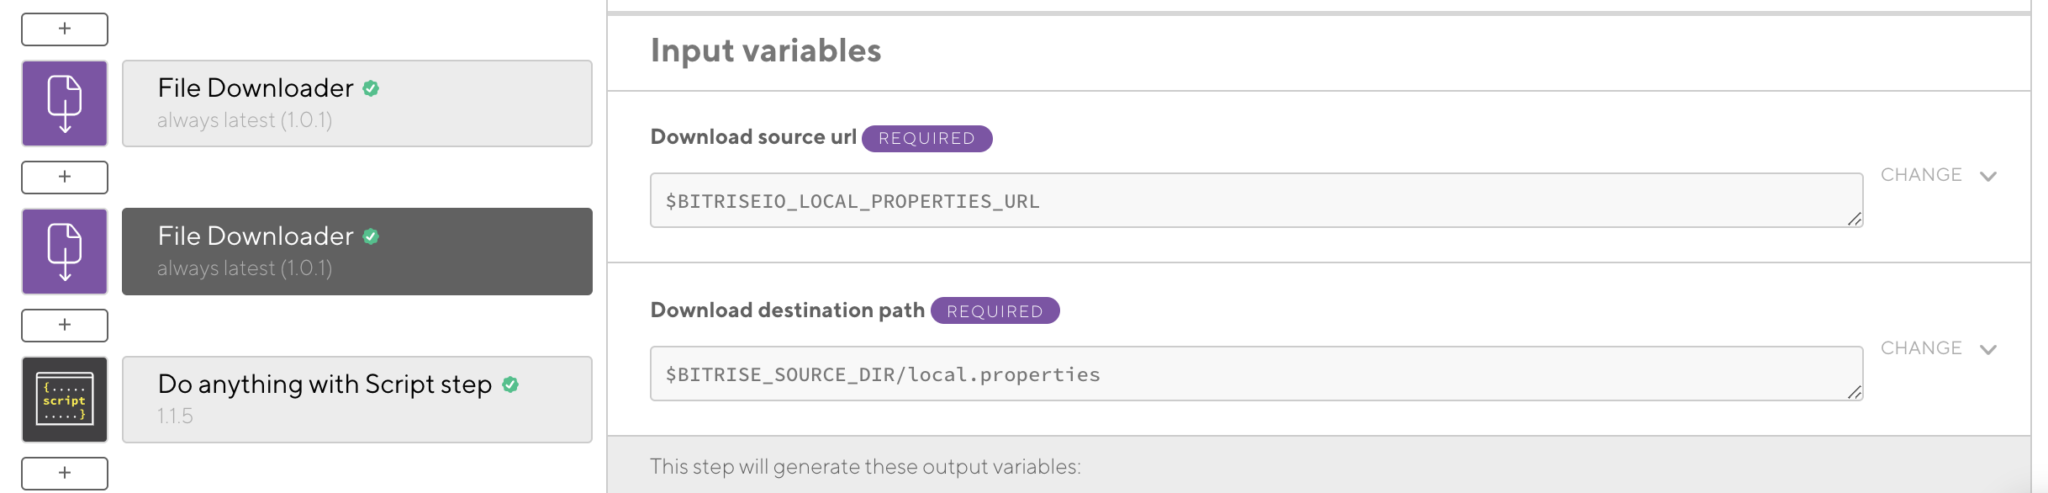
- The next step may be optional for you, but in some cases you may make use of the local.properties file to keep API keys for use within your applications. Chances are you don’t commit this to your repository, so this is something that Bitrise won’t have access to out of the box. Here we’re going to do the exact same as the previous step but with our local.properties file:
- The next significant step within this workflow is the actual signing of our APK. Bitrise provides a step which will do all of the work here for us, we just need to configure it to work correctly. As per the image below you’ll notice some environment variables being used:
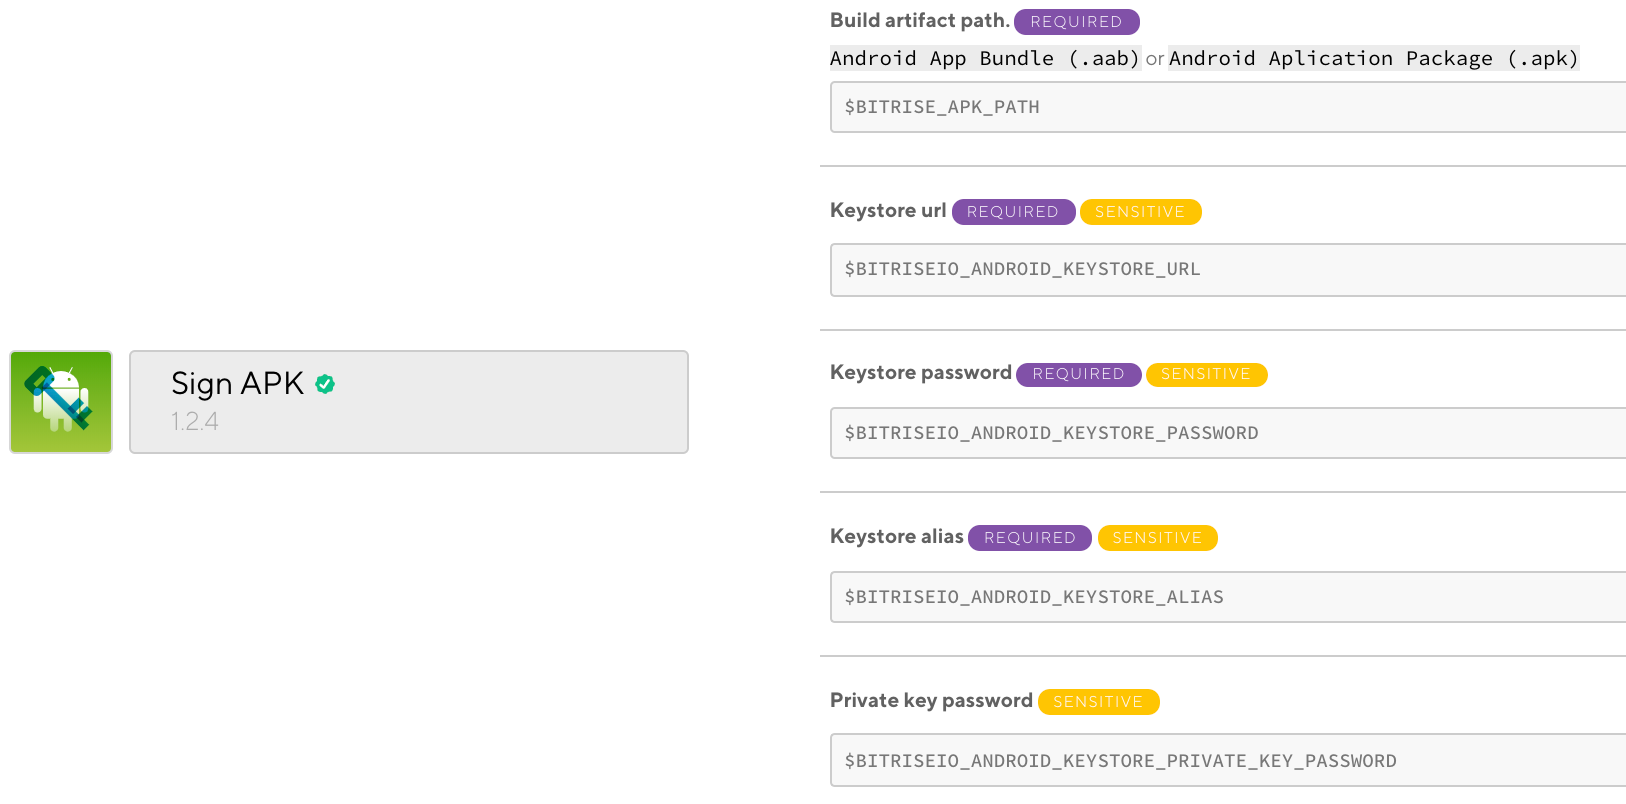
$BITRISE_APK_PATH – This is pre-generated by Bitrise, unless you need to use a specific path then this environment variable will suffice.
$BITRISEIO_ANDROID_KEYSTORE_URL – The location of your remote keystore for download and use within this step.
$BITRISEIO_ANDROID_KEYSTORE_PASSWORD – The password for your keystore, saved as a Secret key within your Bitrise dashboard.
$BITRISEIO_ANDROID_KEYSTORE_ALIAS – The alias for your keystore, saved as a Secret key within your Bitrise dashboard.
$BITRISEIO_ANDROID_KEYSTORE_PRIVATE_KEY_PASSWORD – The private key for your keystore, saved as a Secret key within your Bitrise dashboard.
If the above has all been configured correctly then Bitrise will now have sufficient information to sign your APK ready for release.
Note: You can remove this step completely by opting in for Google Play App Signing over in the Play Console!
- The next step is the actual deployment of our APK to the Google Play console for release. Again there are a couple of details that we need to configure here before this will work.
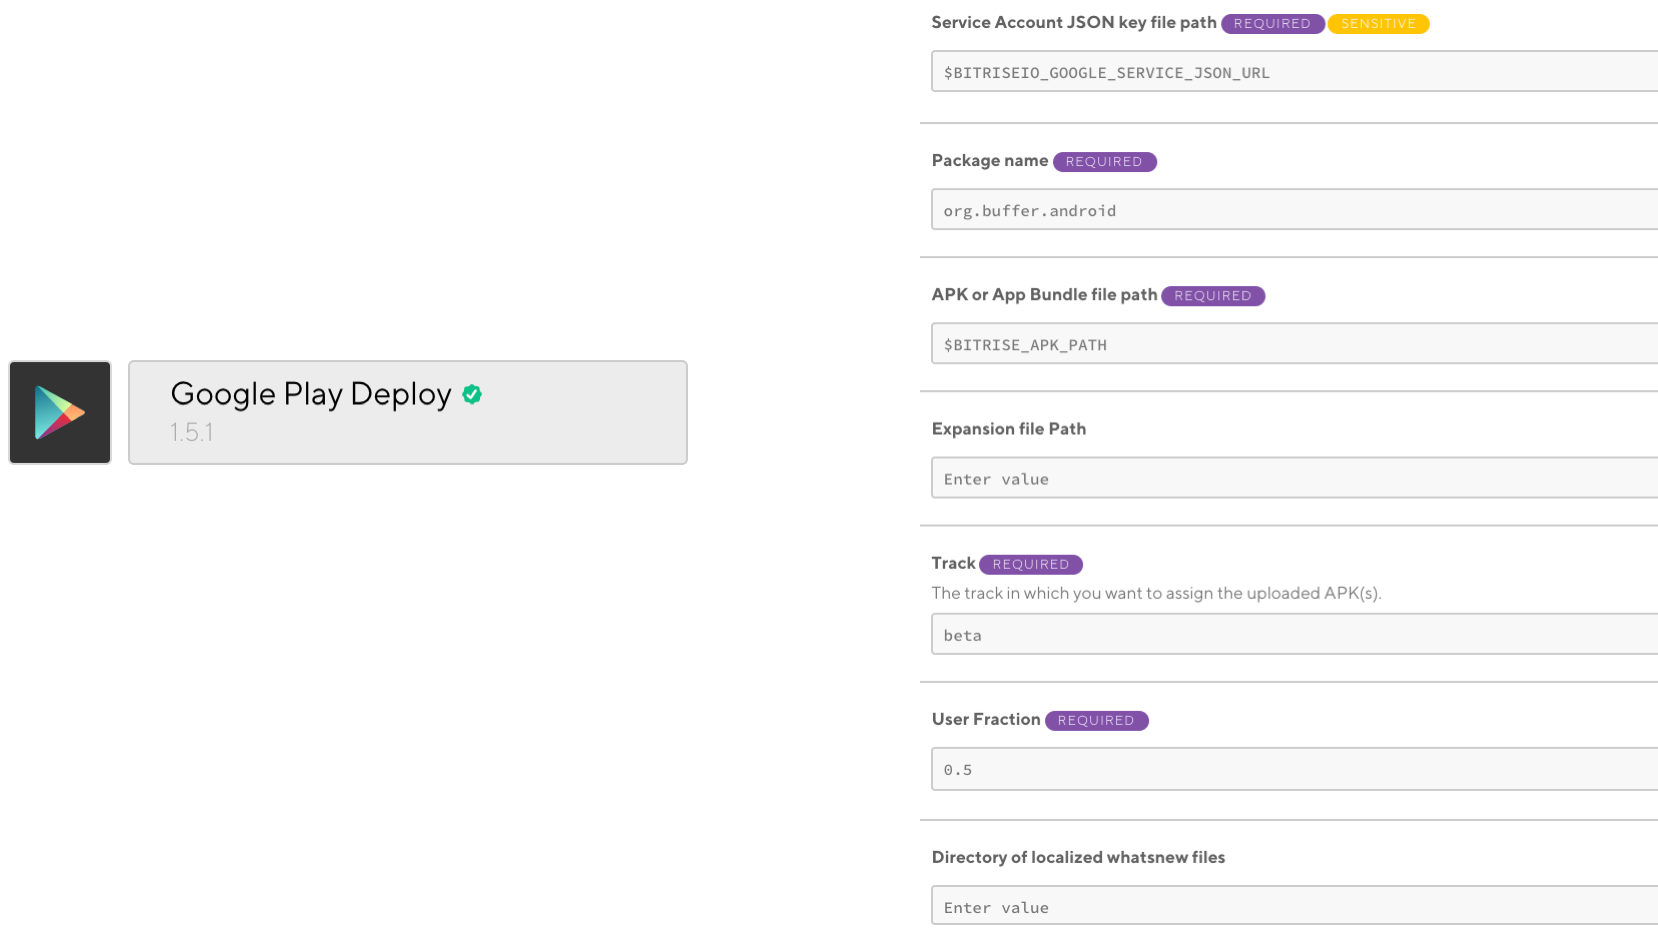
- $BITRISEIO_GOOGLE_SERVICE_JSON_URL – This is the URL for the google services service account json file, this is what essentially gives Bitrise the ability to publish releases for us on our play store account.
- Package name – The package name for the application that we are publishing
- APK path – The path at which our APK is located, using the default bitrise environment variable
- Track – The track which we are publishing the release to. Here we are using beta, but you can also release to production and perform rollouts here too
- User Fraction – The % at which you wish to release the build to when using the rollout option within the track configuration field
- Directory of whatsnew files – The location of the whatsnew files which contain the release notes for your application release
- Finally, we need to begin by defining some triggers. For this we’re going to use Github tags – this means that Bitrise will use our Github webhook to detect when a new tag is pushed to our repository, which in turn will trigger our build process. The neat thing is that we can use patterns to recognise which tag pattern should trigger what workflow. You’ll notice below that we use *.*.*-RC* to detect that the tag thats been pushed is for a beta build and hence triggering the beta-release workflow. For builds patterned as *.*.*, these are not beta builds and should trigger a production release.

With the above in mind, the prod-incremental-release uses a clone of the beta-release workflow. The only difference is that our build gets released the production track with a rollout percentage of 10% (we then update this manually as we please).
Scheduling Release builds using Bitrise
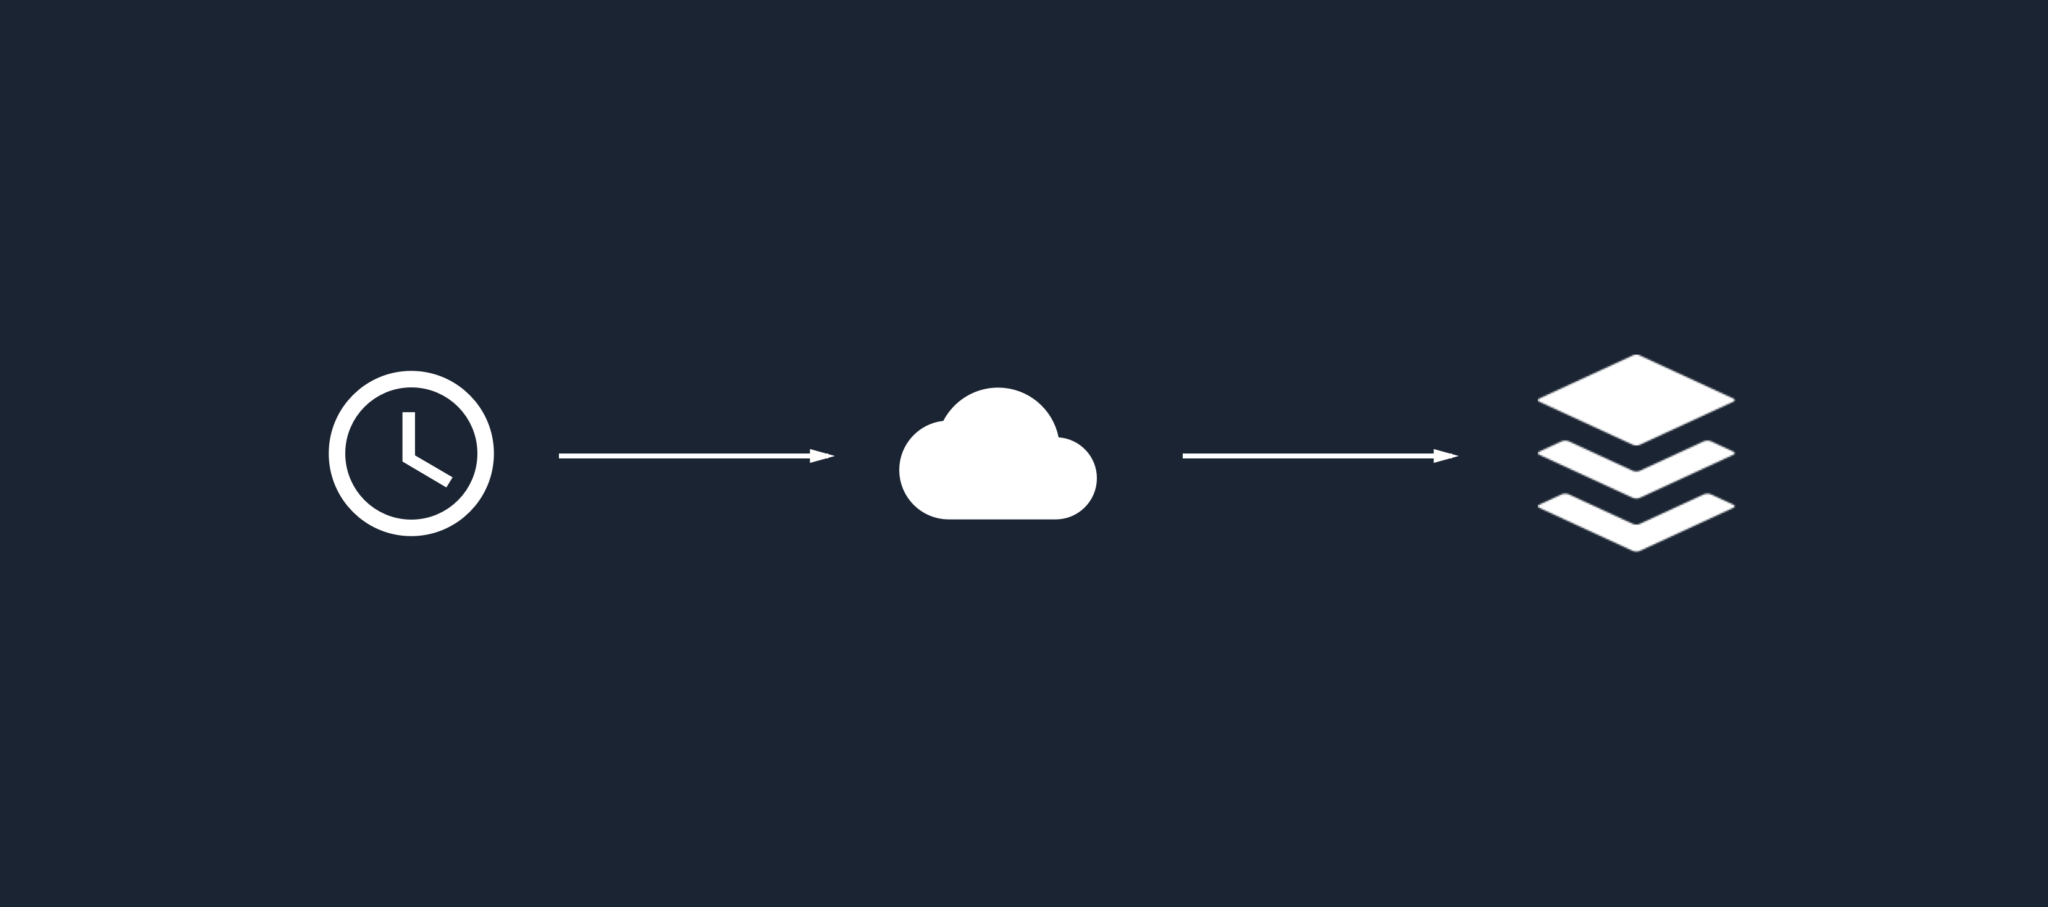
Now that we have a workflow that can be used to build, sign and deploy builds to the Google Play store – we need a workflow that can be scheduled to run at a given time we decide. Displayed below are the steps that we need to take within this workflow.
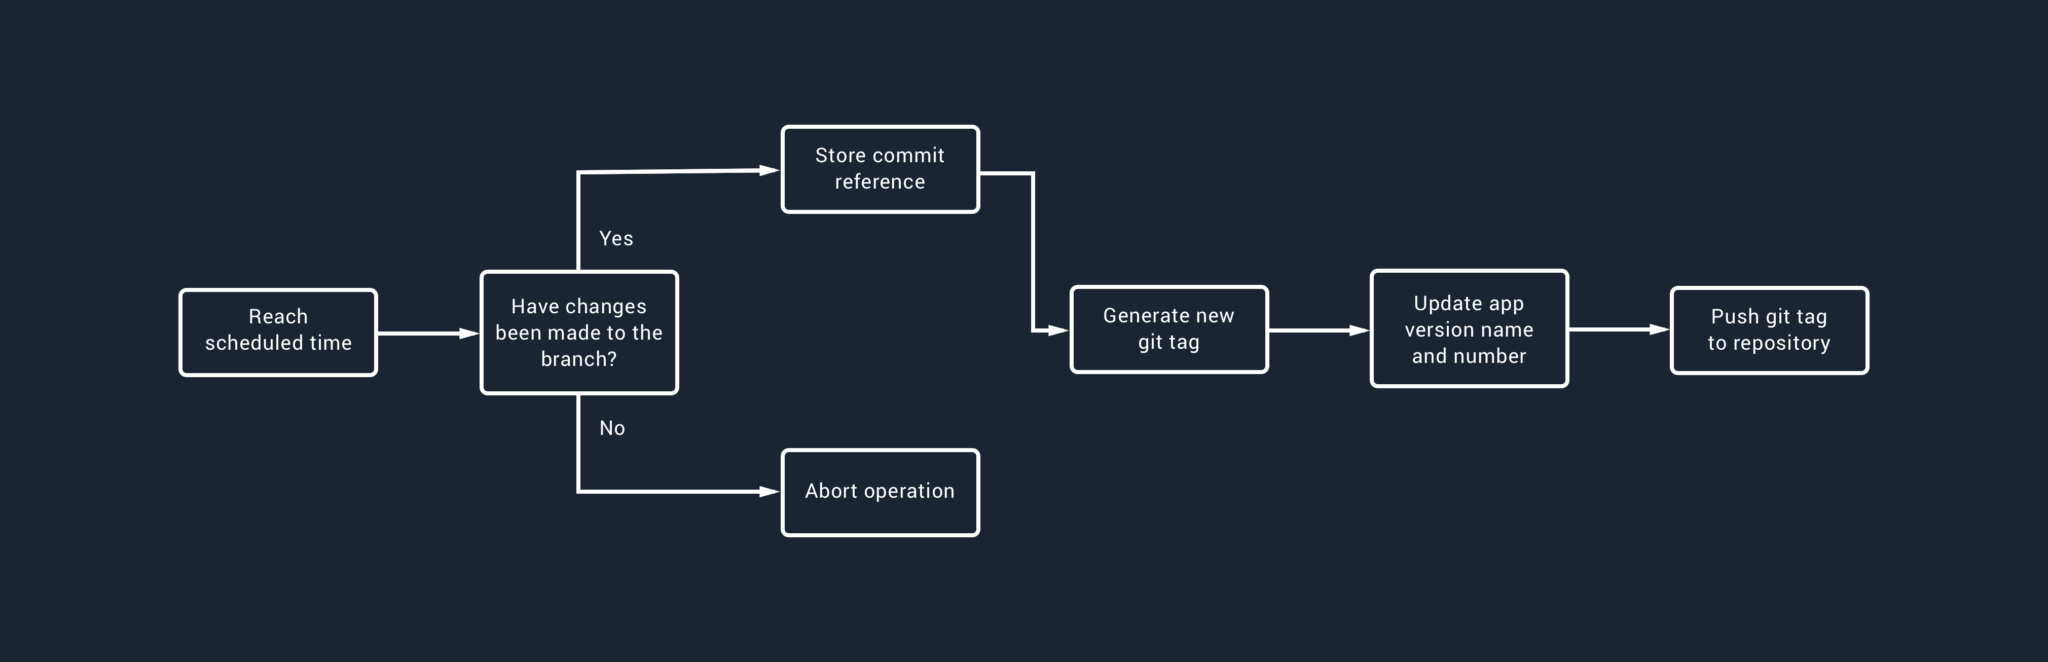
To summarise this:
- We want to run this workflow at a specified day / time. Bitrise currently has a feature in beta which allows you to select the days and hour/minute which a workflow should be run at.
- Now we only want to run this workflow if changes have been made to the branch that we’re building from as we don’t want to ship an update if there’s nothing new to ship!
- If there are changes to ship then we’re going to store the latest commit reference – this is so that the next time this workflow is run, we can use this commit to compare the new latest commit again.
- Next we need to generate a new version name and number for our application, this will then be used to update our application build.gradle file.
- Finally, we’ll use the generated version name to create a new tag and push this tag to the project repository
And when we push this tag to the repository our original beta-release workflow will be run as it will be triggered by the tag push.
Now in comparison to our previous workflow, this new workflow has a little less going on:
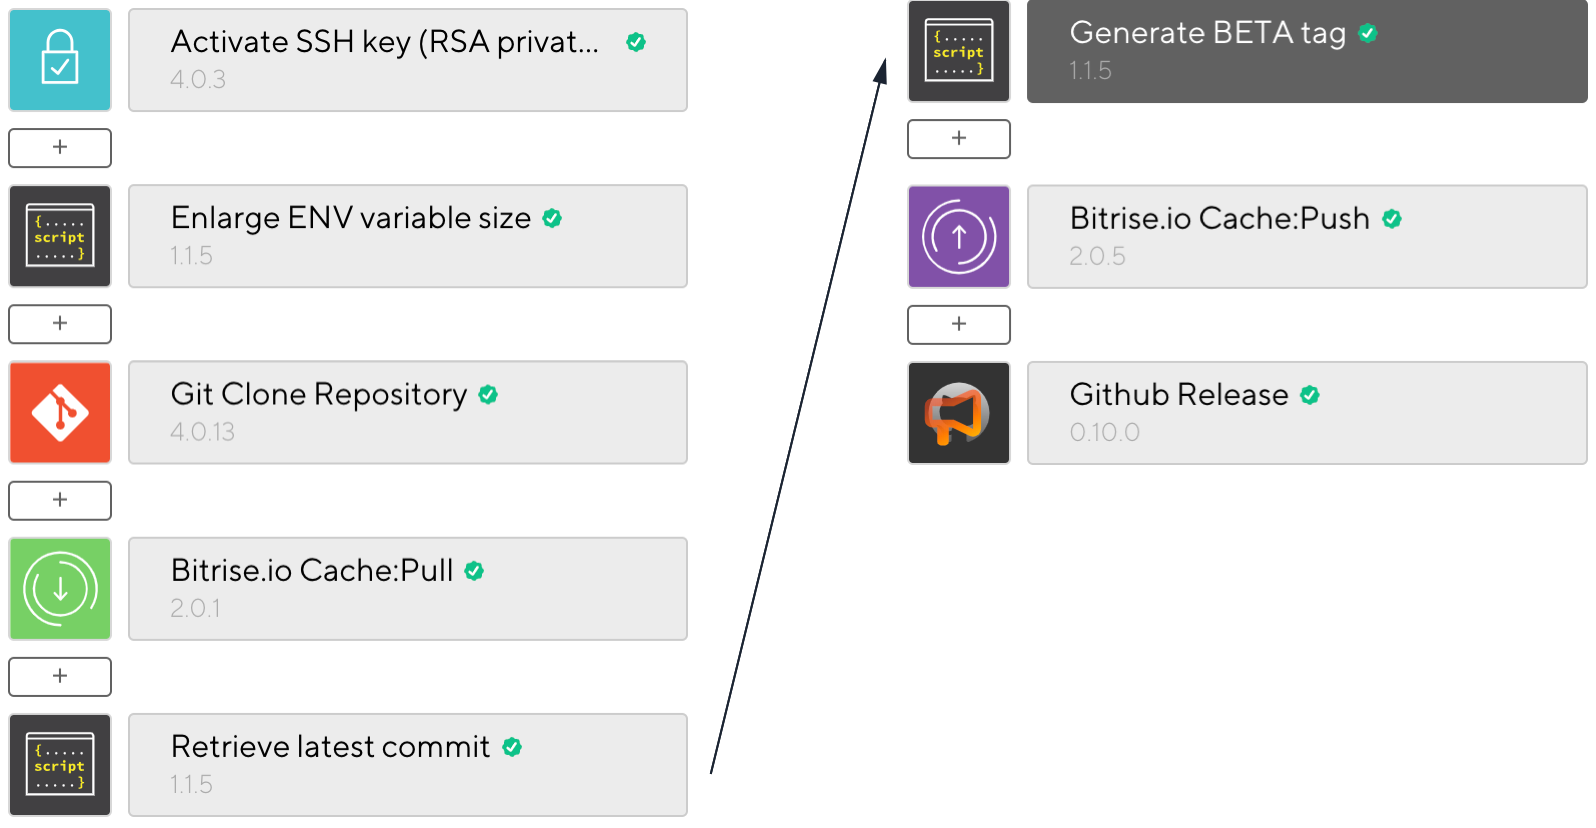
Let’s break down the differences here in comparison to our first workflow:
- Enlarge ENV variable size – This script is used to increase the allowed size for environment variables. Because you’re working off of a branch, the commit messages might get pretty large due to the number of commits being merged into the branch. Bitrise imposes a default restriction on the size of this variable – however, we can increase this size by defining the following script within this given script step:
#!/usr/bin/env bash
set -ex
mkdir -p ~/.envman && echo -e '{"env_bytes_limit_in_kb": 30}' > ~/.envman/configs.json- Retrieve last commit – In this step we need to assert whether or not we should run the scheduled workflow, based off of whether or not the previously logged commit matches the most recent commit on our given branch. We do this like so:
git fetch --tags
export GIT_CURRENT_TAG="$(git describe --abbrev=0 --tags)"
envman add --key GIT_CURRENT_TAG --value "$GIT_CURRENT_TAG"

file_pth="$BITRISE_CACHE_DIR/git_latest_commit"
latestCommit=""
if [ ! -f "$file_pth" ] ; then
  echo " (!) File does not exist"
else
  latestCommit="$(cat $file_pth)"
  envman add --key GIT_LATEST_COMMIT --value "$latestCommit"
fi

currentCommit="$(git rev-parse --verify release/beta)"
if [[ "$latestCommit" != "$currentCommit" ]]
then
    export GIT_LATEST_COMMIT=$currentCommit
    envman add --key SKIP_BUILD --value ""
else
    envman add --key SKIP_BUILD --value "skip"
fi

file_pth="$BITRISE_CACHE_DIR/git_latest_commit"
echo "$GIT_LATEST_COMMIT" > "$file_pth"
Let’s break this down a little bit. We begin by fetching all of the tags from our current repository, followed by fetching the most recent tag in that list and exporting it to the GIT_CURRENT_TAG field. Now that we have this field, we export it as an environment variable so that we can make use of it in other steps of our workflow as GIT_CURRENT_TAG.
git fetch --tags
export GIT_CURRENT_TAG="$(git describe --abbrev=0 --tags)"
envman add --key GIT_CURRENT_TAG --value "$GIT_CURRENT_TAG"
Next we need to try and fetch the stored commit value from the Bitrise cache. Here we make use of the Bitrise cache directory and attempt to access a file labelled as git_latest_commit. Now at this point, if this file doesn’t currently exist then it means that a commit value hasn’t been logged (this would likely be the first time the workflow is run, or if you clear the Bitrise cache). However, if the file does exist then we retrieve the commit value from the cached file path. And once we have this we export it as an environment variable so that we can use it within other steps of this workflow, as GIT_LATEST_COMMIT.
cache_file_path="$BITRISE_CACHE_DIR/git_latest_commit"
latestCommit=""
if [ ! -f "$cache_file_path" ] ; then
  echo " (!) File does not exist"
else
  latestCommit="$(cat $cache_file_path)"
  envman add --key GIT_LATEST_COMMIT --value "$latestCommit"
fi
Now that we have (or don’t have) the stored commit value, we need to go ahead and fetch the current commit from our branch). We use a git command against the branch we’re building and save this within a field, currentCommit. Next we use this currentCommit value along with the latestCommit value to check if they are equal, if they’re not equal then we want to go ahead and continue this workflow. At this point we export the current commit that we just retrieved as GIT_LATEST_COMMIT. We also clear any value that is currently stored in the SKIP_BUILD environment variable – this variable is used to determine whether or not other steps within this workflow should be run (we’ll finish the configuration of this later). On the other hand, if the current commit and latest commit values are equal then we set the SKIP_BUILD environment variable value to skip. Again, we’ll finish the configuration for step skipping towards the end of this section once the whole workflow is implemented.
currentCommit="$(git rev-parse --verify release/beta)"
if [[ "$latestCommit" != "$currentCommit" ]]
then
    export GIT_LATEST_COMMIT=$currentCommit
    envman add --key SKIP_BUILD --value ""
else
    envman add --key SKIP_BUILD --value "skip"
fi
Finally, we take the GIT_LATEST_COMMIT environment variable that we just created and write it to the cache file located at cache_file_path. This means that the next time this workflow is run, the latestCommit value from our initial cache_file_path check will be populated with this GIT_LATEST_COMMIT value.
cache_file_path="$BITRISE_CACHE_DIR/git_latest_commit"
echo "$GIT_LATEST_COMMIT" > "$file_pth"- Generate beta tag – Now that we have the commit information available for our release, we can go ahead and generate the tag for our release. Now it’s understandable that each application may have a different way of configuring the version name for their app, so you may need to tweak this step accordingly. For example, in Buffer Publish we use X.X.X for production releases and X.X.X-RCX for beta releases. The version naming is probably the part that catches a lot of automated build workflows out as you need to manually configure this somehow. This is how we have achieved this within a script step:
versionName=`echo "$GIT_CURRENT_TAG"`
newVersion=""

if [[ $versionName =~ "RC" ]]
then
    newVersion=$versionName
else
    newVersion=$versionName$"-RC"
fi

currentValue=${newVersion#*"RC"}
newValue=0
if [ $currentValue > 0 ] || [ $currentValue != '' ]
then
    newValue=$(($currentValue+1))
else
    newValue=1
fi

name="${newVersion%"-RC"*}"
versionName=$name"-RC"$newValue
export GIT_BETA_TAG="$versionName"
envman add --key GIT_BETA_TAG --value "$GIT_BETA_TAG"
We begin by getting a reference to the current git tag that we retrieved from the previous step. This sets the foundation for the current version name of the release.
versionName=`echo "$GIT_CURRENT_TAG"`
newVersion=""
Next we need to handle the RC suffix in the version name – this script would look a bit different in our production release workflow. We begin by checking if the current version name contains the “RC” text and if so, we leave the version name as it is – assigning it to our newVersion field. Otherwise, we add the “-RC” suffix and assign it to our newVersion field ready for formatting with our RC value in the next steps. We need this check here as the the current release in the play store may supersede our beta version, meaning that there will be not RC suffix in place currently.
if [[ $versionName =~ "RC" ]]
then
    newVersion=$versionName
else
    newVersion=$versionName$"-RC"
fi
Next we need to work out the current RCX value that is to be used for the tag. Our workflow is only going to be used for minor releases, so we need to retrieve the value after the RC string and increment it. We begin by using the currentValue field and accessing the value which appears after the “RC” string – next, if this value currently exists (ie. it is greater than 0 or isn’t empty) then we increment this value. Otherwise we default to setting this value to 1 – this will be used in the case where the current release is a production build and we are releasing a beta that supersedes that.
currentValue=${newVersion#*"RC"}
newValue=0
if [ $currentValue > 0 ] || [ $currentValue != '' ]
then
    newValue=$(($currentValue+1))
else
    newValue=1
fi
Finally we need to put all of the above pieces together and export a beta tag environment variable for use later. We begin by taking the newVersion field that we generated for the version name and strip everything from the “-RC” string and onwards. Next we take this name field and append “-RC’ followed by the new numerical value that we calculated from the previous section – this together will give us something like 7.1.1-RC3. We then take this value and export it to the GIT_BETA_TAG environment variable so that we can use it in a later step.
name="${newVersion%"-RC"*}"
versionName=$name"-RC"$newValue
export GIT_BETA_TAG="$versionName"
envman add --key GIT_BETA_TAG --value "$GIT_BETA_TAG"- GitHub release – Finally, we’re going to make use of the Github Release step (provided by Bitrise) to publish a release from our tag to our repository. This step requires a collection of different values for its configuration which you can see below:

- Personal API token – This is a Github token which will give Bitrise the ability to publish the release to our repository
- Username – The Github username to be used for accessing our repository
- Repository URL – The URL of the repository that we want to access
- Tag – The tag to be used for the release. You’ll notice here that we use the $GIT_BETA_TAG environment variable that we exported from our previous scrip step
- Release name – The name to be used for the release, here we just re-use $GIT_BETA_TAG
- Release body – The message body to be used for the release, here we just re-use $GIT_BETA_TAG
- Draft – Whether or not the release should be uploaded as a draft
Now when this release is published to our repository, our initial workflow will pick up the tag release and build, sign, deploy and publish a release to the Google Play store.
- Skipping steps when commits haven’t changed: During the start of this workflow we brushed over how we might want to abort the current workflow if there have been no new commits since the previously tracked one. For this we were saving a SKIP_BUILD environment variable with either a “skip” or empty value – this is what we’re going to make use of to decide whether or not a step should be run. Now let’s take a look at our github release step inside of our bitrise.yml file:
- github-release@0.10.0:
        inputs:
        - username: "$GH_USER"
        - tag: "$GIT_BETA_TAG"
        - name: "$GIT_BETA_TAG"
        - body: "$GIT_BETA_TAG"
        - draft: 'no'
        - commit: "$GIT_LATEST_COMMIT"
        - api_token: '$GH_TOKEN'
        run_if: enveq "SKIP_BUILD" "skip" | not
The key here is the very last line which I have added to the execution of this step.
run_if: enveq "SKIP_BUILD" "skip" | notHere we access our SKIP_BUILD environment variable and make use of the bitrise run_if functionality to declare that this step should not be executed if the value of this variable is “skip”. I’ve actually added this to all steps after the one where this environment variable is initially set to save wasting any build time.
Note: It’s important to remember to update your whatsnew files when working on the branch which you have setup scheduled releases for, as well as checking that it is within the Play Console requirements for release note lengths. If it’s too long then the release will not be published within the Play Console and if it’s blank (or not updated) then the correct release notes will not be shown within the Play Store for the release.
Now, that’s everything that needs to be configured for this workflow. However, now that we are updating our version name we need to modify our release workflow to utilise this. What we’ll do here is hop on back over to the first workflow that we created and add a step for altering our version name.
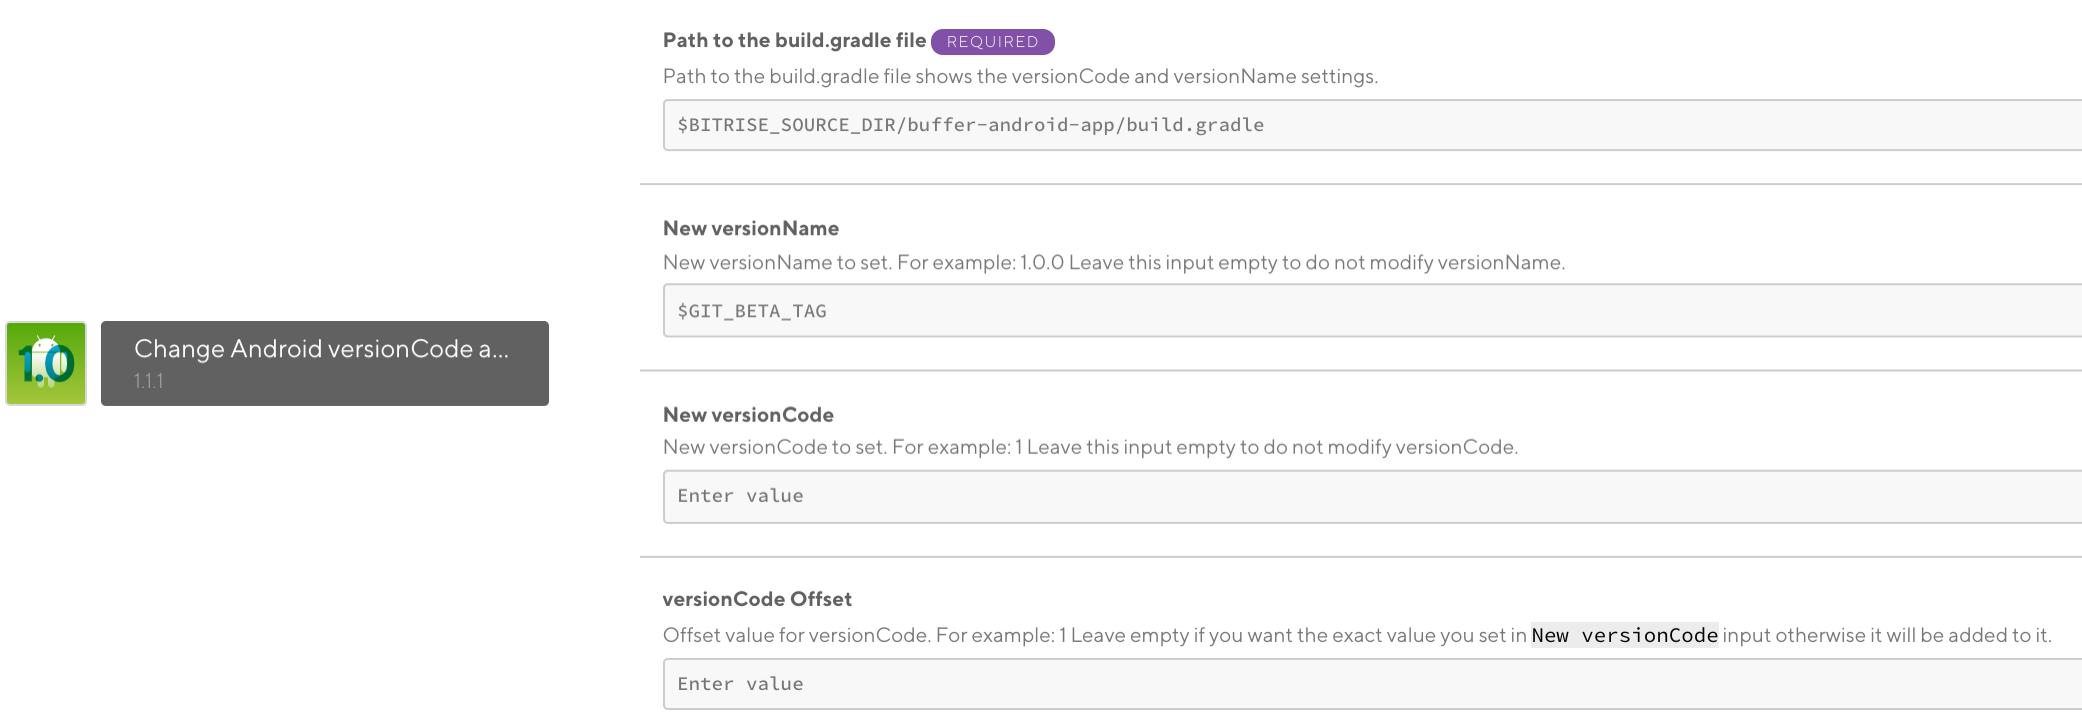
- Change Android version name and code – Now that we have our updated version name, we need to go ahead and assign it within our project configuration. There is a step within Bitrise that allows us to manipulate the version name and code within our build.gradle file. Below you can see that we simply just need to provide the path of our build.gradle file that we wish to modify, along with the new versionName to be applied using our $GIT_BETA_TAG environment variable.
Phew! I know that was a lot to take in, but I hope from the above you can see that it is possible to have a completely automated continuous deployment flow. With all this in place you can remove any chances of human error, cognitive load, machine misconfiguration, responsibility silo and keystore security issues – allowing our team to become more flexible from many angles.
As noted, we are currently just starting to trial this process. From the testing done so far there haven’t been any issues arise, but it is likely that a few things noted in this post may need to be tweaked. If you come across any issues yourself, or need a hand in getting this setup, please do feel free to reach out!
Try Buffer for free
180,000+ creators, small businesses, and marketers use Buffer to grow their audiences every month.
Related Articles

As part of our commitment to transparency and building in public, Buffer engineer Joe Birch shares how we’re doing this for our own GraphQL API via the use of GitHub Actions.

We recently launched a new feature at Buffer, called Ideas. With Ideas, you can store all your best ideas, tweak them until they’re ready, and drop them straight into your Buffer queue. Now that Ideas has launched in our web and mobile apps, we have some time to share some learnings from the development of this feature. In this blog post, we’ll dive into how we added support for URL highlighting to the Ideas Composer on Android, using Jetpack Compose. We started adopting Jetpack Compose into ou

With the surprising swap of Elasticsearch with Opensearch on AWS. Learn how the team at Buffer achieved secure access without AWS credentials.